Case Study: Fixing a WooCommerce Website for a New Client

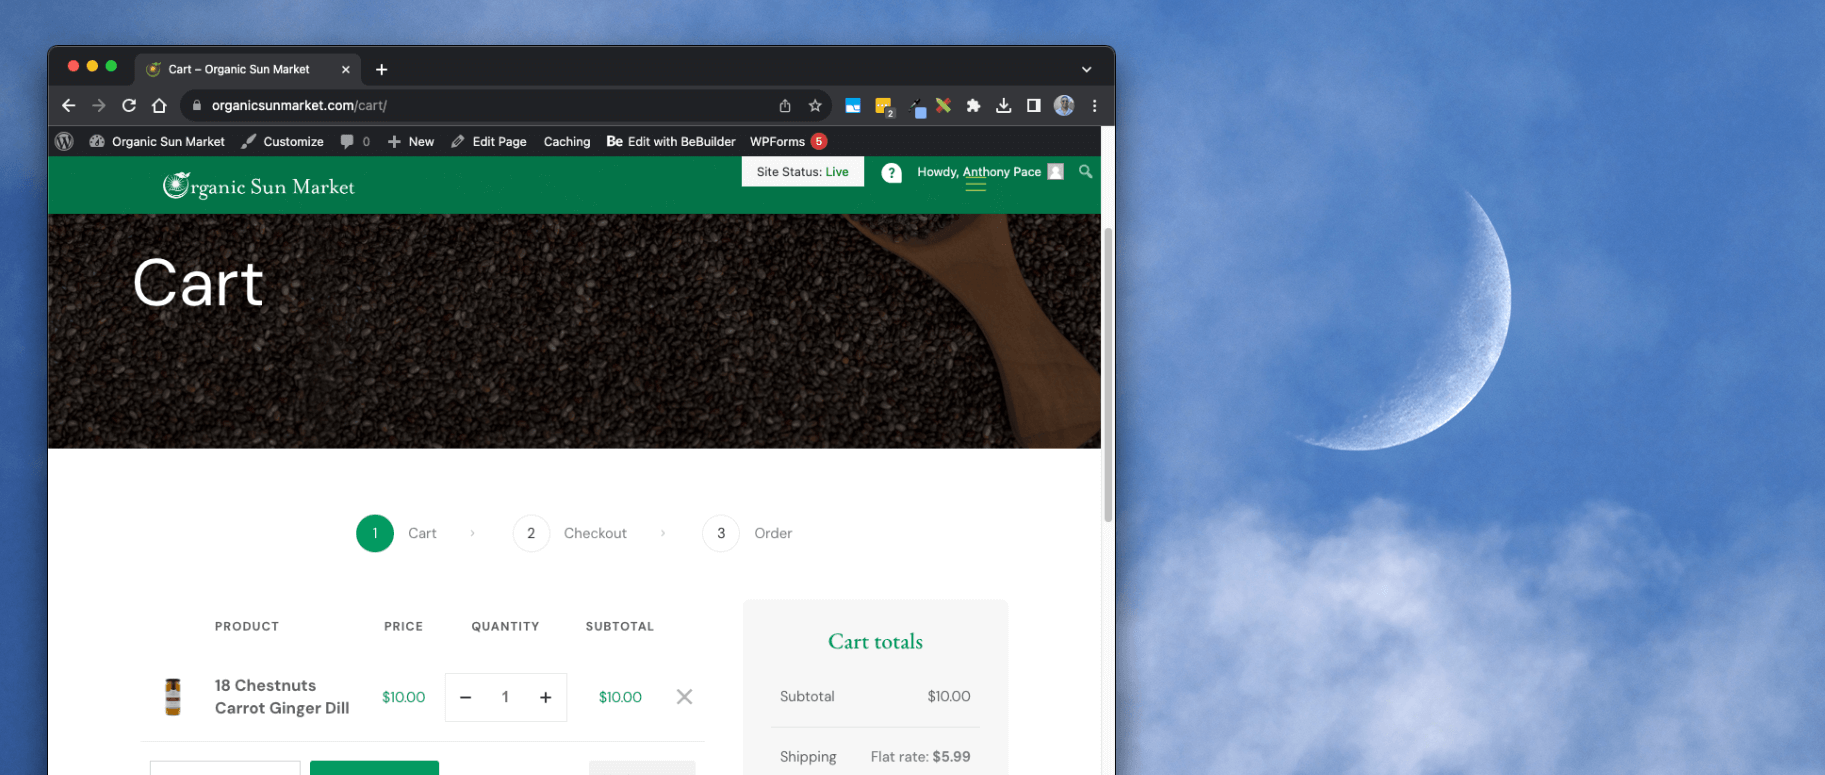
I met Steven at his store on Bloomfield Avenue in Northern New Jersey. After I gave him my business card he told me his website needs help. The checkout wasn’t working, and users couldn’t even add products to their cart. This was how the previous web development vendor left things before their arrangement ended.

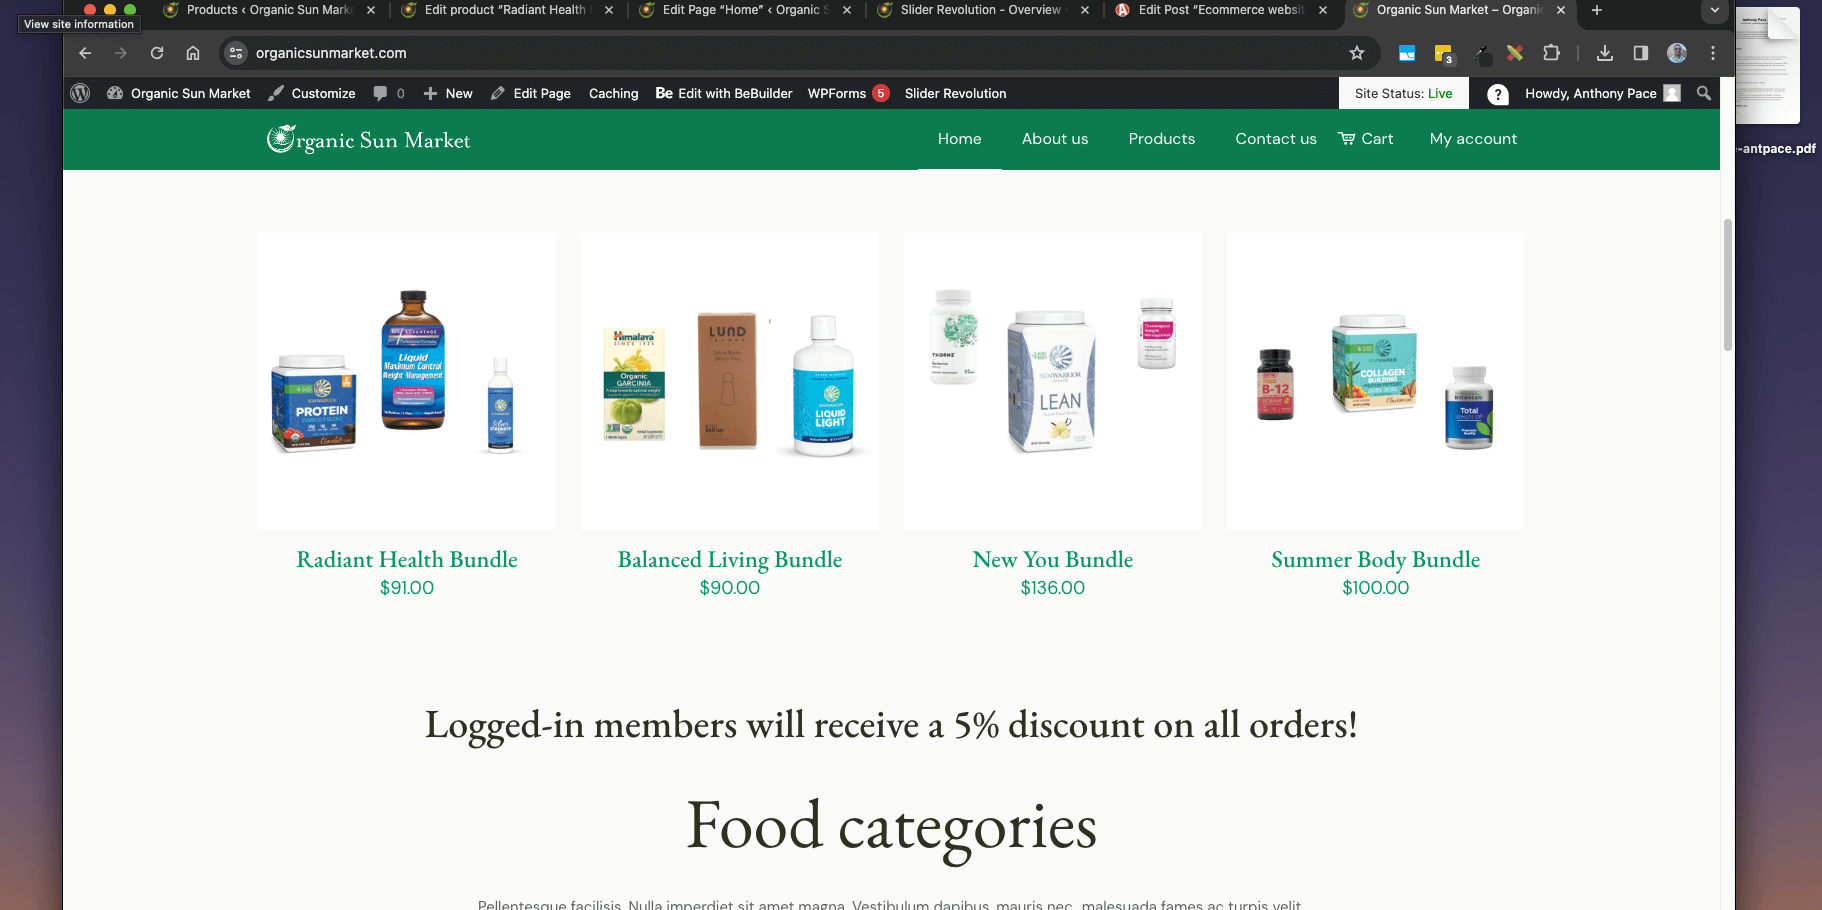
The website was powered by WordPress (managed by Bluehost), and used WooCommerce as its ecommerce solution. I helped him create a Stripe account, and connect it to his online store.  I finished configuring a premium WordPress theme called BeTheme, and gave him a multi-week marketing plan to help sales grow.
website screenshot

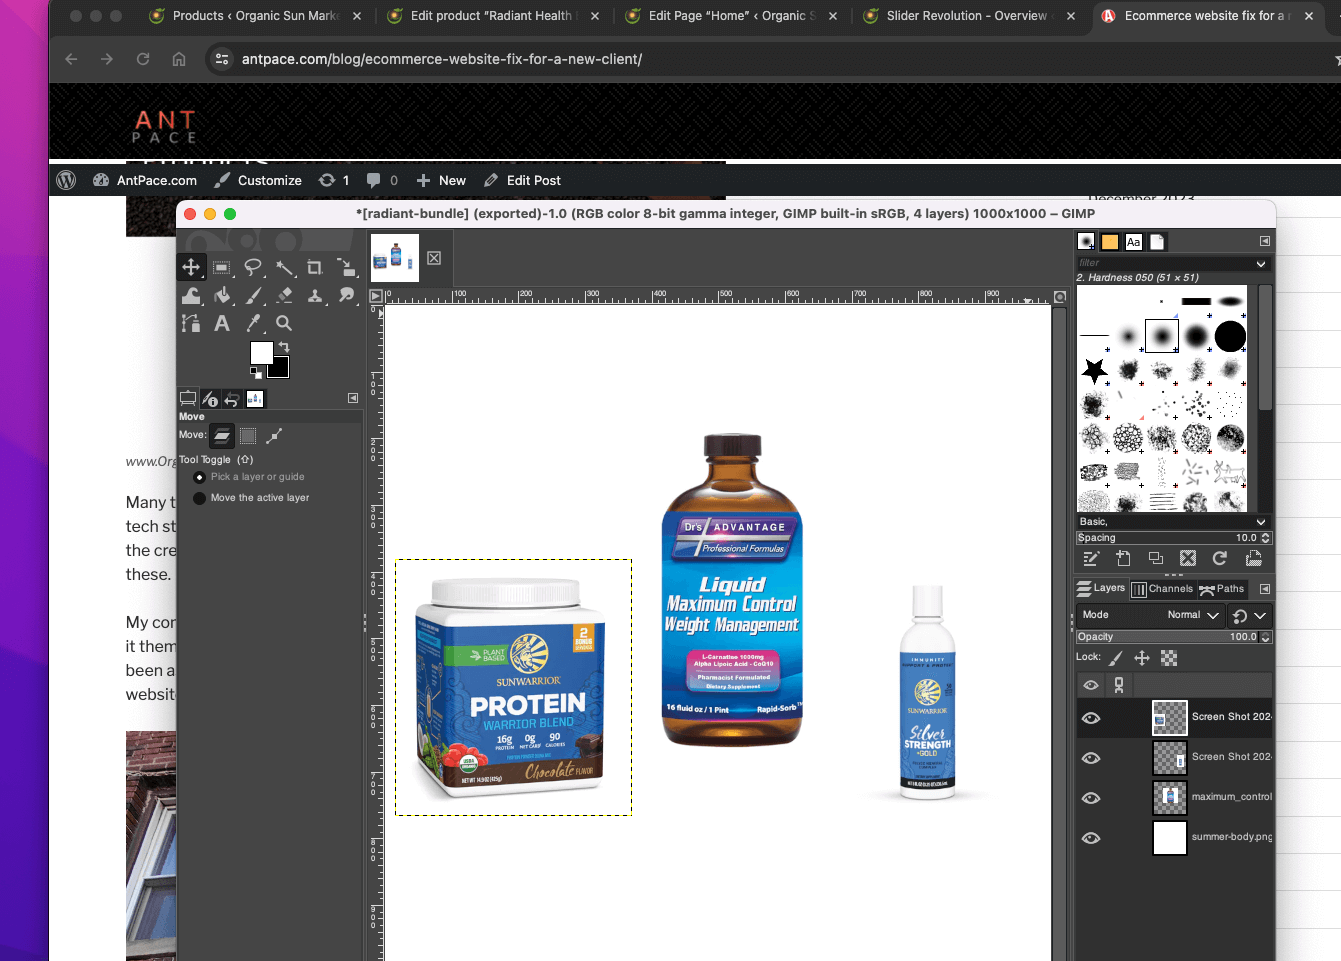
I used an image manipulation program (the GIMP) to create graphic assets used throughout the shop:
website graphic design

Many times I have to pick up where someone else left off. I could tell you another story about inheriting a Frankenstein tech stack from a previous vendor. They left off on non-talking terms after demanding back work payments to release the credentials to my team. My skill in figuring things out, regardless of the technology involved, shines in times like these.

My company tag line is “I can build your website” – it should really be “I can fix your website”. Business owners try to do it themselves, and often make it most of the way. When you need help, I am there to carry it over the finish line. I’ve been asked if services like Wix cuts into my business – it’s actually the opposite. Broken, incomplete, or unoptimized websites created on easy-to-use platforms have provided a solid market for my expertise.
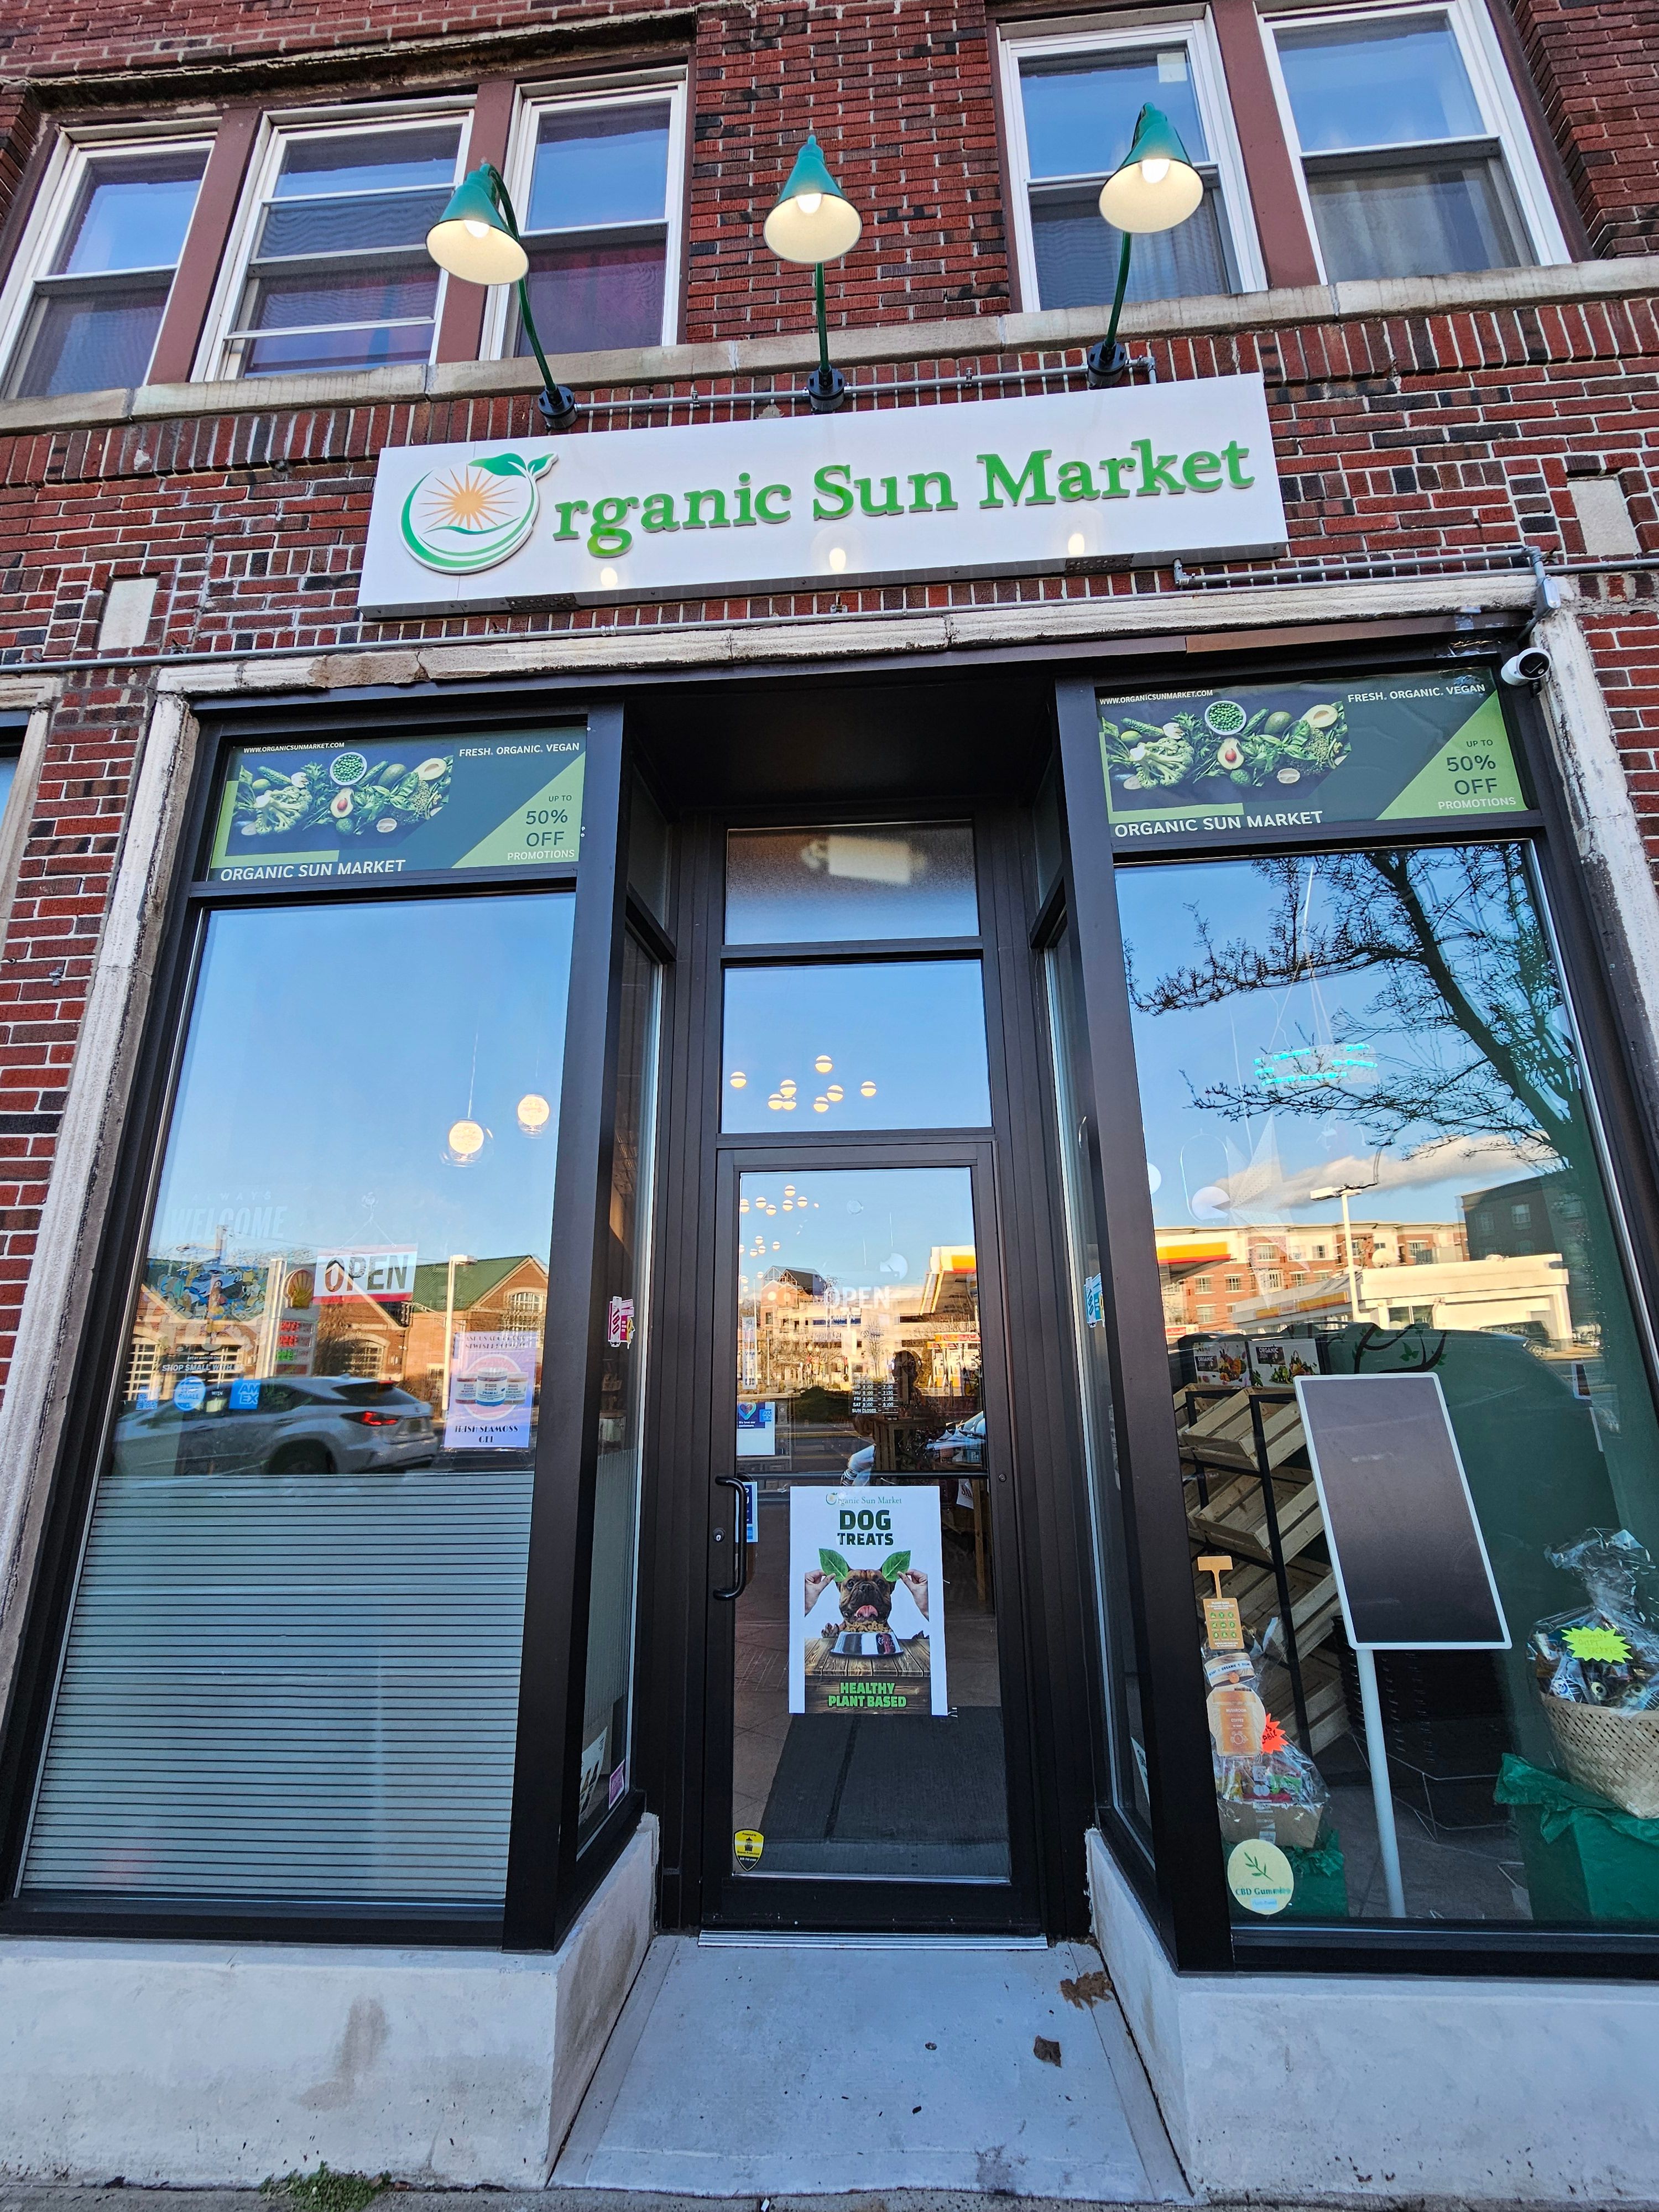
Organic market

Local small businesses are what make neighborhoods unique and give families a chance to make a living themselves. It feels great to help people knowing we can both benefit. You can read more about the plan I use to help businesses with their existing website in another blog post.

Membership Discounts Without a Plugin

As part of the marketing plan, we decided to add membership accounts to the WordPress ecommerce website for Organic Sun Market. Enabling that capability was a few settings in the dashboard: WooCommerce > Settings > Accounts & Privacy
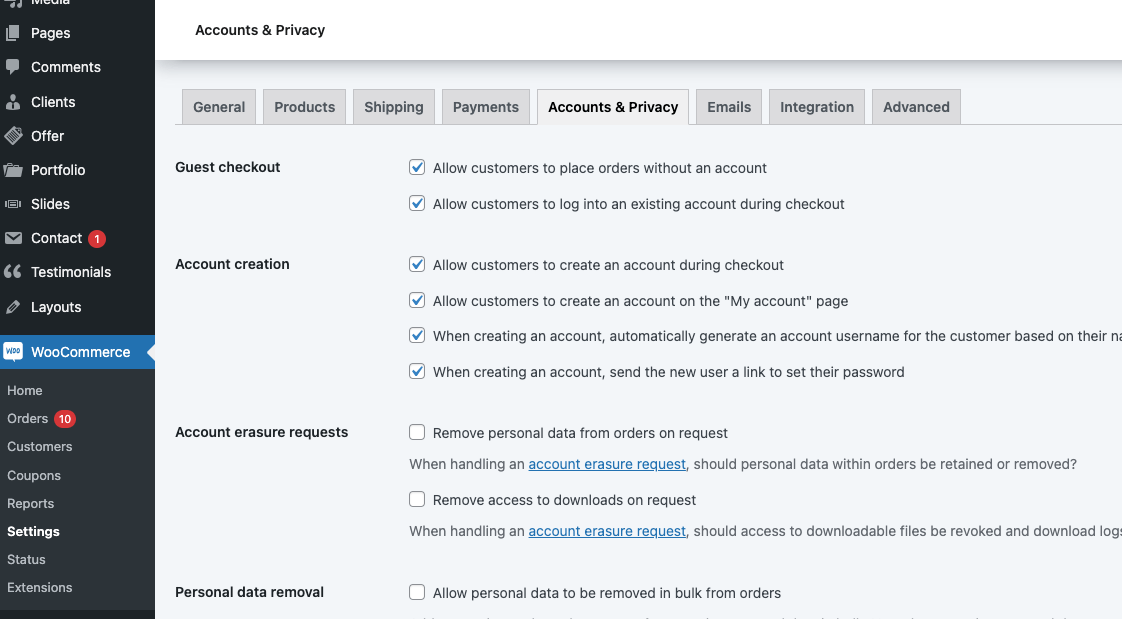
woocommerce accounts and privacy settings

I also added a “My Account” link to the site’s global navigation.
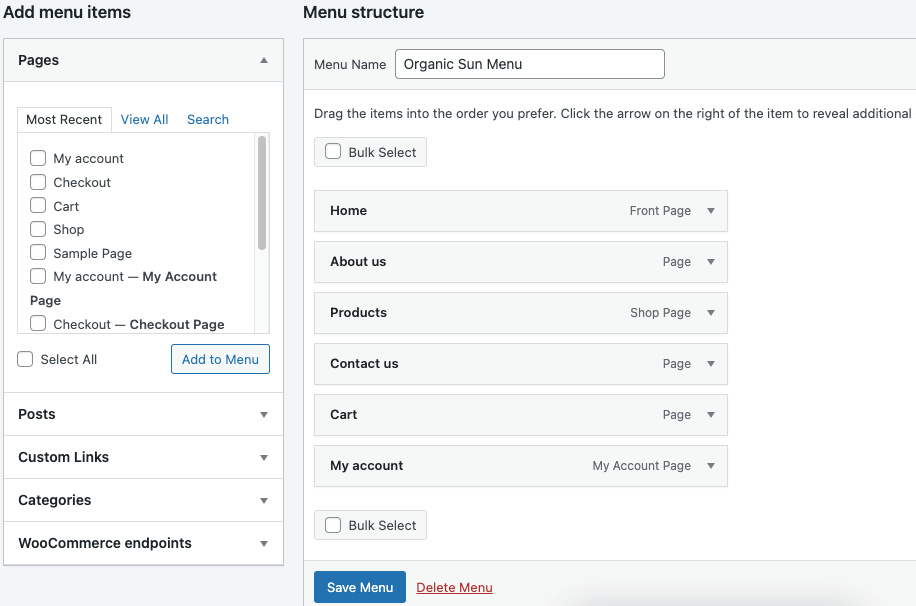
menu in wordpress

By default, WooCommerce provides a “My Account” page where users can log in, view their orders, update their information, and more. You can specify a custom page in the advanced settings: WooCommerce > Settings > Advanced

woocommerce advanced setting

The account page specified uses a WooCommerce short code to handle the content: [woocommerce_my_account]
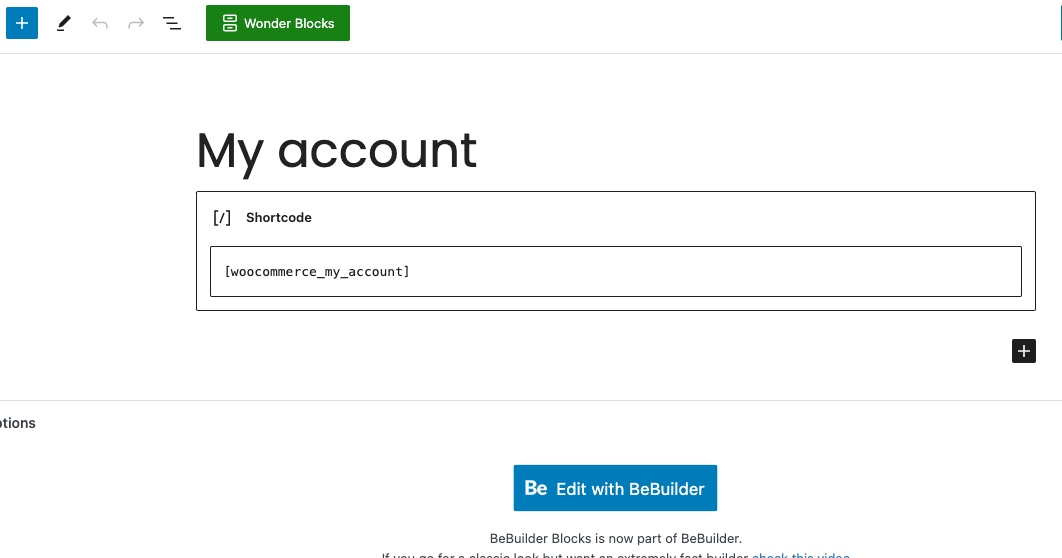
account page shortcode

Change menu text if user is logged into WordPress

I wanted the “My Account” menu text to change if the user is not logged in. I was able to do this with the WordPress hook `wp_nav_menu` and a simple string replacement PHP function:

add_filter('wp_nav_menu', 'change_my_account_menu_item', 10, 2);

function change_my_account_menu_item($nav_menu, $args) {
// Check if the user is not logged in
    if (!is_user_logged_in()) {
        // Change "My Account" link to "Login/Register"
        $nav_menu = str_replace('My account', 'Login/Register', $nav_menu);
    }
    return $nav_menu;
}

To incentivize users to create an account, we offer a 5% discount to any one logged in. The checkout page contains conditional messaging (depending on wether they are logged in or not) to communicate this incentive.
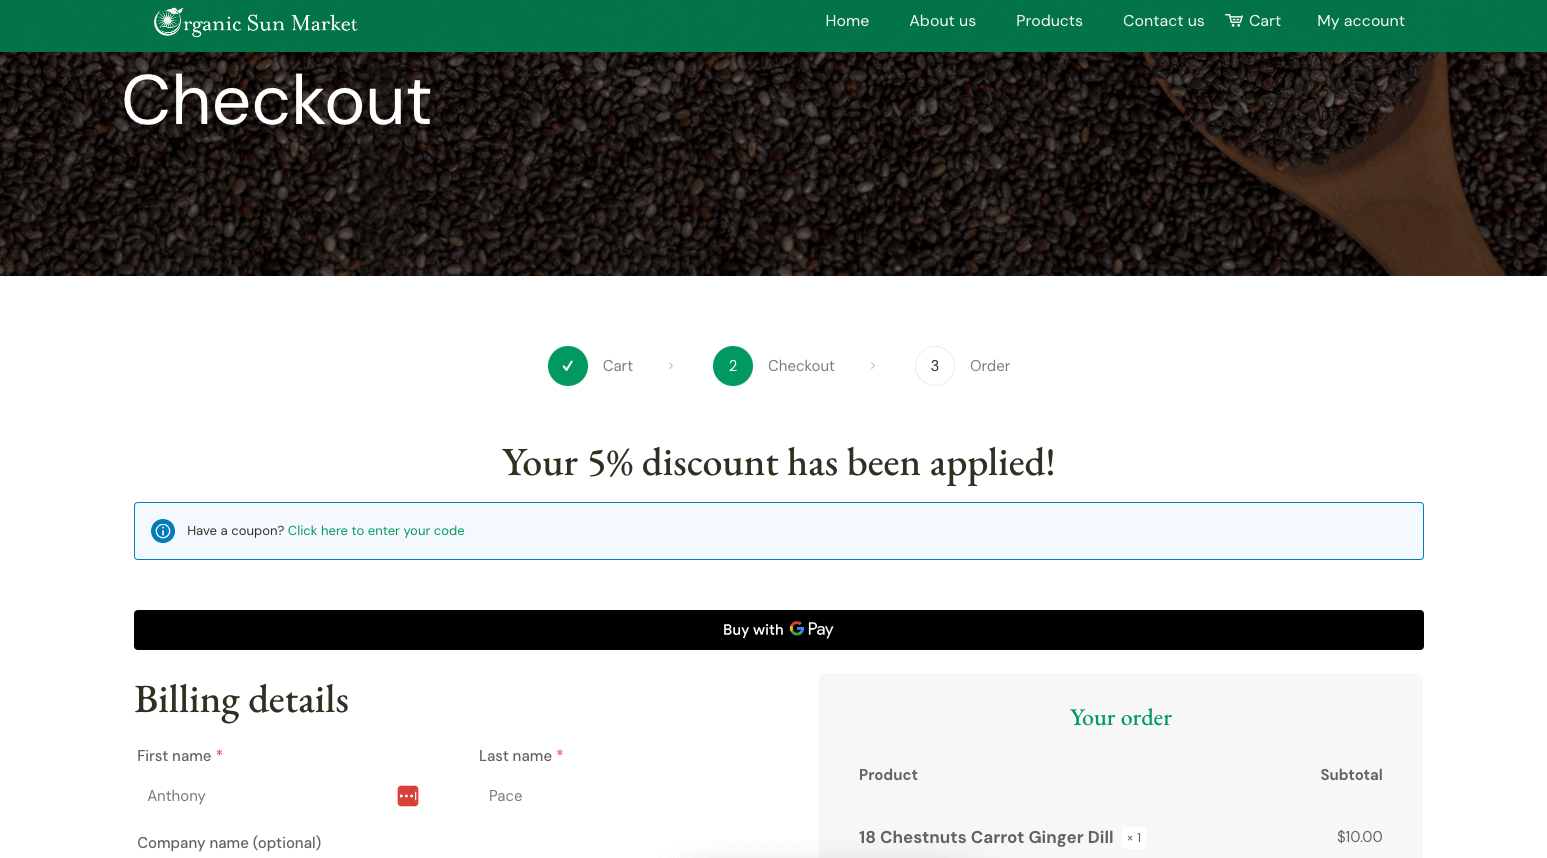
conditional css messaging on checkout

Hide or show UI elements if user is logged into WordPress

I am able to apply that  style condition with two custom CSS classes, specific to the presence of the WordPress body class ‘logged-in’:

.only-show-while-logged-in{display: none;}
body.logged-in .dont-show-while-logged-in{display:none;}
body.logged-in .only-show-while-logged-in{display:block;}

Apply WooCommerce discount to logged in users

I applied the discount by using custom PHP code in the child theme’s functions.php file with the `woocommerce_before_calculate_totals` hook:

add_action( 'woocommerce_before_calculate_totals', 'no_discount_if_not_logged_in', 10, 1);
function no_discount_if_not_logged_in( $cart ) {
	if (is_user_logged_in()) {              
		foreach ( $cart->get_cart() as $cart_item ) {        
			$discount_eliminate = $cart_item['data']->get_regular_price();
			$discount_percentage = 5; // Set your desired discount percentage
			$discount_amount = $discount_eliminate * ($discount_percentage / 100);
			$new_price = $discount_eliminate - $discount_amount;

			$cart_item['data']->set_price($new_price);
		}
	}
}

Apply WooCommerce discount to logged in users on a specific category of products

Later, we changed the logic to be a 10% discount for logged-in members, but only on products that were part of a specific category called “bundles”.

add_action( 'woocommerce_before_calculate_totals', 'discount_for_specific_category', 10, 1);

function discount_for_specific_category( $cart ) {
    if ( is_user_logged_in() ) {
        // Define the category slug you want to apply the discount to
        $target_category = 'bundles';

        foreach ( $cart->get_cart() as $cart_item ) {
            $product_id = $cart_item['product_id'];

            // Check if the product belongs to the target category
            if ( has_term( $target_category, 'product_cat', $product_id ) ) {
                $discount_eliminate = $cart_item['data']->get_regular_price();
                $discount_percentage = 10; // Set your desired discount percentage
                $discount_amount = $discount_eliminate * ( $discount_percentage / 100 );
                $new_price = $discount_eliminate - $discount_amount;

                $cart_item['data']->set_price( $new_price );
            }
        }
    }
}

Print Design

Many local small businesses take their marketing offline and into the real world. Print marketing is a business I have been a part of for almost two decades. I have designed, delivered, and distributed flyers, menus, business cards and more. As the holiday season approached, Steven asked me to create a poster for one of his healthy products.
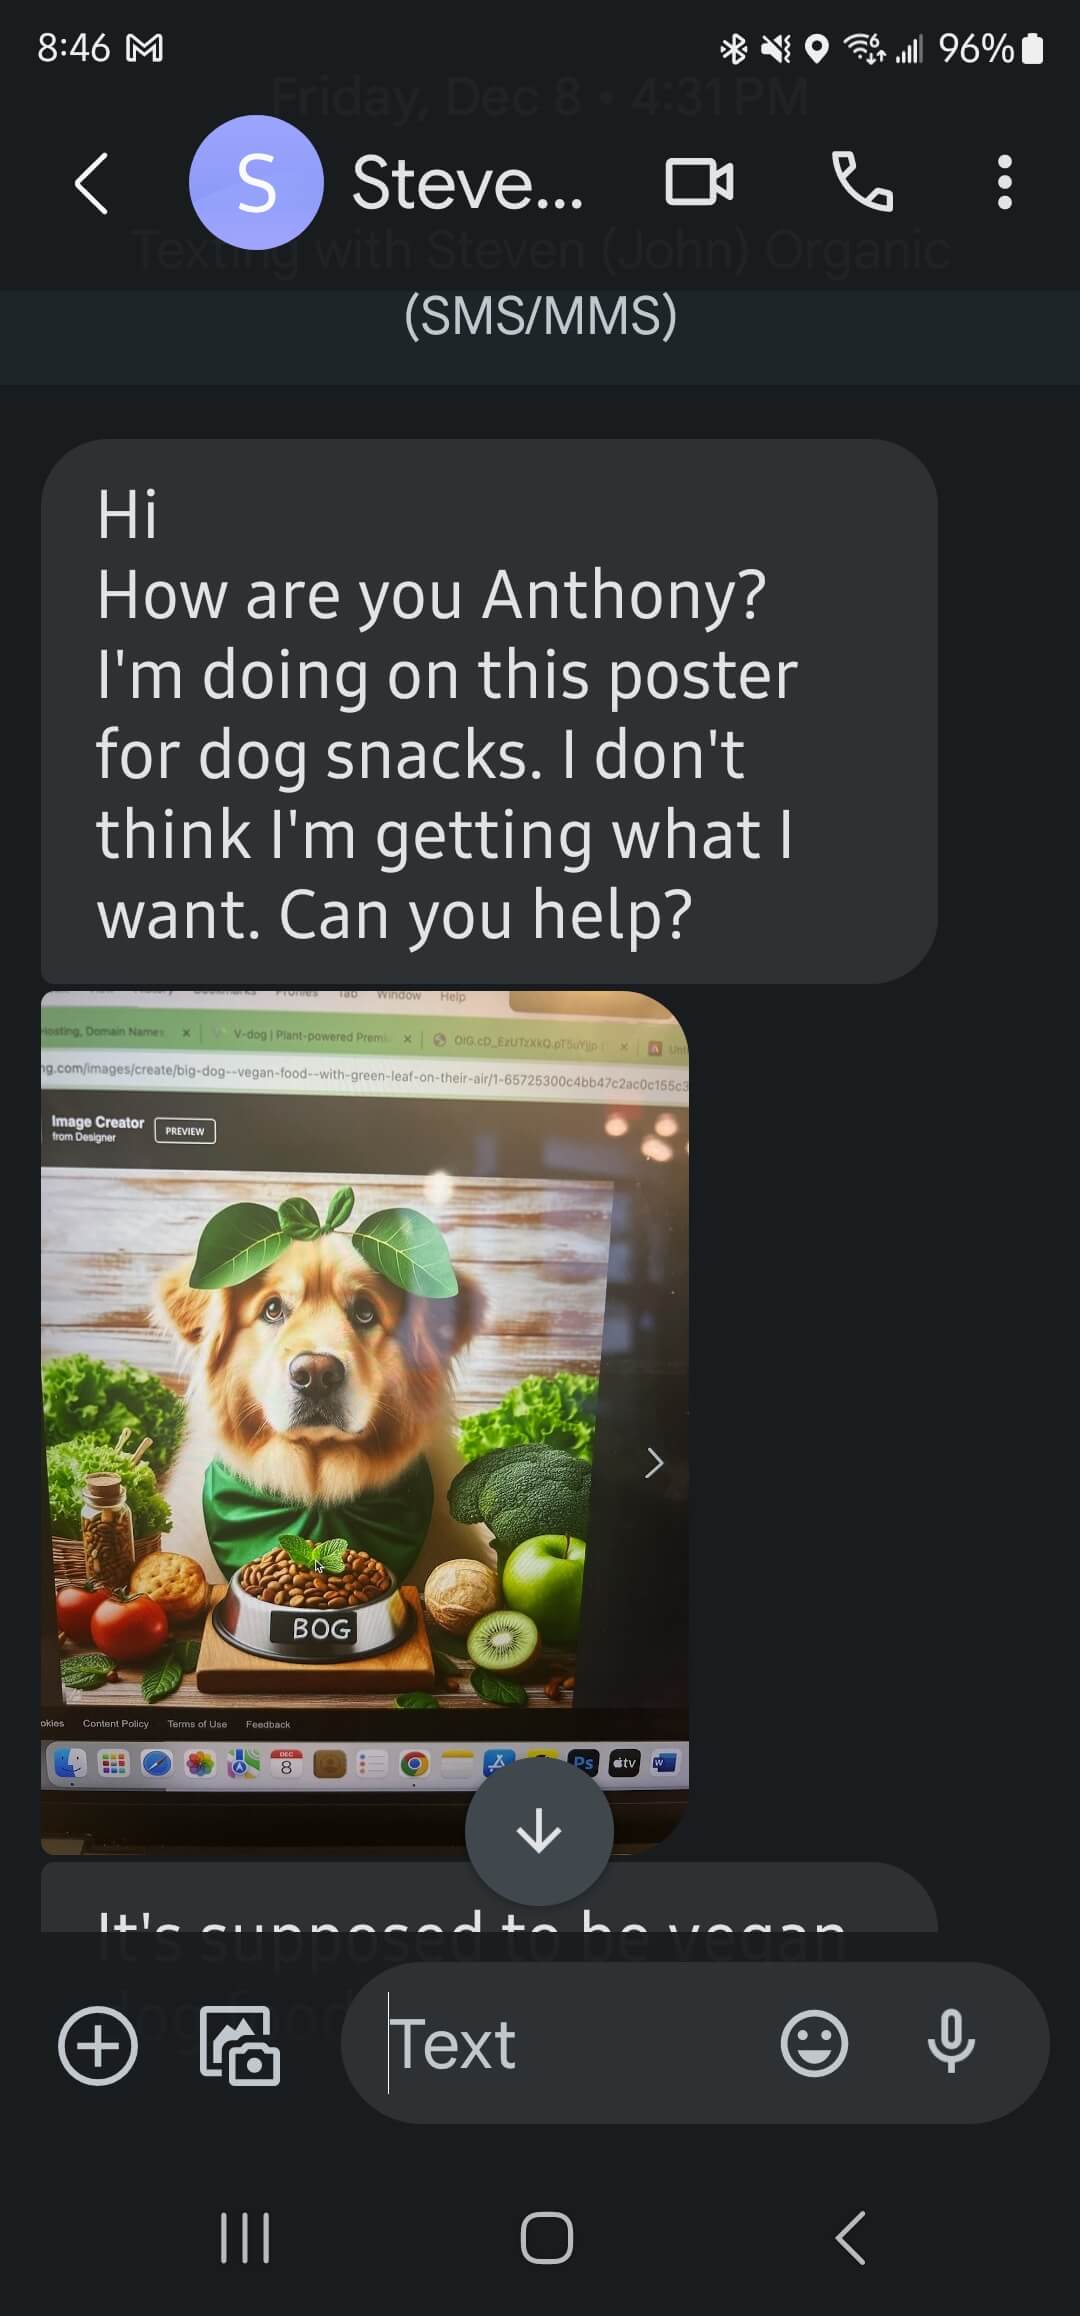
graphic design request via text message

He sent me a draft he has been working on, along with some inspiration examples that expressed the direction he wanted things to go. This was the final product:

Dog treats poster

And here it is hanging in the store front:
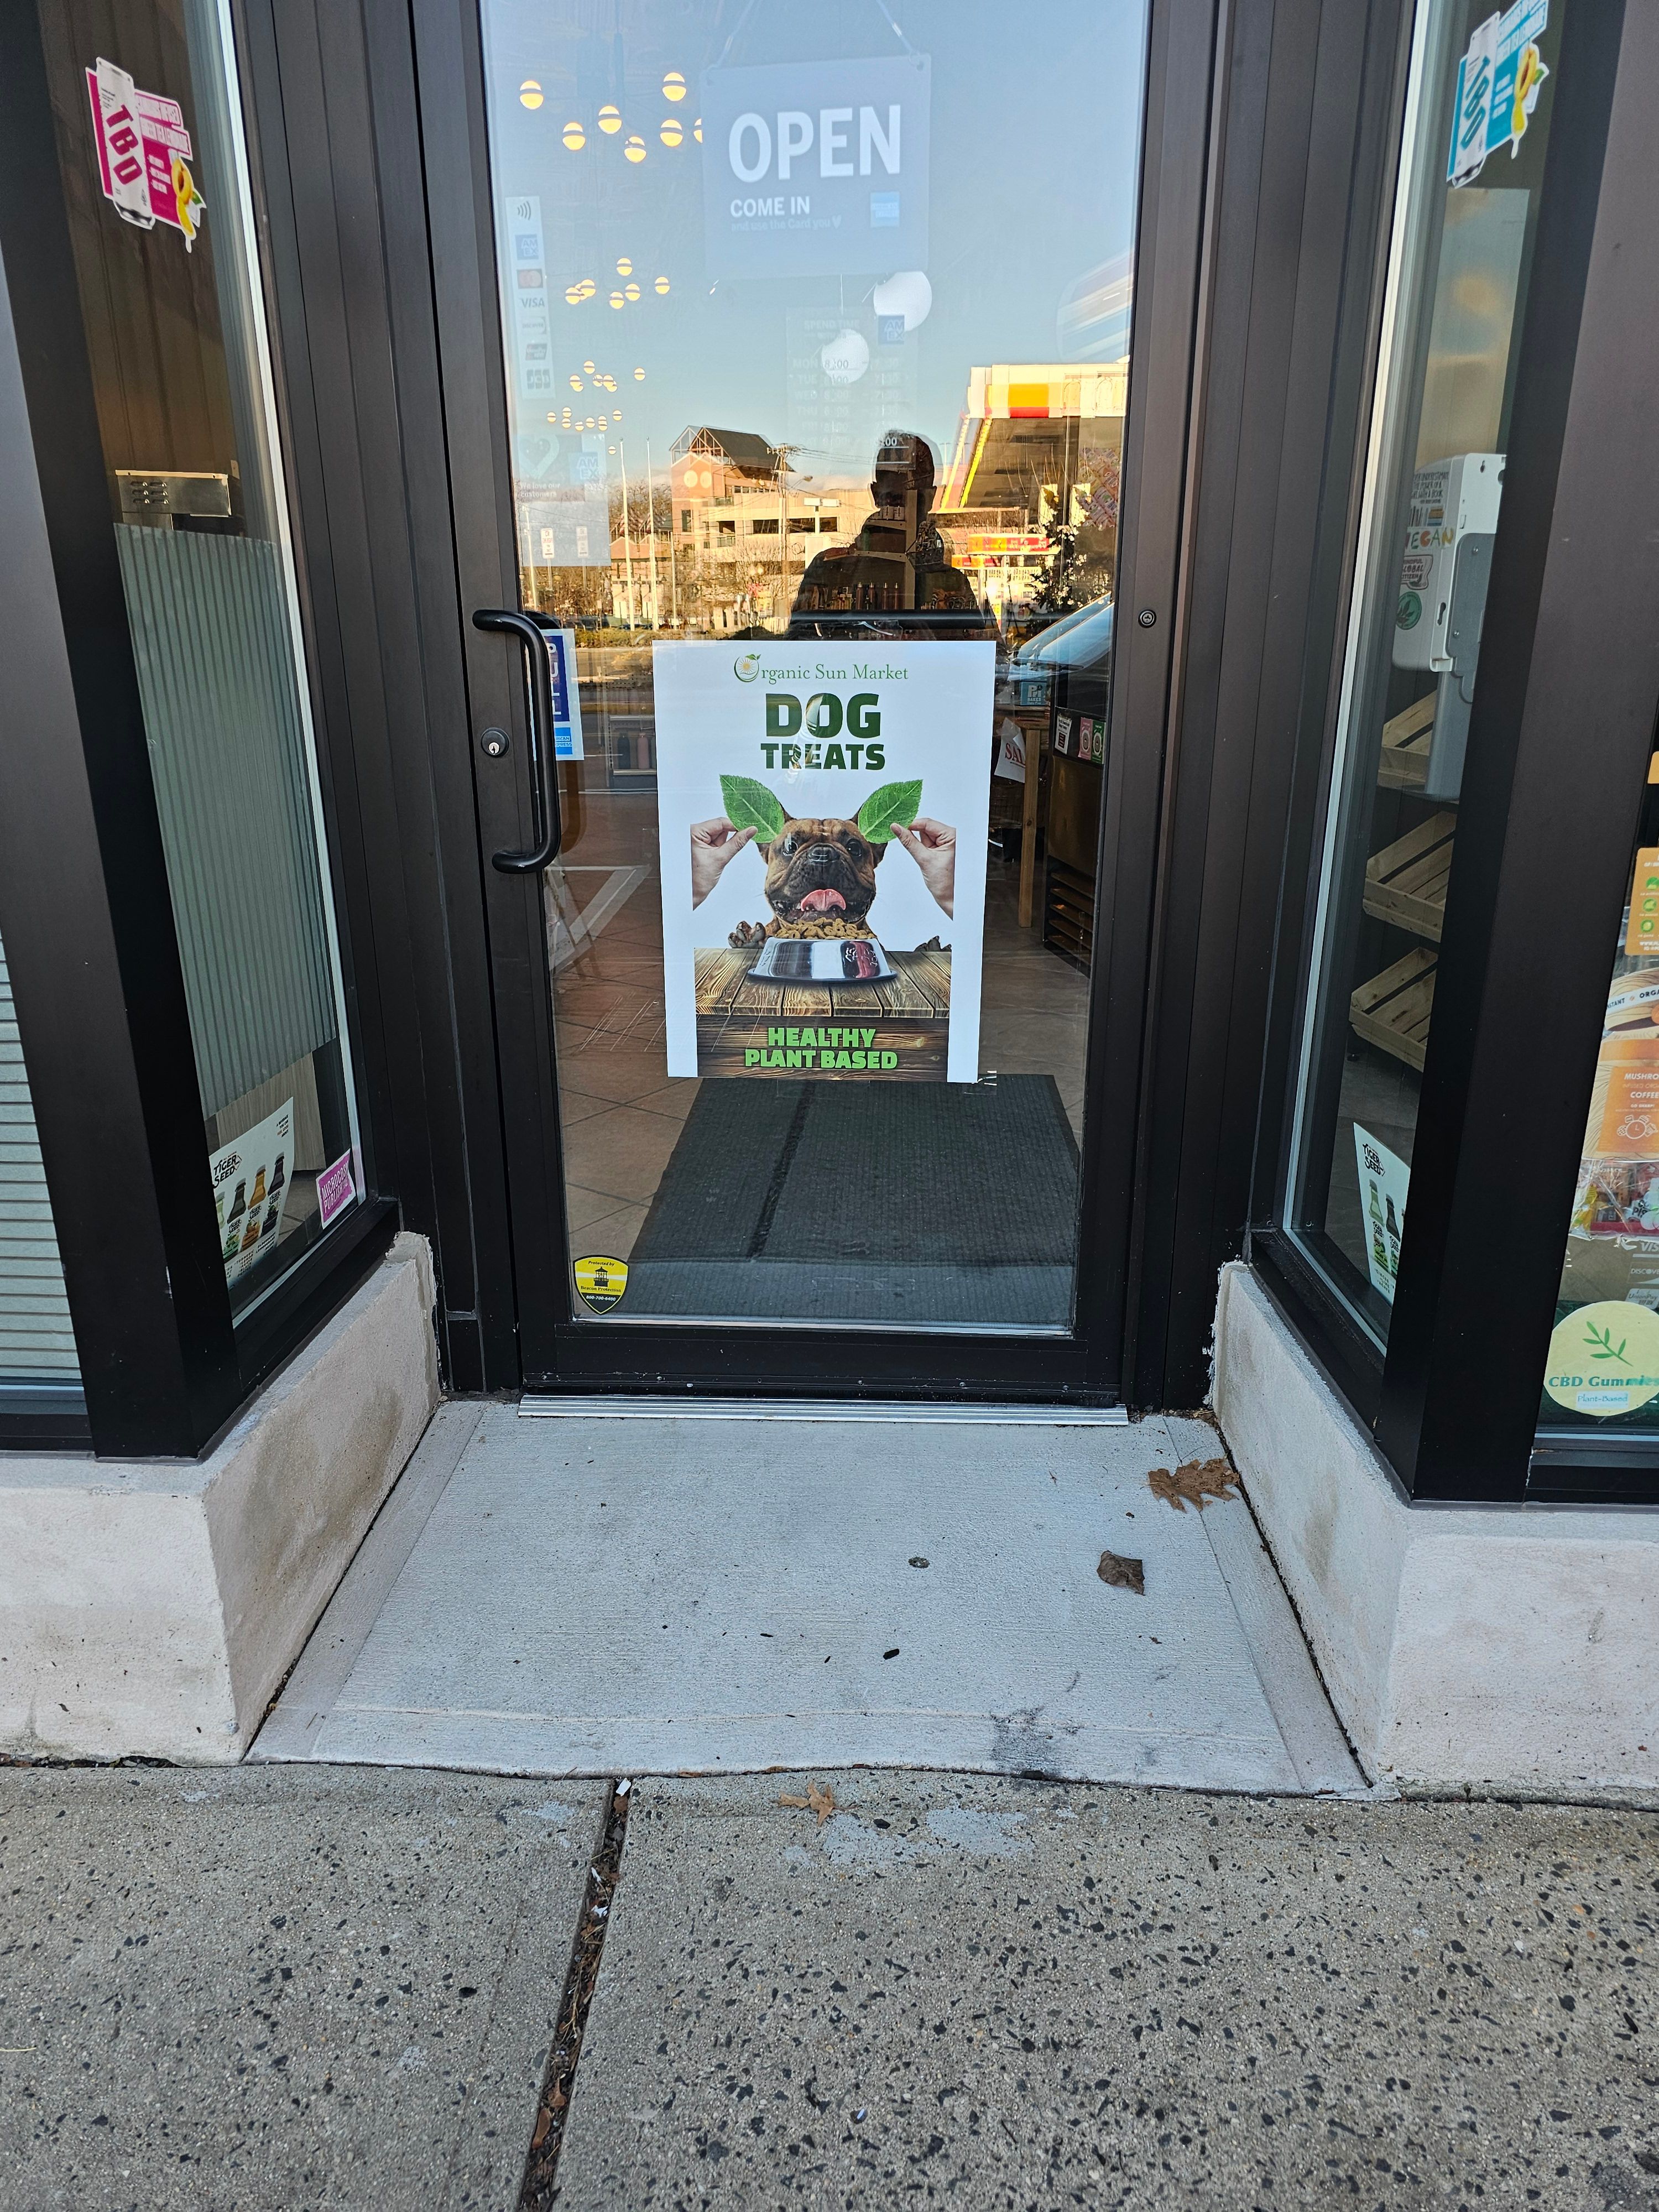
Printed poster design

Why Every Business Needs a Website in 2024

small business websites

Don’t Be Invisible: A Website Puts Your Small Business on the Map

Local small businesses without a brick-and-mortar presence fall into a unique category. They might be service-based businesses like freelance consultants (like myself), home repair services, personal trainers, or cleaning services that operate on a mobile basis or from a home office. These businesses rely heavily on word-of-mouth, local advertising, and community networking to attract and maintain their clientele.

Because this business model does not require a physical storefront, these owners may underestimate the value of a digital presence. They might perceive it as unnecessary, believing that their local reputation and personal customer relationships are sufficient for business growth and sustainability. Consequently, they may neglect their online visibility, not realizing the potential reach and efficiency gains from digital tools.

The digital gap for these businesses can be characterized by a lack of a professional website, minimal social media engagement, and reliance on outdated forms of communication like AOL or Gmail email addresses. While this might maintain a certain level of operation, it limits their ability to scale, reach new markets, and ultimately leaves honey on the table.

By not leveraging the digital space, these businesses miss out on the opportunity to build brand awareness beyond their immediate locality, engage with customers online, and streamline their operations through digital tools (customer management). As a result, they might struggle to compete with others who adopt a more integrated approach to physical and digital business practices.

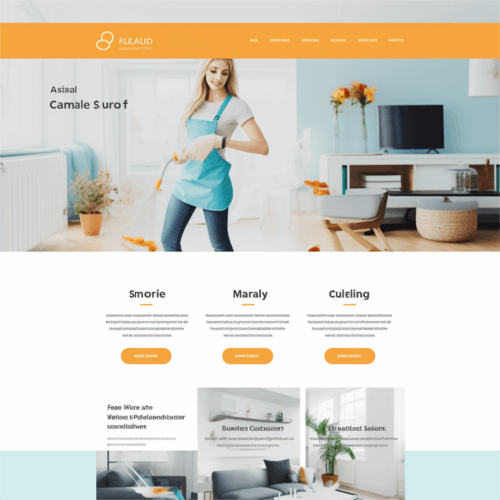
Cleaning website design

Professional Image: Elevate Your Brand

Your website can be the first point of contact between your business and potential customers. Just as you wouldn’t attend a party in pajamas, you shouldn’t let your online presence be represented by a dated AOL email address or non-existent web page. A sleek, user-friendly website tells customers that you are a serious professional who invests in all aspects of your business. I can help you do it right with a custom domain and business email address.

Some businesses rely on on a third-party subdomain or a link-in-bio service. While these options may seem convenient and cost-effective in the short term, it looks unprofessional. It is harder for customers to remember and doesn’t carry the same weight of brand authority as a standalone domain. It’s like to setting up shop in someone else’s store.

Using a personal @aol.com or @gmail.com email address for business communications can inadvertently signal a lack of professionalism and an outdated approach to business. I can assist you in transitioning to a custom domain email that reinforces your credibility. Too often, I walk around and see businesses make the mistake of thinking this detail doesn’t matter.

Testimonials & Social Validation

Word-of-mouth is powerful, but in the digital age, testimonials and portfolios on your website can reach further and speak louder. They serve as a perpetual source of validation for your work, allowing potential customers to see the breadth and quality of your services at any time. It’s the online equivalent of a recommendation from a trusted friend, accessible to everyone, everywhere.

Logo

Having a logo that fits your business image goes beyond digital space. I can show you tips and details for getting it right and making work across online  and print platforms.

A sample web design logo

Organic & Paid Search (Unclaimed Digital Territory)

If you’re running a business without a website and have been relying solely on traditional methods, it’s time to unlock new opportunity. Customers are searching for your service right now!

Organic search refers to the natural listings on search engine results pages (like Google or Bing) that appear because of their relevance to the search terms, as opposed to being advertisements. By not having a website, you’re missing out on the chance to appear in these listings—a place where a significant portion of your potential customers start their journey.

And, this is another reason to get setup with your own domain name if you’re currently using something like Bitly. Search engines like Google give more credibility to websites with a clear, branded domain name, which can significantly impact your search rankings and, by extension, your visibility to potential customers.

On the flip side, paid search advertising allows your website to jump to the top of search results by paying for prime placement. Paid search campaigns through platforms like Google Ads can be tailored to target the exact demographic you want to reach, with the ability to adjust for location, language, and more.

If you’re ready to explore the untapped potential of online search, let’s chat. I’m here to guide you through every step of the journey.

Who needs a website?

A website is your digital calling card and can be a sales generator if we do it right. Here are some of the top industries that I’ve helped grow online:

  • Restauraunt websites: Enjoy commision-free online ordering. With enticing designs and easy navigation, your patrons can effortlessly browse menus, book tables, and more.
  • E-commerce websites: Expand your business horizons by selling online.
  • Wedding websites: Share your love story, manage RSVPs, provide event details, and create lasting memories for you and your guests.
  • Martial arts school websites: Enroll students online, share class schedules, highlight events, and build a digital community.
  • Real Estate websites: Highlight property listings with interactive galleries, virtual tours, and advanced search filters.


Boost Your Marketing: Integrating Newsletter Signups with HubSpot API

hubspot api

I do a lot of in-person prospecting to win new business. I used to focus on giving out my business card, and then hoping the potential client would reach out to me. I learned that its better to capture their information, and then follow up. I used to collect so many business cards. Now I use a CRM, Customer Relationship Manager, called HubSpot. It does a lot of things, but primarily it helps to manage contacts. I want to let users sign up to my newsletter, and add themselves as a HubSpot contact, directly from my website.

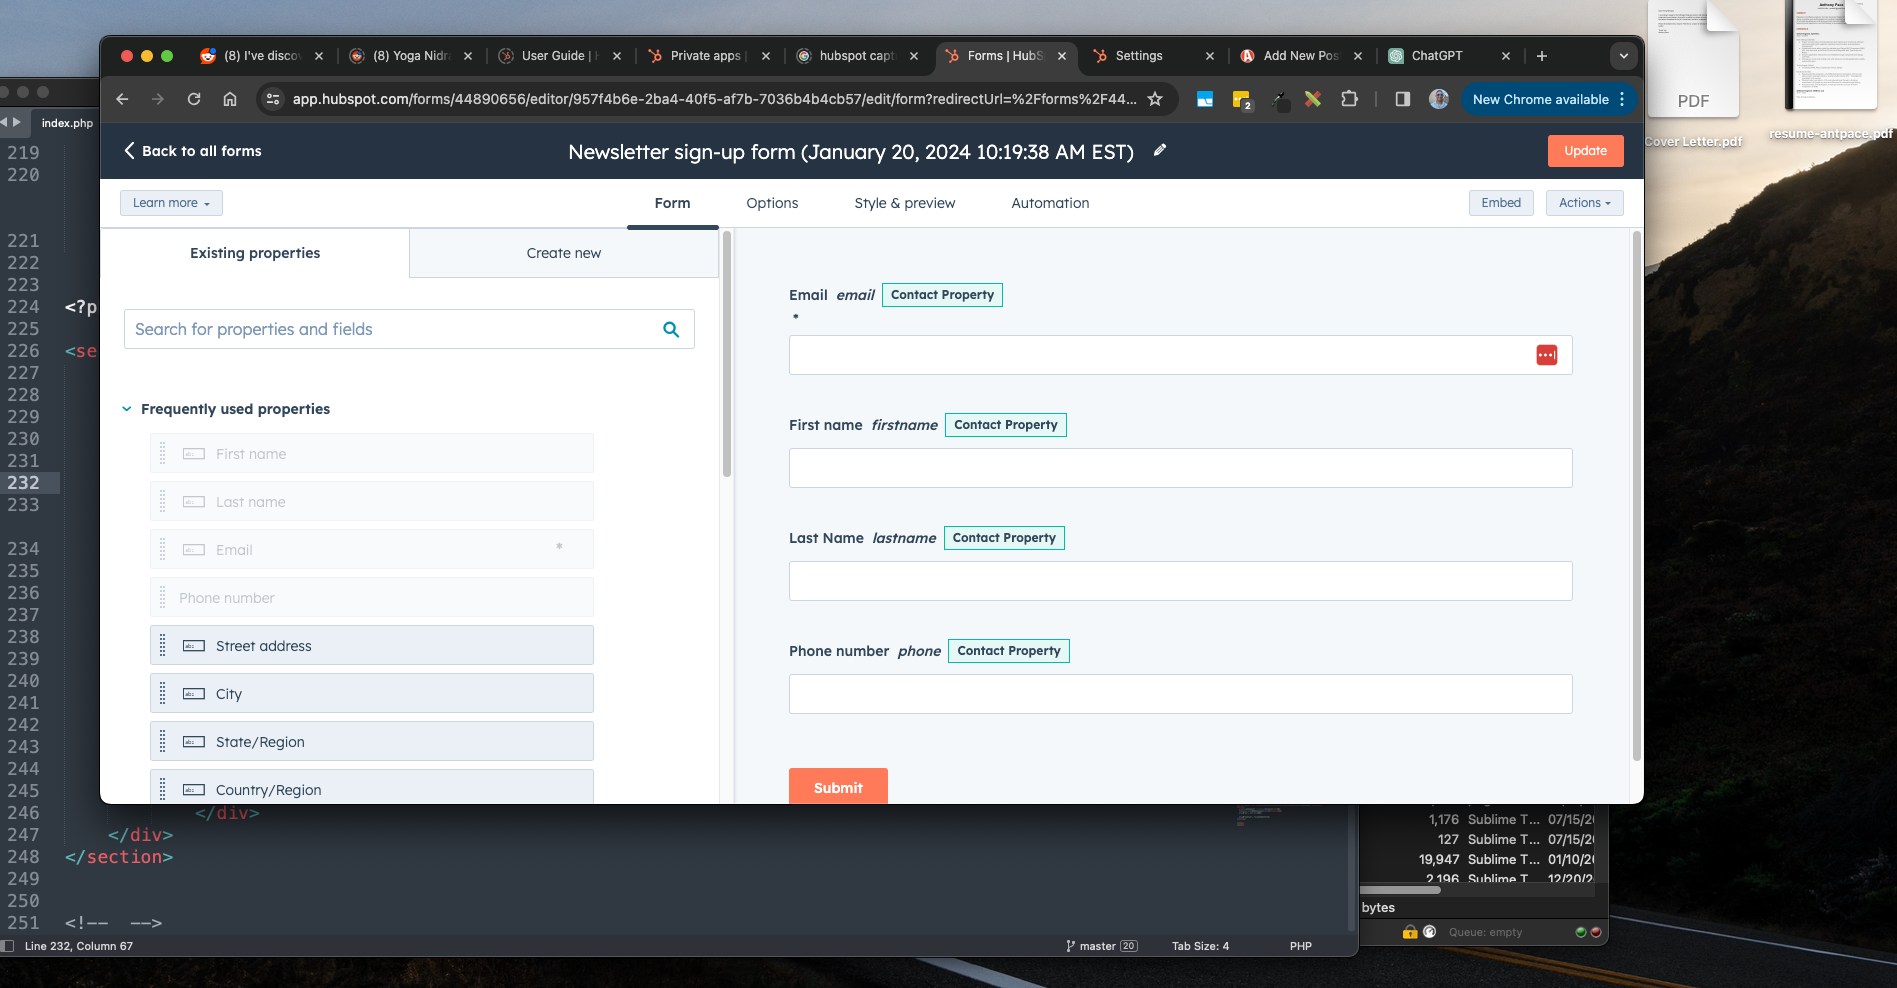
hubspot forms

Create a Custom Newsletter Sign Up Form on Your Website Powered by HubSpot

Out-of-the-box, HubSpot can generate a number of different web forms that can be easily embedded into any website. These forms are used to capture leads and contacts.

HubSpot Private App

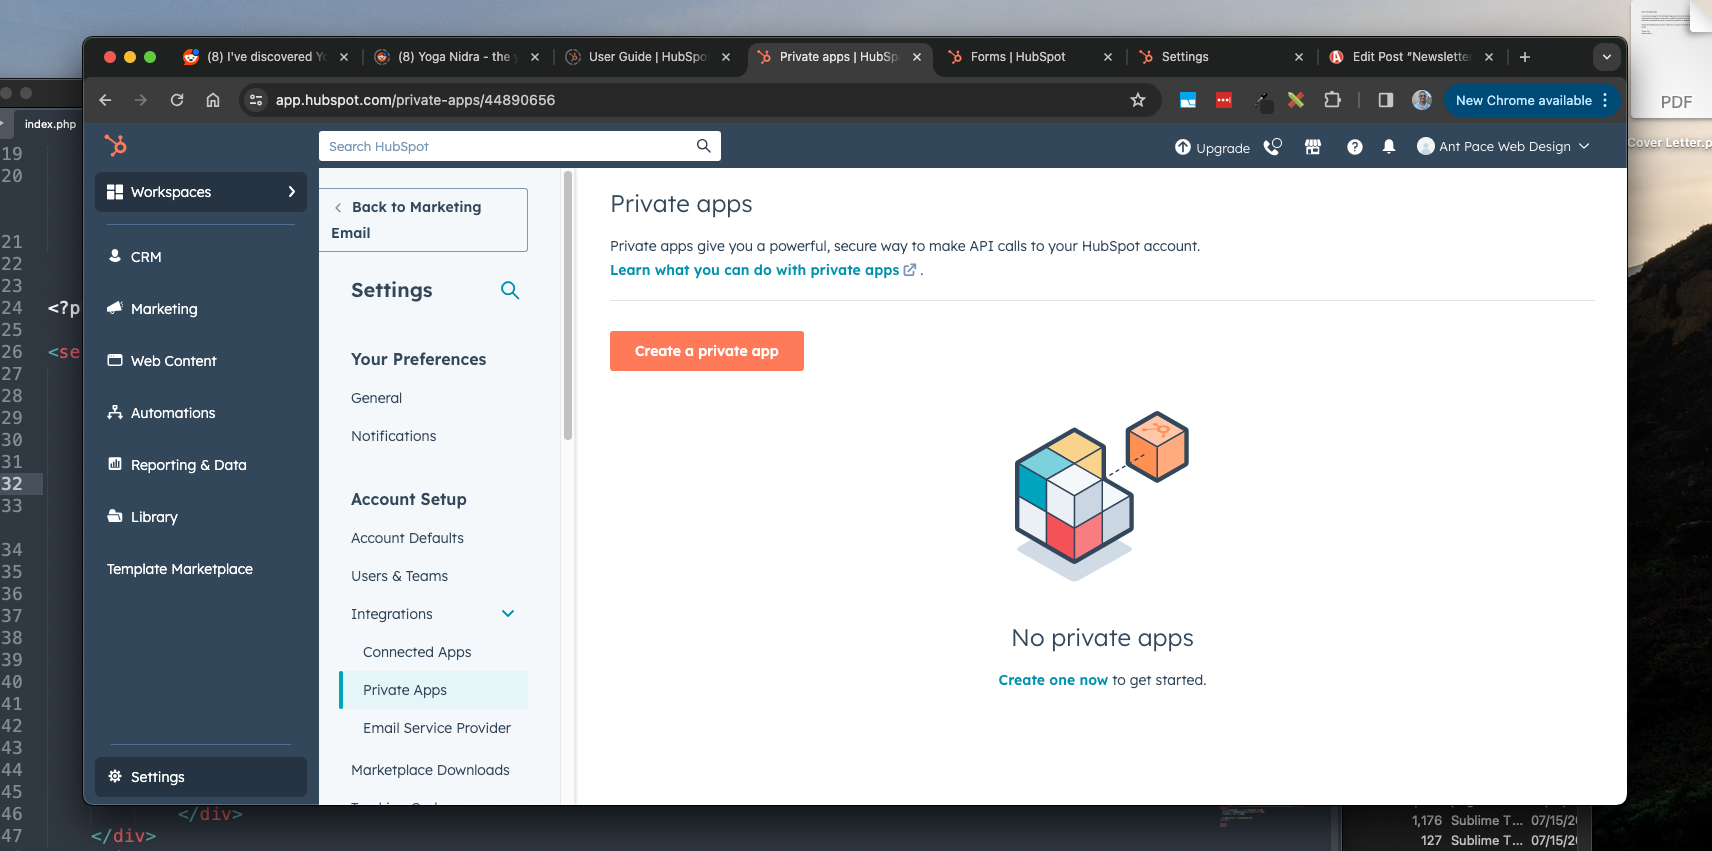
My website (this website) is mostly hand-coded. I want to build my own custom form, and submit the data to the HubSpot service. This is possible with the “Private app” feature. You can find this under ‘Settings -> Integrations -> Private Apps’. This strategy acts as a work-around to remove the HubSpot logo from forms without having to upgrade to premium.

HubSpot Private Apps

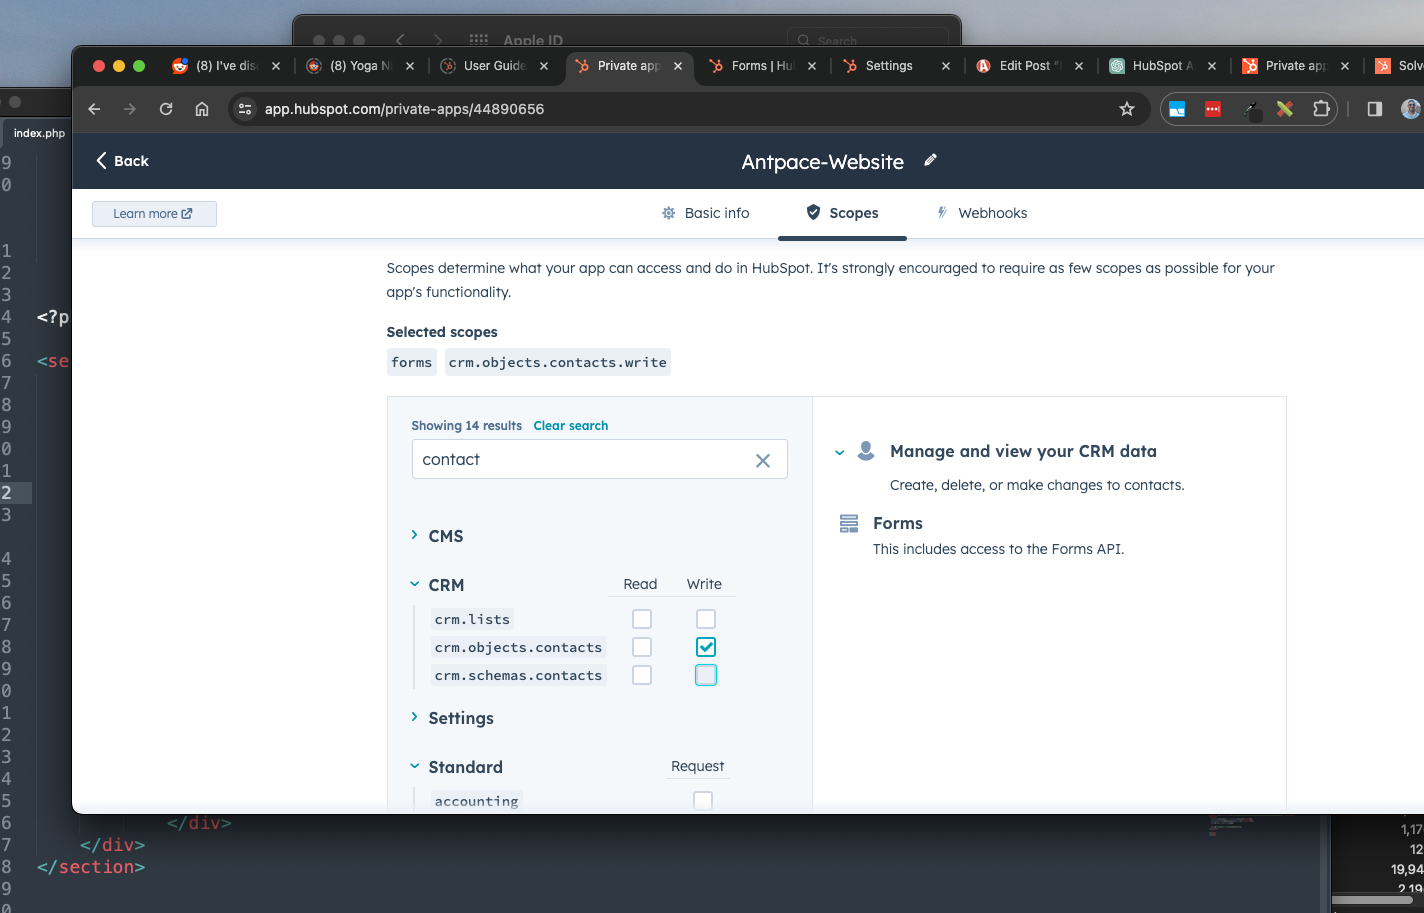
After entering a name and description for your “app”, you’ll need to select permission scopes. I called mine “Antpace-Website” and described it “signup forms on antpace.com”. The only scope is gave it was called `crm.objects.contacts.write`

hubspot permission scopes

CRM API – Create Contact

To create a contact programmatically through the HubSpot API, we use our private app’s access token. In my website’s HTML, I create a simple form:

<div class="col-md-12">
    <h1 style="text-align: center;">Newsletter</h1>
    	<p>Joining the mailing list!</p>
        <form id="hubspotForm" class="styled-form">
            <input type="hidden" value="subscriber" name="lifecyclestage">
            <div>
            	<div><input type="email" placeholder="Email *" value="" id="hubspot-email" name="email" class=""></div>    
                <div><input type="text" placeholder="First Name" name="firstname" value="" class=""></div>
                <div><input type="text" placeholder="Last Name" name="lastname" value="" class=""></div>        
                <div><input type="tel" placeholder="Phone" value="" name="phone" class=""></div>            
                <div><input type="text" placeholder="Company" value="" name="company" class=""></div>            
                <div><input type="text" placeholder="Website" value="" name="website" class=""></div>            
                
                <div><button type="button" id="signupButton" class="btn">Sign Up</button></div>
            </div>
	</form>
</div>

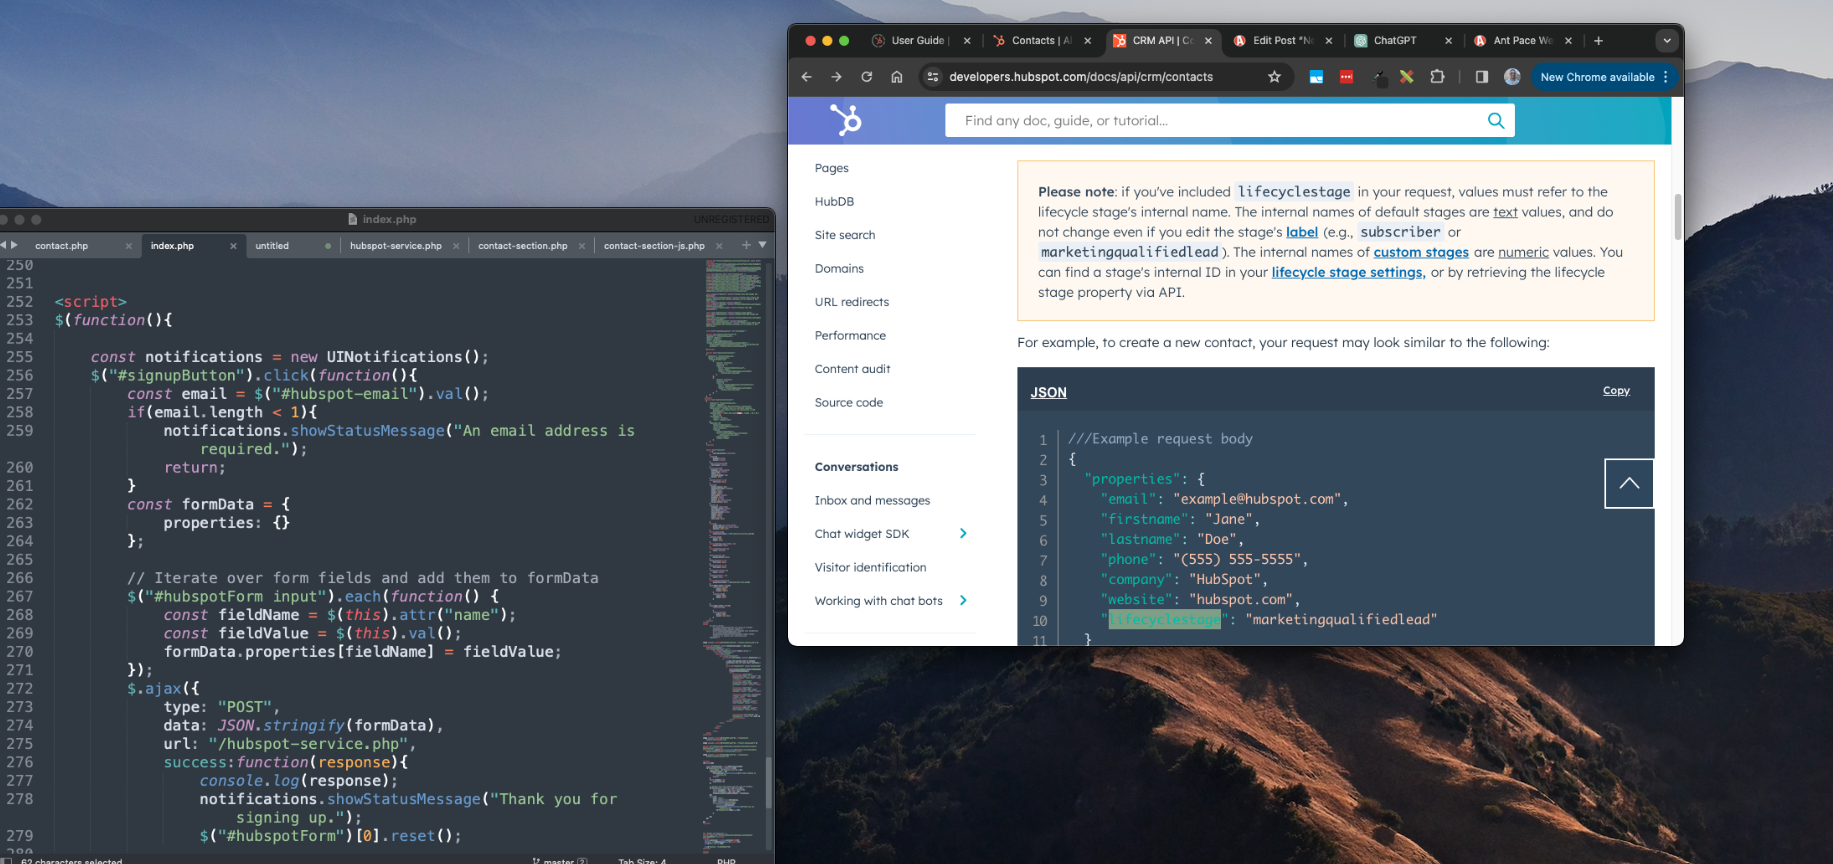
I add basic jQuery JavaScript to pass the form data along to my backend service when the button is clicked:

<script>
$(function(){
	const notifications = new UINotifications();
	$("#signupButton").click(function(){
		const email = $("#hubspot-email").val();
		if(email.length < 1){
			notifications.showStatusMessage("An email address is required.");
			return;
		}
		const formData = {
			properties: {}
		};

		// Iterate over form fields and add them to formData
		$("#hubspotForm input").each(function() {
			const fieldName = $(this).attr("name");
			const fieldValue = $(this).val();
			formData.properties[fieldName] = fieldValue;
		});
		$.ajax({
			type: "POST",
			data: JSON.stringify(formData),
			url: "/hubspot-service.php",
			success:function(response){
				console.log(response);
				notifications.showStatusMessage("Thank you for signing up.");
                                $("#hubspotForm")[0].reset();
			
			}
			
		});
	});

});
</script>

The HubSpot API documentation says, “To create new contacts, make a POST request to /crm/v3/objects/contacts“. Some simple PHP cURL commands accomplishes this. Here is the content of hubspot-service.php:

<?php

$url = 'https://api.hubapi.com/crm/v3/objects/contacts';
$accessToken = 'xxx';

$headers = array(
    'Authorization: Bearer ' . $accessToken,
    'Content-Type: application/json',
);

$postData = file_get_contents("php://input");

$ch = curl_init($url);

curl_setopt($ch, CURLOPT_POST, 1);
curl_setopt($ch, CURLOPT_POSTFIELDS, $postData);
curl_setopt($ch, CURLOPT_RETURNTRANSFER, true);
curl_setopt($ch, CURLOPT_HTTPHEADER, $headers);

$response = curl_exec($ch);

if (curl_errno($ch)) {
    echo 'Error: ' . curl_error($ch);
}

curl_close($ch);
echo $response;

?>

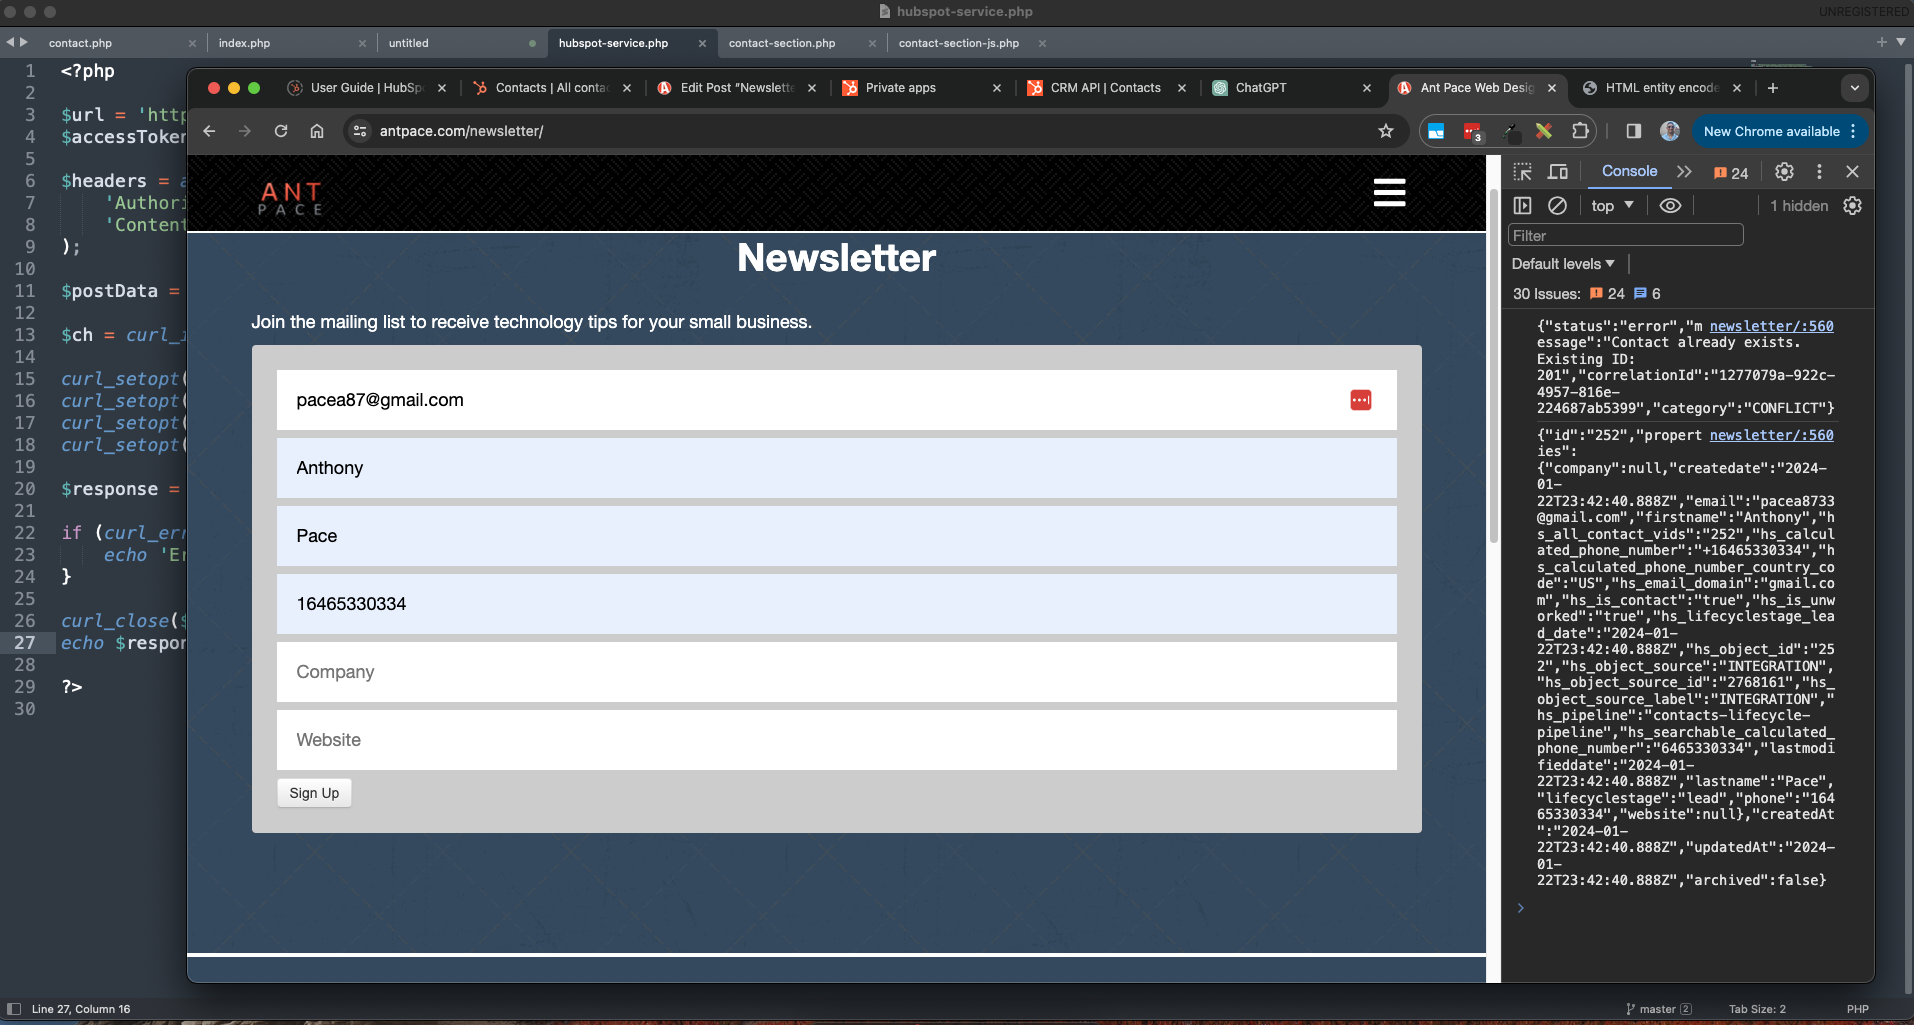
You can see the end result by visiting my newsletter sign up page. Make sure you add yourself so you can stay up-to-date with technology tips for business.

Newsletter sign up page

I can use this same PHP service file for other HubSpot email sign up forms throughout my website.

Magic Squares in JavaScript

magic squares in javascript

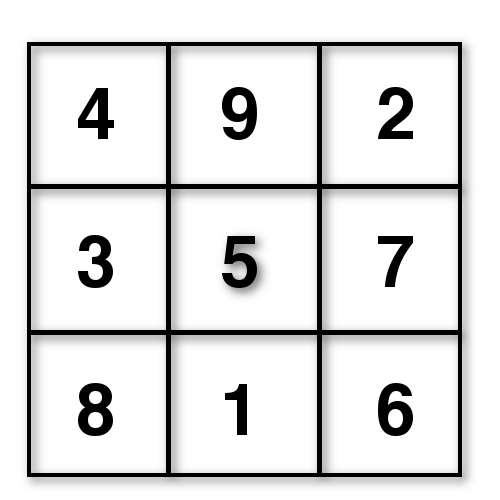
magic square

In mathematics, a “magic square” is a matrix of numbers where each row, column, and diagonal add-up to the same number. That number is called the “magic constant“. The integers used are only positive, and do not repeat. The constant sum is determined by the size of the square and is described by a formula:

M = n * ((n^2 + 1) / 2)

Facts about the properties and classifications of these numeric formations have been discussed by scholars for millennia. Knowledge of this topic goes back thousands of years, and can be found referenced throughout the world.

History & Culture

Magic squares have a fascinating historical and cultural significance, often with mystical undertones. They are mentioned in the I Ching, Brhat Samhita, and other works concerned with the transcendental and occult. They can be seen used in art, divination, perfumery, recreational gaming, computer science, and more.

a computer programmer using the Brhat Samhita to generate a talismans
AI images generated using Midjourney

In the Brhat Samhita, the magic square is used as a symbolic representation of the planets. It makes use of magic squares in the creation of talismans for astrological purposes.

For the purposes of this blog post, we’ll view them through the lens of software engineering.

3×3 Magic Squares

There’s so much to cover on this topic. I’ll narrow it down to 3×3 lattices (magic squares can actually be any size), specifically in the context of the JavaScript programming language. A quad of numbers, like the one pictured above, can be described as a two-dimensional array:

const magicSquare = [[4, 9, 2], [3, 5, 7], [8, 1, 6]];

Squares of this size always have a magic constant of 15. And, the number 5 will be in the middle. There’s additional logic that explains which numerals can appear where and why. Those ideas are explored in the comments section of a HackerRank coding challenge titled “Forming a Magic Square”.

HackerRank Coding Challenge

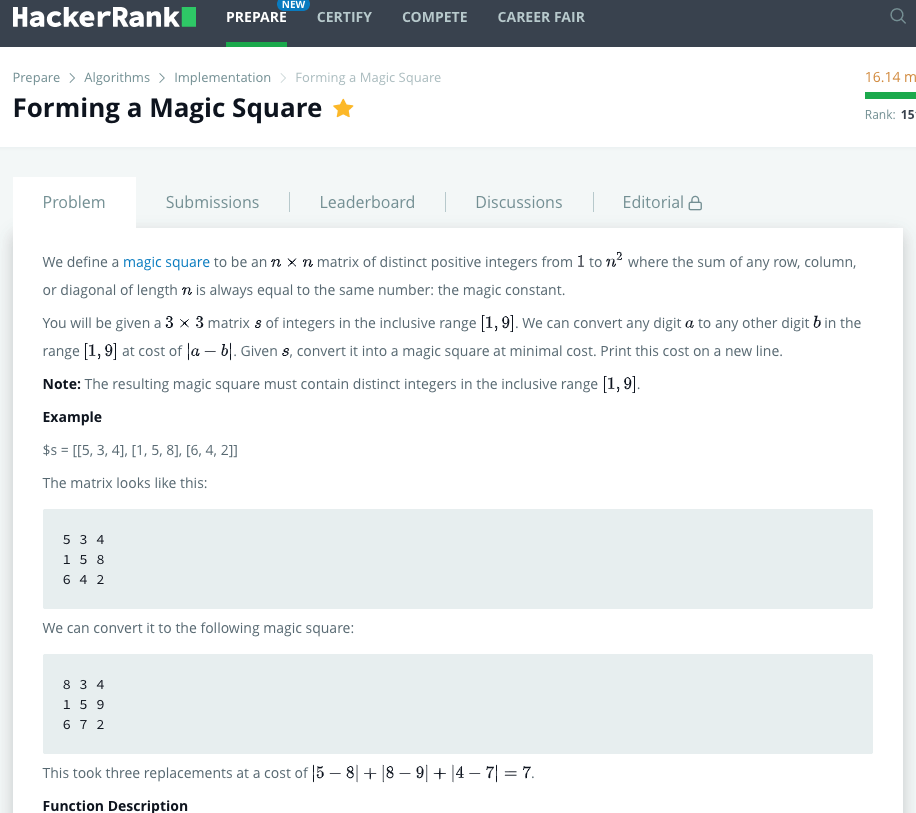
This coding problem found on HackerRank asks programmers to figure out what it would take to convert a 3×3 matrix of integers into a magic square. The input array is almost valid, but requires a few replacements. For each change, we must track the difference between the numbers and return the total variance – referred to as the “cost”. The correct answer will be the lowest cost required to convert the input data into a magic square.

hackerrank coding challenge

The difficulty of this assignment is considered “medium”. The first step is realizing that there are a finite number of valid magic square configurations. As it turns out, there are exactly eight 3×3 permutations:

const magicSquares = [[[4, 9, 2], [3, 5, 7], [8, 1, 6]], 
                [[6, 1, 8], [7, 5, 3], [2, 9, 4]], 
                [[8, 1, 6], [3, 5, 7], [4, 9, 2]], 
                [[2, 9, 4], [7, 5, 3], [6, 1, 8]], 
                [[8, 3, 4], [1, 5, 9], [6, 7, 2]], 
                [[4, 3, 8], [9, 5, 1], [2, 7, 6]], 
                [[6, 7, 2], [1, 5, 9], [8, 3, 4]], 
                [[2, 7, 6], [9, 5, 1], [4, 3, 8]]];

Starting with any one of these, we can generate the other seven programmatically. The subsequent arrangements can be derived through rotation and reflection. Using JavaScript, I rotate an initial seed square three times to have the first four series. Then, I flip each one of those to get the final records.

function generateMagicSquares(magicSquare1){
	const magicSquares = [];
	magicSquares.push(magicSquare1);

	// we need to rotate it 3 times to get all rotations
	for(let i = 0; i < 3; i++){
		var rotation = magicSquares[i].map((val, index) => magicSquares[i].map(row => row[index]).reverse());
		// console.log(rotation)
		magicSquares.push(rotation);
	}

	// and then flip each one
	for(let i = 0; i < 4; i++){
		var flipped = magicSquares[i].map((_, colIndex) => magicSquares[i].map(row => row[colIndex]));
		magicSquares.push(flipped);
	}
	
	return magicSquares;
}

const magicSquare1 = [[4, 9, 2], [3, 5, 7], [8, 1, 6]];
const magicSquares = generateMagicSquares(magicSquare1);
console.log(magicSquares);

To solve this exercise, we’ll take the input array and compare it to each of the valid magic squares. We keep track of the cost on each iteration, and finally return the minimum.

function formingMagicSquare(s){
	const magicSquares = [[[4, 9, 2], [3, 5, 7], [8, 1, 6]], [[6, 1, 8], [7, 5, 3], [2, 9, 4]], [[8, 1, 6], [3, 5, 7], [4, 9, 2]], [[2, 9, 4], [7, 5, 3], [6, 1, 8]], [[8, 3, 4], [1, 5, 9], [6, 7, 2]], [[4, 3, 8], [9, 5, 1], [2, 7, 6]], [[6, 7, 2], [1, 5, 9], [8, 3, 4]], [[2, 7, 6], [9, 5, 1], [4, 3, 8]]];
	
	// let minCost = 100000;
	let minCost = Number.MAX_SAFE_INTEGER;
	let cost = 0;
	for(let i = 0; i < magicSquares.length; i++){
		cost = determineCost(s, magicSquares[i]);
		if(cost < minCost){
			minCost = cost;
		}
	}
	return minCost;
}

You’ll notice that the initial minimum cost is set to a very high number. As I loop through each of the valid magic squares, I check if the cost is lower than the current minimum and then replace the value.

With each comparison, subtraction is used to determine the cost to complete the transformation. That code loops through each digit of each row on both 2D arrays. The absolute value of the difference between each coordinate is tallied and returned.

function determineCost(inputArray, validMagicSquare){
	let cost = 0;
	for(let i = 0; i < 3; i++){ // each row
		
		for(let j = 0; j < 3; j++){ // each digit

			cost += Math.abs(inputArray[i][j] - validMagicSquare[i][j]);
		}
	}
	return cost;
}

The working code all stitched together looks like this:

<script>

function generateMagicSquares(magicSquare1){
	const magicSquares = [];
	magicSquares.push(magicSquare1);

	// we need to rotate it 3 times to get all rotations
	for(let i = 0; i < 3; i++){
		var rotation = magicSquares[i].map((val, index) => magicSquares[i].map(row => row[index]).reverse());
		// console.log(rotation)
		magicSquares.push(rotation);
	}

	// and then flip each one
	for(let i = 0; i < 4; i++){
		var flipped = magicSquares[i].map((_, colIndex) => magicSquares[i].map(row => row[colIndex]));
		magicSquares.push(flipped);
	}
	
	return magicSquares;
}

function determineCost(inputArray, validMagicSquare){
	let cost = 0;
	
	for(let i = 0; i < 3; i++){ // each row
		
		for(let j = 0; j < 3; j++){ // each digit

			cost += Math.abs(inputArray[i][j] - validMagicSquare[i][j]);
		}
	}

	return cost;

}

function formingMagicSquare(s){
	// const magicSquares = [[[4, 9, 2], [3, 5, 7], [8, 1, 6]], [[6, 1, 8], [7, 5, 3], [2, 9, 4]], [[8, 1, 6], [3, 5, 7], [4, 9, 2]], [[2, 9, 4], [7, 5, 3], [6, 1, 8]], [[8, 3, 4], [1, 5, 9], [6, 7, 2]], [[4, 3, 8], [9, 5, 1], [2, 7, 6]], [[6, 7, 2], [1, 5, 9], [8, 3, 4]], [[2, 7, 6], [9, 5, 1], [4, 3, 8]]];
	const magicSquare1 = [[4, 9, 2], [3, 5, 7], [8, 1, 6]];
	const magicSquares = generateMagicSquares(magicSquare1);
	
	// let minCost = 100000;
	let minCost = Number.MAX_SAFE_INTEGER;
	let cost = 0;
	for(let i = 0; i < magicSquares.length; i++){
		cost = determineCost(s, magicSquares[i]);
		if(cost < minCost){
			minCost = cost;
		}
	}
	return minCost;
}

const finalCost = formingMagicSquare([[4, 9, 2], [3, 5, 7], [8, 1, 5]]);
console.log(finalCost);
</script>

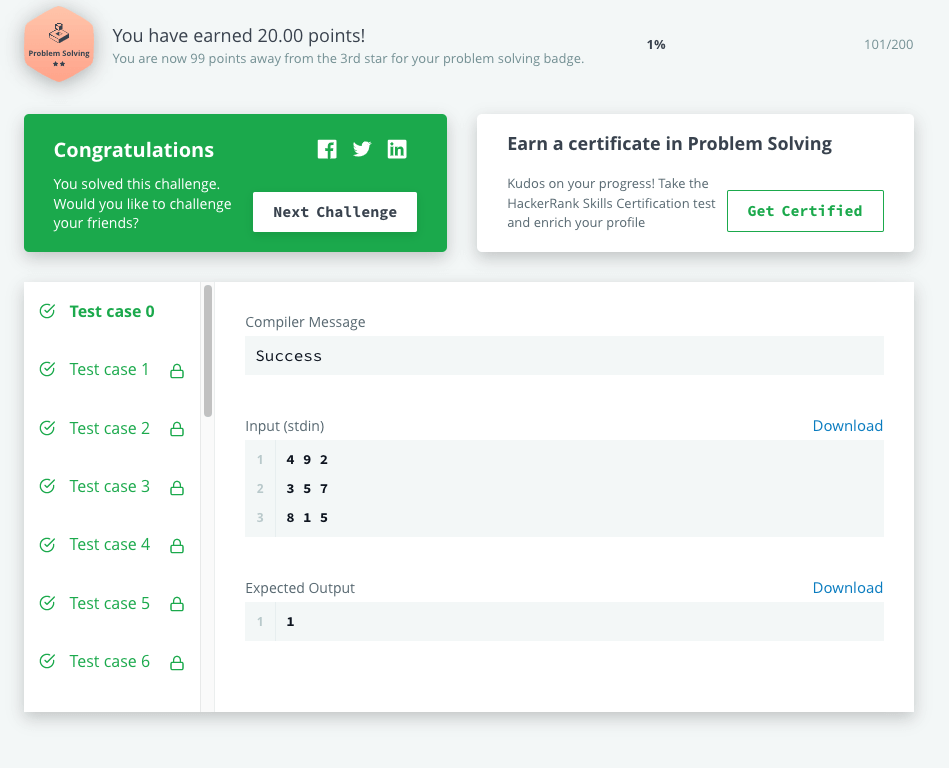
This solution was not intuitive to me and took some research and experimentation. It was interesting to learn about the concept of magic squares (and other shapes) along the way.

HackerRank challenge completed

Additional References

CSS Grid: Border Between Each Row

CSS Grid borders

User Interface Layout with CSS

CSS Grid is a layout system that allows you to design web interfaces with rows and columns. In earlier times, developers used less elegant techniques to arrange UI elements. In the 1990s, using HTML tables was the standard way. Many of my earliest clients used tables for their entire website and email newsletter code bases. During that time Dreamweaver was a popular product that let designers build websites and generated source code that was mostly tables. The semantic problem what this approach was that we were using tables for non-tabular data.

By the 2000s, the CSS float property became popular for multi-column layouts. We didn’t see Flexbox until the mid 2010s. You can read about examples of its use in the layout of my blog  and an image carousel I built.

CSS Grid

Grid is the latest addition to the toolbox of options. For a recent project I used CSS Grid to create a two column web application. Here is some example HTML:

<h1>Below is a grid of data</h1>
<div style="display: grid; grid-template-columns:repeat(2, 1fr); grid-gap: 24px">
	<div>Row 1, Column 1</div>
	<div>Row 1, Column 2</div>

	<div>Row 2, Column 1</div>
	<div>Row 2, Column 2</div>

	<div>Row 3, Column 1</div>
	<div>Row 3, Column 2</div>
</div>

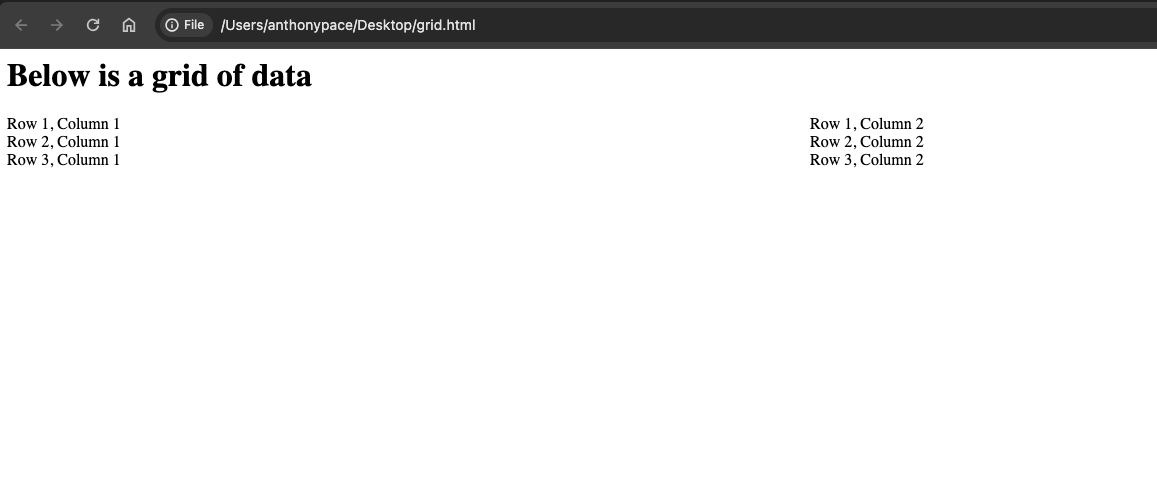
The grid container has a property: `grid-template-columns:repeat(2, 1fr);`. The CSS property grid-template-columns is used to define the number and size of columns in a CSS Grid layout. This repeat() function is used to repeat a pattern a specified number of times. In this case, the pattern is defined by the second argument, 1fr. fr stands for “fractional unit.” This property is describing two columns, with each item taking up an equal amount of space. This is what it looks like:

grid css layout

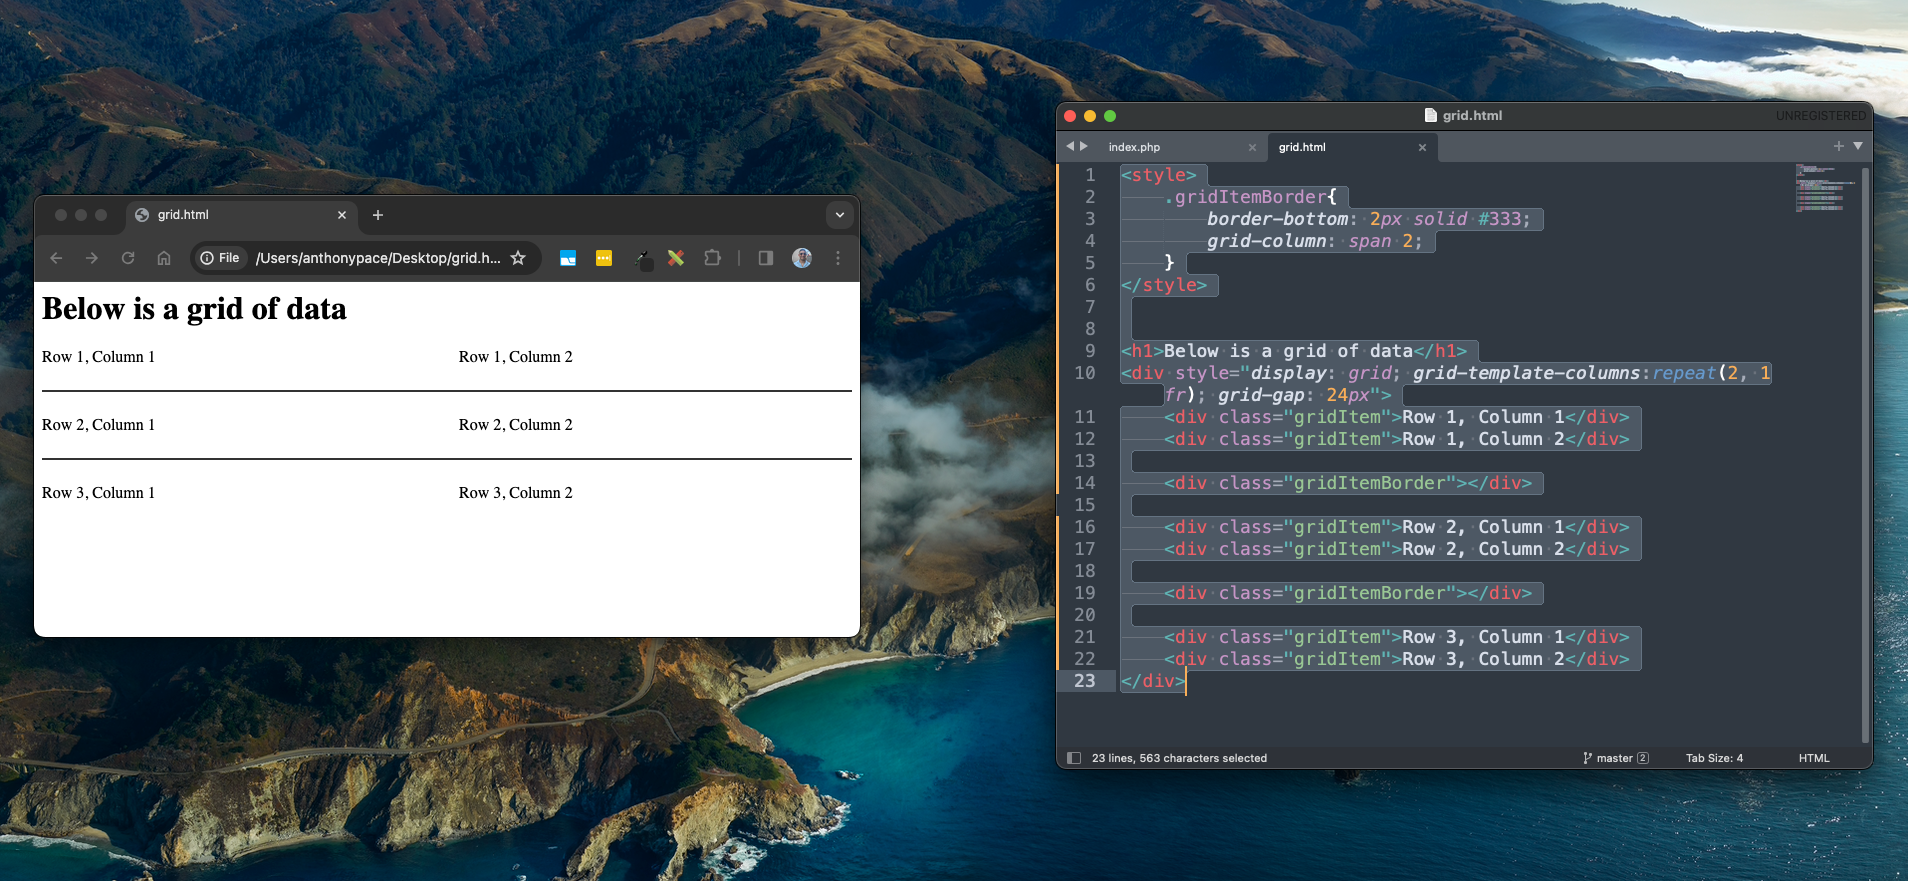
I wanted a horizontal line to separate each row. Usually, just adding a border-bottom to each of the grid items will work. In this scenario, the grid design called for a grid-gap property that forced the border to break.

css grid-gap

We fixed this by adding a new grid item between each “row” (that is, every third element). Those elements would represent each border line. I set the grid-column property of those elements to span two columns.

<style>
	.gridItemBorder{
		border-bottom: 2px solid #333;
		grid-column: span 2;
	}
</style>


<h1>Below is a grid of data</h1>
<div style="display: grid; grid-template-columns:repeat(2, 1fr); grid-gap: 24px">
	<div class="gridItem">Row 1, Column 1</div>
	<div class="gridItem">Row 1, Column 2</div>

	<div class="gridItemBorder"></div>

	<div class="gridItem">Row 2, Column 1</div>
	<div class="gridItem">Row 2, Column 2</div>

	<div class="gridItemBorder"></div>

	<div class="gridItem">Row 3, Column 1</div>
	<div class="gridItem">Row 3, Column 2</div>
</div>

The end result is just what we wanted:

css grid layout with row separators

Background Parallax Webpage with CSS

parallax website CSS

Parallax scrolling is a technique where the background moves at a different speed than the foreground. Ideally, the effect has many layers: a background, a mid-ground, and a foreground. These layers moving at different speeds create the illusion of depth and immersion

  • The background layer forms the foundation of the parallax effect. It typically consists of large, visually captivating images or patterns that set the scene and establish the mood of the website.
  • The mid-ground layer serves as an intermediary between the background and foreground, providing additional visual interest and depth.
  • The foreground layer contains the primary content and interactive elements that users engage with directly.

My favorite example comes from the classic Sonic the Hedgehog game on the Sega Genesis. In that game, the background layer encompasses lush landscapes, while the intermediate layer consists of trees and obstacles that add depth to the scene. Sonic and collectibles represent the foreground layer, with Sonic’s speedy movements contrasting the slower-paced background and intermediate layers.

HTML & CSS Parallax Effect

We can use HTML and CSS to achieve a parallax scrolling effect by manipulating the position and properties of background images or layers.

HTML:

<div class="parallax-container">
  <div class="parallax-background"></div>
  <div class="content">
    <!-- Your content here -->
  </div>
</div>

CSS:

.parallax-container {
  position: relative;
  overflow-x: hidden;
  overflow-y: auto; /* Enable vertical scrolling */
  height: 100vh; /* Set the container height to full viewport height */
}

.parallax-background {
  position: absolute;
  top: 0;
  left: 0;
  width: 100%;
  height: 200%; /* Adjust height to create a taller background for parallax effect */
  background-image: url('background.jpg');
  background-size: cover;
  background-position: center;
  z-index: -1; /* Ensure background is behind content */
}

.content {
  padding: 20px;
  /* Other styles for your content */
}

  1. The .parallax-container serves as the main container for the parallax effect. It has relative positioning to contain the absolutely positioned background layer.
  2. The .parallax-background div contains the background image. It’s absolutely positioned to cover the entire container and set behind the content with a negative z-index.
  3. Adjusting the height of .parallax-background to be taller than the container creates the parallax effect when the user scrolls.
  4. The .content div holds the content and is positioned over the parallax background.

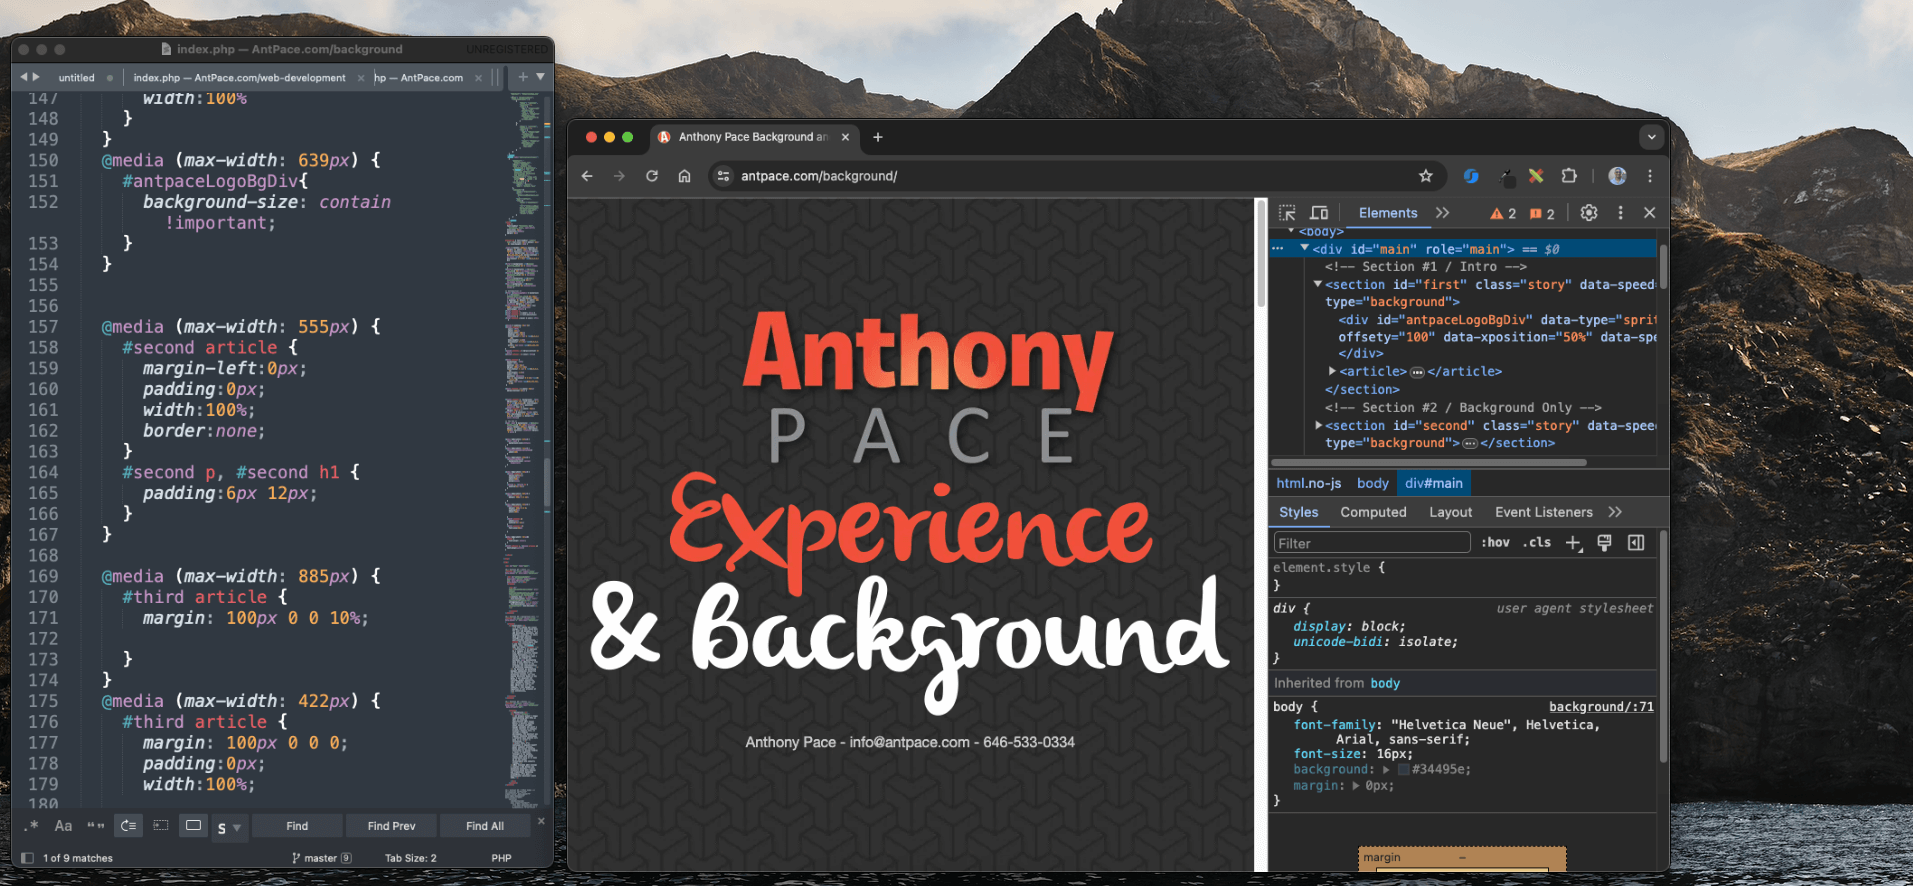
My Background Webpage

A few years ago, I made a single webpage to describe my professional background and experience. I decided to use a parallax background effect for this page. You can visit it here.

I really love the way the main logo text initially seems to blend into the foreground but remains static as you scroll. Upon scrolling, you’ll observe that the top text remains fixed while the second line moves independently, creating a distinct visual effect. It feels unexpected. The contrasting image backgrounds creates a fun juxtaposition.

And, it’s all done with CSS (no JavaScript necessary). You can create a simple parallax effect by adjusting the positioning of background images or layers using CSS properties like background-position and background-attachment. This allows the background to move at a different rate than the foreground content as the user scrolls, creating the illusion of depth.

Here is the code that I used to build this example:

<!doctype html>
<html class="no-js" lang="en">
<head>
<meta charset="utf-8">
<meta http-equiv="X-UA-Compatible" content="IE=edge,chrome=1">
<link rel="shortcut icon" href="https://www.antpace.com/favicon.ico" />
<link rel="apple-touch-icon-precomposed" sizes="144x144" href="https://www.antpace.com/apple-touch-icon-144x144-precomposed.png">
<link rel="apple-touch-icon-precomposed" sizes="114x114" href="https://www.antpace.com/apple-touch-icon-114x114-precomposed.png">
<link rel="apple-touch-icon-precomposed" sizes="72x72" href="https://www.antpace.com/apple-touch-icon-72x72-precomposed.png">
<link rel="apple-touch-icon-precomposed" sizes="57x57" href="https://www.antpace.com/apple-touch-icon-57x57-precomposed.png">
<link rel="apple-touch-icon-precomposed" href="https://www.antpace.com/apple-touch-icon-precomposed.png">
<title>Anthony Pace Background and Experience</title>
<meta name="description" content="Anthony Pace is a web developer, designer, and database architect. His daily work includes writing software and creating user-centered experiences. The technologies that he use most frequently are HTML5, CSS3, Javascript, PHP, and MySql.">
<meta name="keywords" content="Anthony Pace, web, development, design, marketing, websites, creative services, Bronx, New York">
<meta name="viewport" content="width=device-width">
<link rel="stylesheet" href="https://use.fontawesome.com/releases/v5.5.0/css/all.css" integrity="sha384-B4dIYHKNBt8Bc12p+WXckhzcICo0wtJAoU8YZTY5qE0Id1GSseTk6S+L3BlXeVIU" crossorigin="anonymous">
<link href='https://fonts.googleapis.com/css?family=Lobster+Two:700&v2' rel='stylesheet' type='text/css'>
 	<script type="application/ld+json">
	    {
	      "@context": "http://schema.org",
	      "@type": "BreadcrumbList",
	       "itemListElement": [
	            {
	                "@type": "ListItem",
	                "position": 1,
	                "item": {
	                  "@id": "https://www.antpace.com",
	                  "name": "Home",
	                  "image": "https://www.antpace.com/images/anthony-pace-logo.webp"
	                }
	            }, 
	            {
	                "@type": "ListItem",
	                "position": 2,
	                "item": {
	                  "@id": "https://www.antpace.com/background",
	                  "name": "Background",
	                  "image": "https://www.antpace.com/background/logo.webp"
	                }
	            } 
	        ]
	    }
	  </script>
	  <script type="application/ld+json">
	    {
	        "@context": "http://schema.org",
	        "@type": "WebPage",
	        "name": "Anthony Pace Background & Experience",
	        "description": "The page describes Anthony's professional background and experience.",
	        "lastReviewed": "<?php echo date("Y-m-d", time() - 60 * 60 * 24); ?>",
	        "reviewedBy": {
	            "@type": "Person",
	            "name": "Anthony Pace"
	        },
	        "publisher":{
	            "@type":"Organization",
	            "url":"https://www.antpace.com",
	            "name":"AntPace",
	            "logo":{
	                "@type":"ImageObject",
	                "url":"https://www.antpace.com/images/anthony-pace-logo.webp",
	                "width":"490px",
	                "height":"230px"
	            }
	        }
	    }
	    </script>
  <style>
  	body { 
		font-family: "Helvetica Neue", Helvetica, Arial, sans-serif;
		font-size: 16px;
		background:#34495e;
		margin: 0px;
	} 
	 
	 
	article h1 { font-family: 'Lobster Two'; font-size: 60px; margin: 25px 0; line-height: 1em; }

	.story { height: 1000px; padding: 0; margin: 0; width: 100%; max-width: 1920px; position: relative; margin: 0 auto; border-top: 1px solid rgba(255,255,255,0.3); border-bottom: 1px solid rgba(0,0,0,0.4); box-shadow: 0 0 50px rgba(0,0,0,0.8);}

	#first { background: url(images/textured.webp) 50% 0 repeat fixed; }
	#second { background: url(images/ufo.webp) 50% 0 no-repeat fixed; }
	#fourth { background: url(images/abstract2.webp) 50% 0 no-repeat fixed; }
	#third { background: url(images/desertEarthSet.webp) 50% 0 no-repeat fixed; }
	#last { background: url(images/textured.webp) 50% bottom repeat fixed; }

	/* Introduction */
	#first #antpaceLogoBgDiv { background: url(/images/anthony-pace-logo.webp) 50% 100px no-repeat fixed; min-height: 1000px; padding: 0; margin: 0; width: 100%; max-width: 1920px; position: relative; margin: 0 auto; }
	#first article { width: 100%; top: 300px; position: absolute; text-align: center; }
	#first article p,
	#first article a { color: #ccc; }
	#first article a { text-decoration: underline; }
	#first article a:hover { color: #fff; }

	 
	#second { padding: 50px 0;}
	#second article { 
		 color: #fff; 
		 width: 445px;
		 margin-left: 100px; 
		 padding: 10px 20px; 
		 text-shadow: 0 -1px 0 rgba(0,0,0,0.5); 
		 line-height: 1.5em; 
		 box-shadow: 0 0 25px rgba(0,0,0,0.3); 
		 border: 1px solid rgba(150,150,150,0.1); 
	}
	#second article p { margin-bottom: 25px; }
	#second article a { color: #ff0;}

	 
	#third article {
		background:  #333; 
		color: #fff; 
		padding: 10px 20px; 
		margin: 100px 0 0 60%; 
		text-shadow: 0 -1px 0 rgba(0,0,0,0.5); 
		line-height: 1.5em; 
		color: #fff; 
		position: absolute; 
		top: 0; box-shadow: 0 0 25px rgba(0,0,0,0.3); 
		border: 1px solid rgba(150,150,150,0.1); 
	 }

	#third article p { width: 300px; margin-bottom: 25px; }


	#fourth article {  background:  #333;margin-left: 10%; text-shadow: 0 -1px 0 rgba(0,0,0,0.5); line-height: 1.5em; color: #fff; position: absolute; top: 0; }
	#fourth article p { width: 300px; margin: 50px 0; }
	#fourth img { position: fixed; left: 50%; box-shadow: 0 0 25px rgba(0,0,0,0.7); z-index: 1; border:5px solid white;}

	/* The End */
	#last .last { background: url(images/thanks.webp) 50% 100px no-repeat fixed; height: 1000px; padding: 0; margin: 0; width: 100%; max-width: 1920px; position: relative; margin: 0 auto; }


	@media (max-width: 625px) {
		#last .last {
			background-size:contain;
		}
	}
	@media (max-width: 711px) {
		#experienceAndBackgroundImg{
			width:100%
		}
	}
	@media (max-width: 639px) {
		#antpaceLogoBgDiv{
			background-size: contain !important;
		}
	}


	@media (max-width: 555px) {
		#second article {
			margin-left:0px;
			padding:0px;
			width:100%;
			border:none;
		}
		#second p, #second h1 {
			padding:6px 12px;
		}
	}

	@media (max-width: 885px) {
		#third article {
			margin: 100px 0 0 10%; 
			 
		}
	}
	@media (max-width: 422px) {
		#third article {
			margin: 100px 0 0 0; 
			padding:0px;
			width:100%;
			 
			 
		}
		#third article p{
			width:auto;
			padding:6px 12px;
		}
		#third article h1{
			font-size:50px;
			 
		}
		 
	}  
	@media (max-width: 767px){
		footer {
			text-align: center;
		}
	}
	#third article p, #second article p{
		text-align:justify;
	}


  </style>
  
</head>

<body>

  <div id="main" role="main">

	<!-- Section #1 / Intro -->
	<section id="first" class="story" data-speed="8" data-type="background">    	
		<div id="antpaceLogoBgDiv" data-type="sprite" data-offsetY="100" data-Xposition="50%" data-speed="-2"></div>		
		<article>

			<img id="experienceAndBackgroundImg" src="images/experienceAndBackground.webp" alt="Experience and Background"  />
			<p>Anthony Pace - <a style="text-decoration: none;" href="mailto:info@antpace.com">info@antpace.com</a> - <a style="text-decoration: none;" href="tel:6465330334">646-533-0334</a></p>
			
	    </article>
	</section>

	<!-- Section #2 / Background Only -->
	<section id="second" class="story" data-speed="4" data-type="background">
		<article>
			<h1>Experience</h1>
		    	<p>I love coding and visual design. I've been doing both for over two decades. I am a web developer, designer, and database architect. My daily work includes writing software and creating user-centered experiences. <strong>The technologies that I use most frequently are HTML5, CSS3, Javascript, PHP, and MySQL.</strong> </p>
		    	<p>Currently, I am employed by a company in New York City where I directly manage other developers. I am in charge of developing apps (native and HTML5) and building &amp; maintaining data driven websites. I also play a large role in the strategy and implementation of marketing campaigns.  </p>
				<p> My position as marketing manager emphasizes measuring the effectiveness of our marketing actions, and then making decisions based on the data. I use advanced A/B testing, google analytics, email campaign reports, and user surveys to figure out what works best for the company. I also manage the logistics of our presence at live exhibitions.
				</p>
		    			
		</article>
	</section>
	
	<!-- Section #3 / Photos -->
	<section id="third" class="story" data-speed="6" data-type="background" data-offsetY="250">    	
		 
    	<article>
    		<h1>Background</h1>
	    	<div class="textbox">    	
		    	<p>In primary school I began experimenting with HTML as well as creating applications with Visual Basic. I quickly learned about various software design concepts and built a strong interest in Computer Science. Despite this, in college I studied philosophy. The abstract and logical thinking techniques I fostered have applied very much to my career in technology. </p>
		    	<p>Since then, I've continued to educate myself about computer science. Books and online lectures facilitate me moving towards a level of expertise relevant to my career. Social media and online communities help me to keep up on the latest technologies and industry trends.</p>
				<p>When finished with college I created a web design and marketing business. I built clientele using both digital and traditional marketing strategies. I've been a professional developer since 2008.</p>
				
		    </div>
    	</article>
	</section>	
	

	<!-- Section #4 / HTML5 Video -->
	<!--<section id="fourth" class="story" data-speed="8" data-type="background" data-offsetY="250">
    	<article>
    		<h2>Skills</h2>
	    	<div class="textbox">    	
		    	<p>I have acquired and honed a variety of abilities as a technologist. I am a full stack web developer with a passion for programming. Some of the most useful skills that I have built include:
					<ul>
						<li>Project Management
						<li>Business Management
						<li>Design
						<li>Software Engineering
						<li>Marketing
					</ul>
				</p>For a more technical description of my abilites please visit my <a style="color:white;" href="http://antpace.com/resume" target="_blank">resum&eacute;</a>.</p>
		   
		    </div>
    	</article>
		 
	</section>	-->

	<!-- Section #5 / The End-->
	<section id="last" data-speed="8" data-type="background" data-offsetY="250">    
	
		<a href="/blog/"><div class="last" data-type="sprite" data-offsetY="-1600" data-Xposition="50%" data-speed="-2"></div>	</a>
		<p style=" text-align: center; padding: 50px;font-size: 24px;"><a href="/blog/about/" style="color:white; text-decoration: none;">Continue to my blog &nbsp;&nbsp;<i class="fas fa-arrow-right"></i></a></p>
	</section>
	
  </div> <!-- // End of #main -->
  
<?php include $_SERVER["DOCUMENT_ROOT"] . '/footer-shared.php'; ?>
<?php include $_SERVER["DOCUMENT_ROOT"] . '/components/analytics.php'; ?>

</body>
</html>

Take a look:

References:

  1. https://www.clickrain.com/blog/parallax-scrolling-examples-and-history
  2. https://en.wikipedia.org/wiki/Parallax_scrolling
  3. https://www.w3schools.com/howto/howto_css_parallax.asp

Freelance Web Development: Delivering Value to Clients

freelance web dev process

When I win a new web development client I follow a structured progress. This ensures high quality results. Years of refinement and experience continue to define how I work with people and businesses to help them succeed.

Discussion

This is the first step. Communication is key.

This initial discussion allows us to explore your project’s overarching goals. It’s a high-level chat to understand your aspirations and ensure our visions align. We’ll delve into:

  • Nature of the Project: Is this a revamp of an existing platform or the birth of something entirely new?
  • Scope of Work: What exactly are we building? It could range from a website, a dynamic web application, an eCommerce storefront, to other web-based projects.
  • Branding Elements: Have you established a brand identity already? Do you possess logo designs or specific themes you want incorporated?
  • Budget Considerations: A transparent conversation about the budget ensures we shape the project according to the resources available.
  • Project Goals: What do you hope to achieve with this project? Understanding your objectives ensures we’re steering in the right direction from the get-go.

After our conversation, we’ll examine any pre-existing materials that are pertinent. Perhaps you have an existing website that needs sprucing up or logos that you’d love incorporated. Alternatively, you might point to other inspiring sites or platforms, even if they’re not yours, to give a clearer picture of your vision. This step is all about gathering resources and setting a concrete foundation.

Based on our dialogue and the data collated, I’ll recommend the best technologies and tools. This could encompass anything from choosing the right content management system, database technologies, or frontend frameworks.

Planning

Step two. Every element discussed in our initial conversation is now put down in black and white. It’s our chance to reiterate the goals and ensure we’re on the same page. This documentation becomes a reference point, ensuring we stay aligned with the project’s vision.

We detail objectives, decide on the most fitting technology stack, outline the budget, and establish a clear timeline.

Development

As we progress through this building phase, you’ll have access to a private server for reviews and approvals. Everything—from the user-friendly experience to backend configurations like domain setup, security measures, and CMS installation—is shaped by our prior discussions, ensuring both aesthetics and functionality are on point.

Content

During the website’s initial build, I typically use placeholder content. With the design and layout set, it’s your cue to provide the actual content. While you can opt to share materials earlier, this phase is ideal. And rest assured, you’ll retain full control to modify content as needed later on.

Quality Review

Before launching, I rigorously test the product across various devices, browsers, and screen dimensions to ensure quality. This phase is dedicated to refining the detail, ensuring both appearance and functionality are flawless.

Final Touches

I ensure that your website is fully optimized for SEO, integrating structured data, sitemaps, and relevant keywords. By enhancing its security, mobile responsiveness, and speed, your SEO score will naturally improve. Further bolstering this, I can register your site with Google Search Console and activate AMP (Accelerated Mobile Pages) to amplify its prominence in Google searches. Additionally, I’m here to guide you in devising a content strategy tailored to elevate your online visibility.

For those seeking email hosting, I offer solutions tailored to your needs, with Google Workspace being a top recommendation for those starting afresh. When it comes to choosing a CMS, WordPress or Shopify are often top picks for businesses.

Beyond these services, I specialize in web design, crafting a visual identity that seamlessly embodies your brand. And rest assured, user experience is a top priority; I design ensuring visitors experience positive, smooth interactions across your digital platform.

This framework is described and outlined on another page of this website. It is what I use when I engage a client that has an existing website that might need maintenance or improvements.

Diagnosing and Resolving Disk Space Issues on AWS EC2 with MariaDB

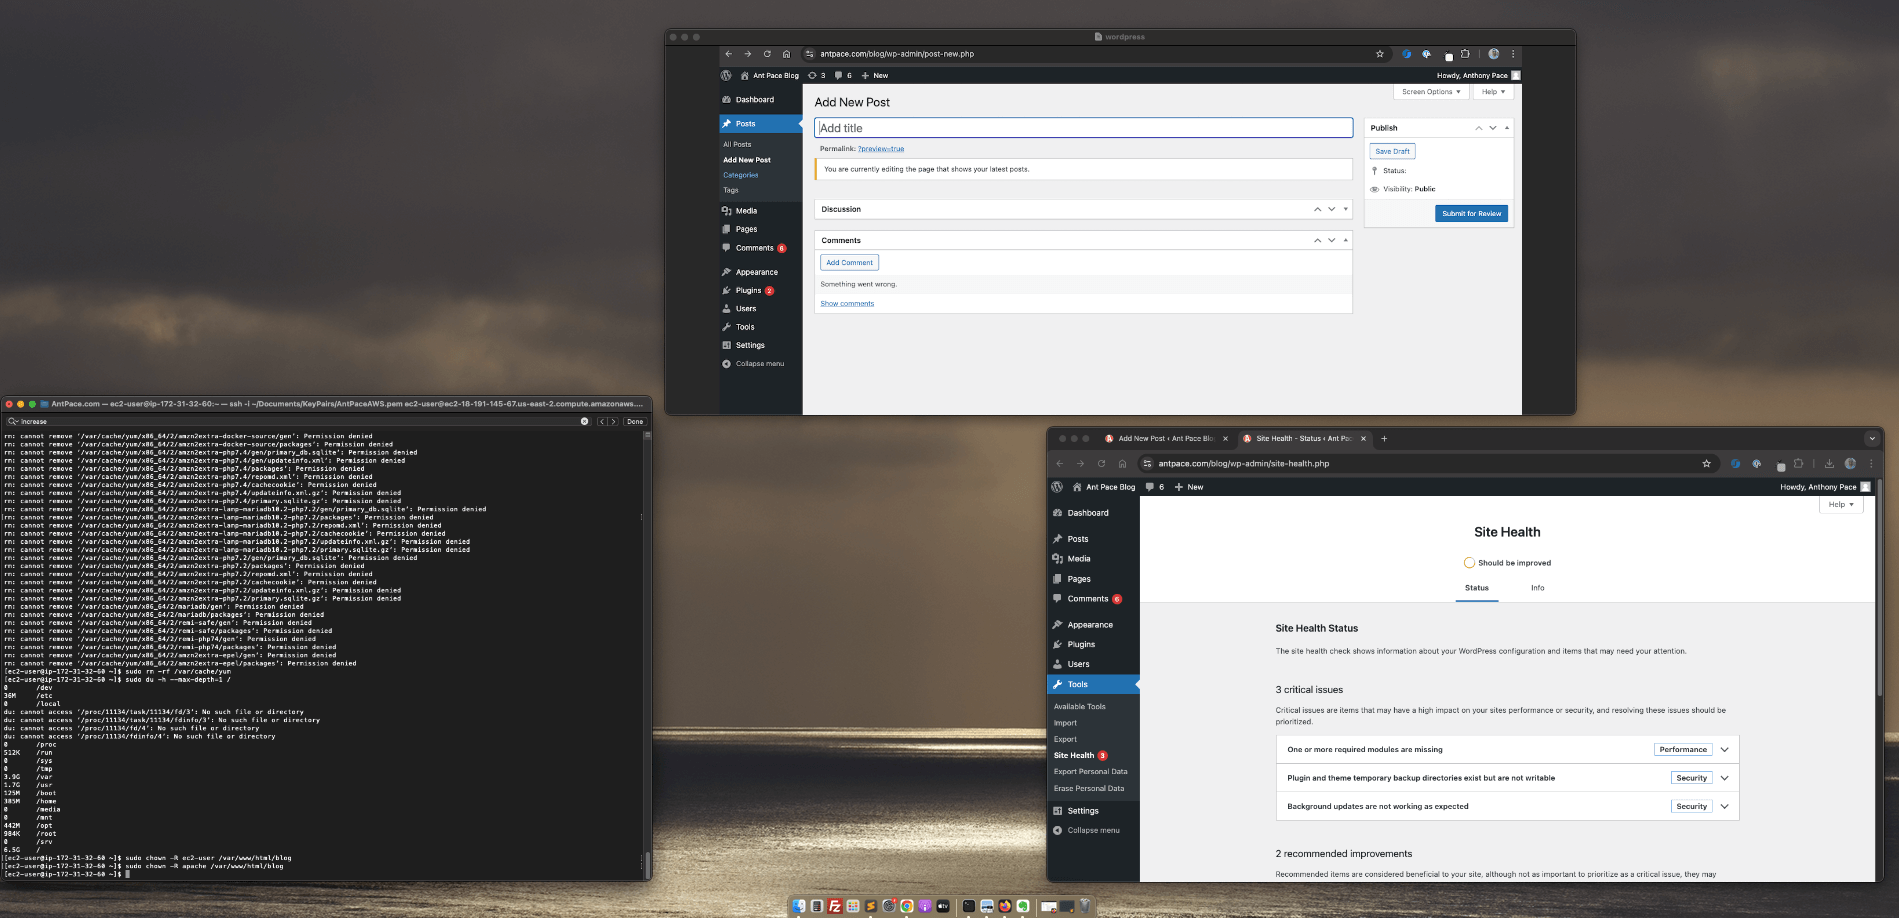
I run this website on a t2.micro EC2 instance. It only has 8 gigabytes of storage space. The blog runs on WordPress. I tried creating a new post recently, but it wouldn’t let me publish.

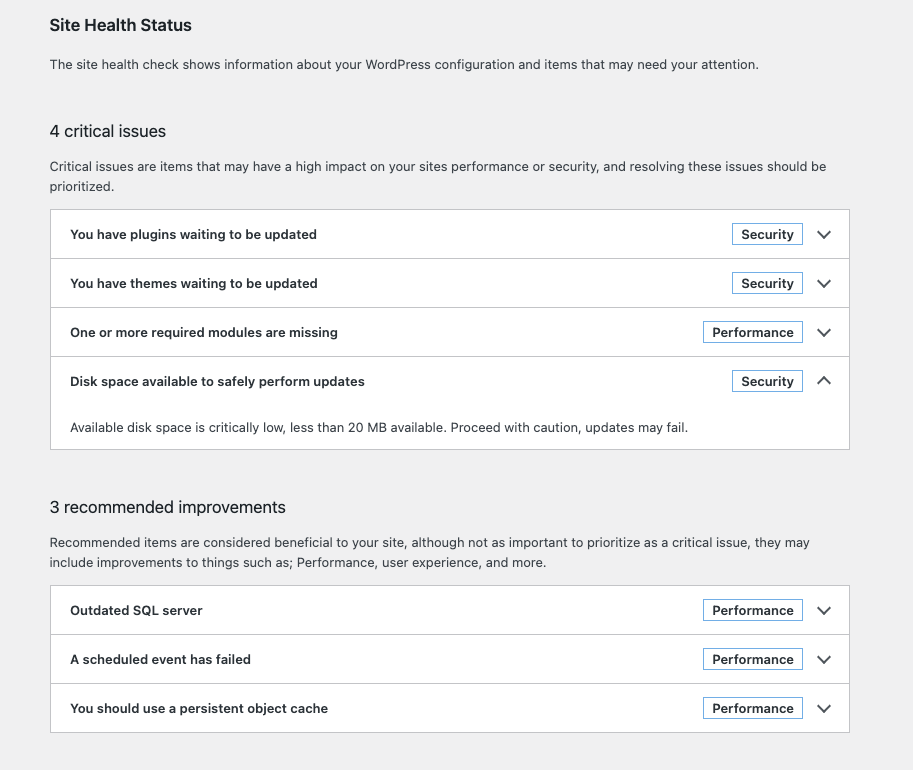
A vague message told me I was “editing the page that shows your latest posts” – even though I wasn’t. I checked the dashboard site health, and noticed that somethings needed updating, but disk space was critically low.

WordPress site health

I SSH’d into the instance was able to confirm that 100% of the 8 gigabytes was in use: `df -h`

hardrive space

I was able to use the ‘disk usage’ command to drill down and find large directories: ‘sudo du -h –max-depth=1 /var’. I was able to clean up unused yum packages, logs, and cache to clear up over a gigabyte of space.

sudo journalctl --vacuum-size=100M
sudo yum clean all
rm -rf /var/cache/yum

It looks like there are some database files that could be cleaned up too, but I’ll wait for now. I think my next course of action, when this inevitably happens again, will be to increase my disk space by expanding my EBS volume and resizing the file system.

Playing with databases and storage can be dangerous. Make sure you always have a back-up strategy and disaster recovery plan.

How to Fix a GoDaddy Parked Page and Revive Your Website

godaddy parked page fixed

It all started with a client text message that was hard to miss — their website was suddenly showing a GoDaddy “parked” page. This unexpected hiccup was more than just a minor inconvenience; it was a full-blown business disruption for my client.

The Challenge

When the client reached out, he was understandably frustrated. His website, which was supposed to be active and processing sign-ups, was inactive, displaying a message typically associated with unconfigured or newly registered domains. This was particularly perplexing as the site had been running smoothly just days before.

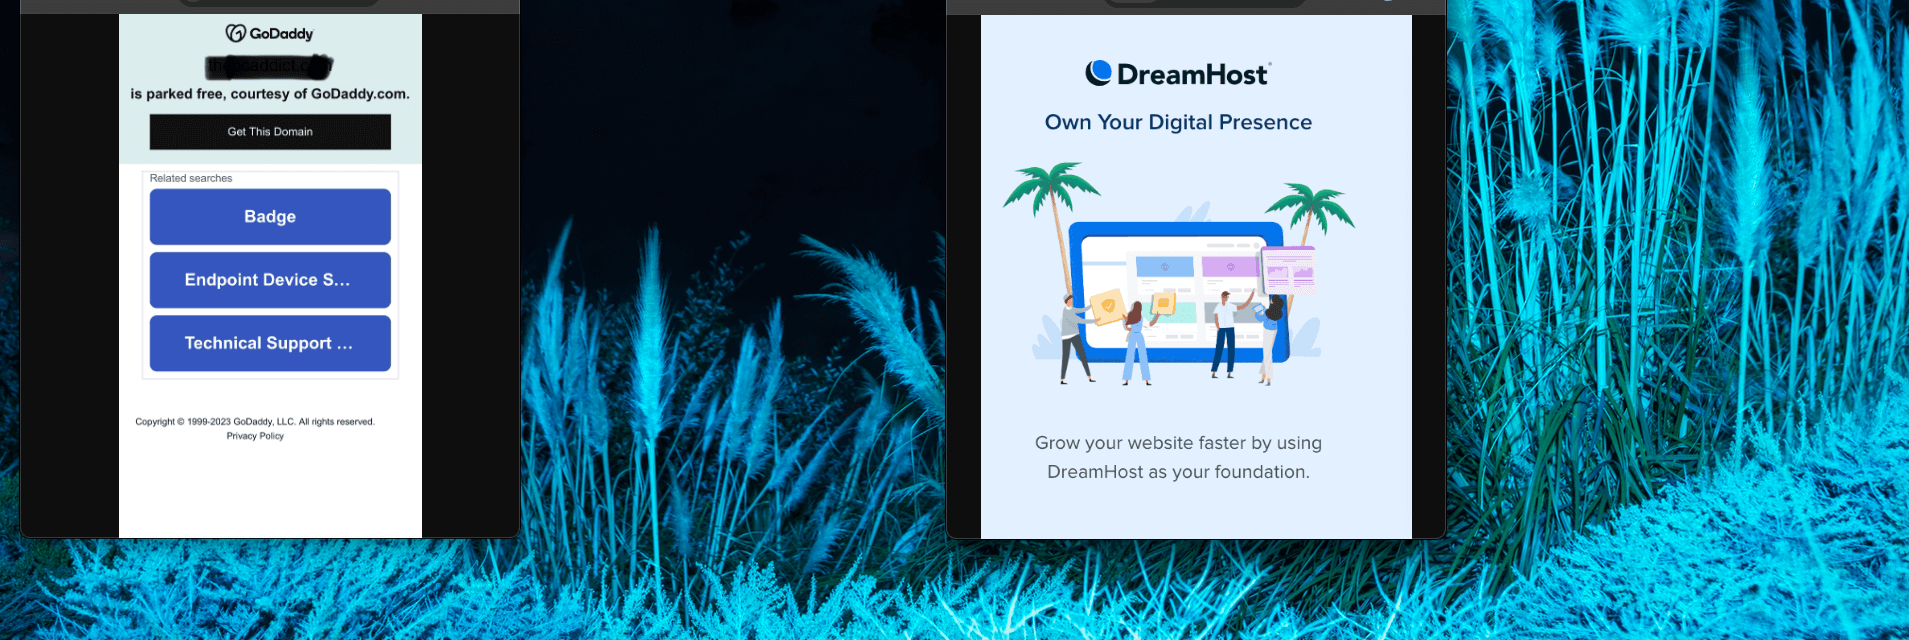
My first step was to verify the DNS settings. A parked domain page usually indicates issues with domain pointing, possibly due to changes in DNS or hosting services. The client told me he had tried to create a subdomain through his domain registrar, GoDaddy. It turned out that his domain’s name servers pointed to his web hosting company, DreamHost. Making DNS changes directly in GoDaddy led to a change in the domain’s nameserver records so that it became managed by GoDaddy directly, removing any reference to the web hosting package where the site actually lived.

The Solution

After identifying the mismatch, the next step was clear but not simple—access the DreamHost account to find the correct nameserver value to point the domain to. However, the client didn’t have the DreamHost login credentials readily available, which added another layer to our challenge.

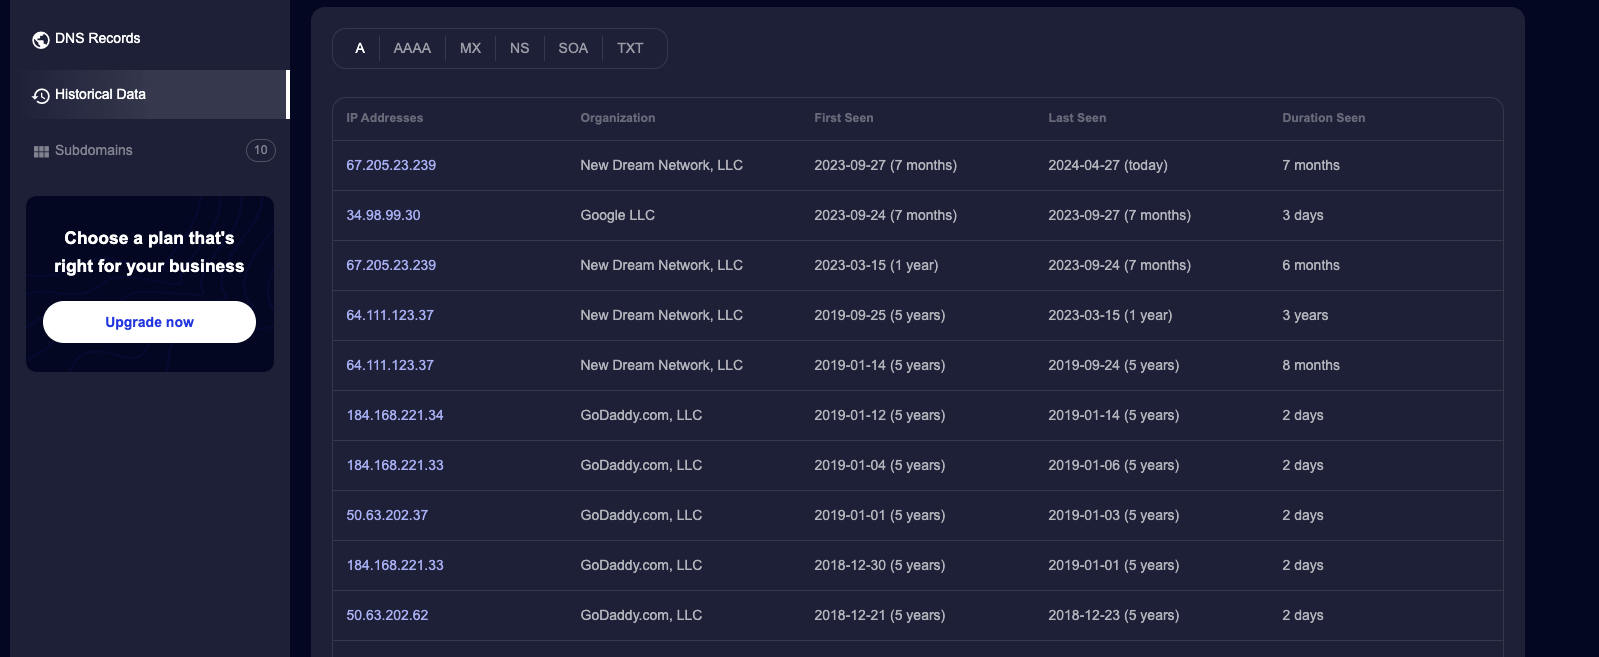
Using SecurityTrails, I conducted a DNS history check. This not only confirmed that the name servers were indeed pointing to DreamHost but also provided a clear historical view of the DNS changes over time. I was able to copy and paste the name server values from the history log. Subsequently, we were able to recover access to the DreamHost account by going through account recovery processes, which involved verifying the client’s identity and ownership of the domain.

dns log

Once we regained access, I immediately updated the DNS records to ensure they correctly pointed to the client’s active web server. This change effectively removed the parked page error, restoring the site’s functionality.

Conclusion

This scenario underscored the critical importance of keeping domain and hosting details organized and accessible. It also highlighted how easy it is for essential information to become overlooked, especially when multiple service providers are involved over the years. Effective disaster recovery strategies are crucial for quickly restoring operations in the event of a service disruption, whether caused by human error, technical failures, or external threats.

With the website back up and running, and the domain correctly configured, the client was relieved and could focus on his business again. For me, it reinforced a key aspect of my work: solving complex tech puzzles not only requires technical know-how but also an investigative approach to untangle the often convoluted web of digital assets. My role transcends building websites—it’s about ensuring they continue to serve their purpose, even when unexpected disruptions occur.

While my tagline says, “I can build your website,” days like these remind me it should also include, “and I can rescue it too.” This experience serves as a testament to the value of professional web management, especially in a world where digital presence is synonymous with business viability.