Using Stripe for SAAS payments

stripe for saas payment

Letting users pay for your software service is important part of building a “Software as a Service” business. Accepting payment requires a third-party service, such as Stripe. Their PHP library makes it easy to accept credit cards and subscribe users to monthly payment plans. My examples use version 6.43. The Stripe JavaScript library is used to create secure UI elements that collect sensitive card data.

Before any coding, log into your Stripe account. Create a product with a monthly price. That product’s API ID is used to programmatically charge users and subscribe them recurring billing.

stripe product dashboard

User Interface (front end)

In this part Stripe collects the payment information, and returns a secure token that can be used server-side to create a charge. Payment does not actually happen until the token is processed on the back-end.

My software product gives users a 7-day free trial before core functionality is disabled. When they decide to activate their account they are presented with a credit card input user interface.

activate account subscription

It is built with basic HTML and CSS.

<style type="text/css">
	#card-element{
		width: 100%;
		margin-bottom: 10px; 
	}
	.StripeElement {
	  box-sizing: border-box;

	  height: 40px;

	  padding: 10px 12px;

	  border: 1px solid transparent;
	  border-radius: 4px;
	  background-color: white;

	  box-shadow: 0 1px 3px 0 #e6ebf1;
	  -webkit-transition: box-shadow 150ms ease;
	  transition: box-shadow 150ms ease;
	}

	.StripeElement--focus {
	  box-shadow: 0 1px 3px 0 #cfd7df;
	}

	.StripeElement--invalid {
	  border-color: #fa755a;
	}

	.StripeElement--webkit-autofill {
	  background-color: #fefde5 !important;
	}
</style>

<div id="stripe-payment-modal" class="modal stripe-payment-modal" style="display: none;">

	<!-- Modal content -->
	<div class="modal-content">
		<p>
		  <button type="button" class="dismiss-modal close" >&times;</button>
		</p>
		<p>Activate your account subscription.</p>
		<p><?php echo $price_point; ?> per month.</p>
		<form id="payment-form">
		  <div class="form-row">
		    <!-- <label for="card-element">
		      Credit or debit card
		    </label> -->
		    <div id="card-element">
		      <!-- A Stripe Element will be inserted here. -->
		    </div>

		    <!-- Used to display Element errors. -->
		    <div id="card-errors" role="alert"></div>
		  </div>

		  <button type="button" class="btn submit-payment">Submit Payment</button>
		</form>

  	</div>

</div>

The actual input elements are generated by Stripe’s JavaScript. The Stripe form handles real-time validation and generates a secure token to be sent to your server.

<script src="https://js.stripe.com/v3/"></script>
<script type="text/javascript">

	$(document).ready(function() {
		// var stripe = Stripe('pk_test_xxxx'); //sandbox
		var stripe = Stripe('pk_live_xxxx');

		var elements = stripe.elements();

		// Custom styling can be passed to options when creating an Element.
		var style = {
		  base: {
		    color: '#32325d',
		    fontFamily: '"Helvetica Neue", Helvetica, sans-serif',
		    fontSmoothing: 'antialiased',
		    fontSize: '16px',
		    '::placeholder': {
		      color: '#aab7c4'
		    }
		  },
		  invalid: {
		    color: '#fa755a',
		    iconColor: '#fa755a'
		  }
		};

		// Create an instance of the card Element.
		var card = elements.create('card', {style: style});

		// Add an instance of the card Element into the `card-element` <div>.
		card.mount('#card-element');

		// Handle real-time validation errors from the card Element.
		card.addEventListener('change', function(event) {
		  var displayError = document.getElementById('card-errors');
		  if (event.error) {
		    displayError.textContent = event.error.message;
		  } else {
		    displayError.textContent = '';
		  }
		});

		// Handle form submission.
		var form = document.getElementById('payment-form');
		form.addEventListener('submit', function(event) {
		  event.preventDefault();

		  stripe.createToken(card).then(function(result) {
		    if (result.error) {
		      // Inform the user if there was an error.
		      var errorElement = document.getElementById('card-errors');
		      errorElement.textContent = result.error.message;
		    } else {
		      // Send the token to your server.
		      stripeTokenHandler(result.token);
		    }
		  });
		});

		// Submit the form with the token ID.
		function stripeTokenHandler(token) {
		  // Insert the token ID into the form so it gets submitted to the server
		  var form = document.getElementById('payment-form');
		  var hiddenInput = document.createElement('input');
		  hiddenInput.setAttribute('type', 'hidden');
		  hiddenInput.setAttribute('name', 'stripeToken');
		  hiddenInput.setAttribute('value', token.id);
		  form.appendChild(hiddenInput);
		 
		  var data = $("#payment-form").serialize();
		  $.ajax({
		  	url:"/service-layer/stripe-service?method=subscribe",
		  	method: "POST",
		  	data: data,
		  	complete: function(response){
		  		console.log(response);
		  		window.location.reload();
		  	}
		  })
		}

		$(".submit-payment").click(function(){
			stripe.createToken(card).then(function(result) {
		    if (result.error) {
		    	// Inform the customer that there was an error.
		    	var errorElement = document.getElementById('card-errors');
		    	errorElement.textContent = result.error.message;
		    } else {
				$(".submit-payment").attr("disabled", "disabled").html('Working <i class="fas fa-spinner fa-spin"></i>');
		      	// Send the token to your server.
		      	stripeTokenHandler(result.token);
		    }
		  });
		});

	});

</script>

After referencing the CDN JS library, the Stripe object accepts a public API key. That object then creates a customizable element that can be mounted into an existing <div> on your webpage. In your JavaScript, you can either listen for the form to be submitted or for an arbitrary button to be clicked. Then, we rely on the Stripe object to create a card token, which we can pass along to our back-end service.

You can find test payment methods in Stripe’s documentation.

Payment

Creating a subscription

Once the token is passed along to the server, it can be used to subscribe to the monthly product. We will need to load the PHP library and provide our secret API key. The key can be found in Stripe’s web dashboard.

require_once('/stripe-php-6.43.0/init.php');
\Stripe\Stripe::setApiKey('sk_live_XXXXXXX');

A Stripe customer ID is needed to create the subscription. Our code checks if the user record already has a Stripe customer ID saved to our database (in case they signed up previously, and cancelled).  If not, we call the “customer create” method first.

function subscribe(){
	$stripe_token = $_POST['stripeToken'];
	$conn = $this->connection;
	
	if(isset($_SESSION['email'])){
		$email = $_SESSION['email'];
	}else{
		die("No email found.");
	}
	
	if(strlen($email)>0){
		$sql = "SELECT * FROM `account` WHERE email = ?"; 
		$result = $conn->prepare($sql); 
		$result->execute(array($email));
		$row = $result->fetch(PDO::FETCH_ASSOC);
	}
	$customer_id = $row['billing_customer_id'];
	//check if this account already has a billing_customer_id
	if(strlen($customer_id) < 1){
		//if not, create the customer
		$customer = \Stripe\Customer::create([
		  'email' => $email,
		  'source' => $stripe_token,
		]);
		$customer_id = $customer['id'];
		//write stripe ID to db
		$sql = "UPDATE `account` SET billing_customer_id = ? WHERE email = ?"; 
		$result = $conn->prepare($sql); 
		$result->execute(array($customer_id, $email));
	}

	// Create the subscription
	$subscription = \Stripe\Subscription::create([
	  'customer' => $customer_id,
	  'items' => [
	    [
	      // 'plan' => 'plan_FjOzMSMahyM7Ap', //sandbox.
	      'plan' => 'price_1He7vwLjg3FTECK8lb3GDQhV', //"basic" plan. setup in Stripe dashboard.
	    ],
	  ],
	  'expand' => ['latest_invoice.payment_intent'],
	  'billing_cycle_anchor' => time()
	]);
	$subscription_status = $subscription['status'];
	$subscription_id = $subscription['id'];
	if($subscription_status == "active"){
		//set current_period_end to 32 days (1 month plus some leeway) in the future. set past_due as false 
		$sql = "UPDATE `account` SET stripe_subscription_id = ?, current_period_end = ?, past_due = 0 WHERE email = ?"; 
		$result = $conn->prepare($sql);
		$past_due = false;
		$current_period_end = new DateTime;  
		$current_period_end->modify( '+32 day' );
		$current_period_end = $current_period_end->format('Y-m-d H:i:s'); 
		$result->execute(array($subscription_id, $current_period_end, $email));
	}
}

With the subscription complete, their account’s “past due” property is marked as false and “current period end” is recorded to about 1 month in the future. The Stripe subscription ID is recorded for later use and reference.

Subscription life-cycle workflow

The application knows if an account is paying for premium service based on that “past due” property. After a user first signs up, that value is managed by a nightly scheduled cron job. If the “current period end” date is in the past, “past due” is marked as true, all projects are turned off, and a notification email is sent.

function checkPastDue(){	
	$sql = "SELECT * FROM `account` WHERE past_due = '0'";
	$result = $conn->prepare($sql); 
	$result->execute(); 
	$rows = $result->fetchAll(PDO::FETCH_ASSOC);
	$number_of_rows = $result->rowCount();
	
	include 'send-email-service.php';	

	foreach ($rows as $key => $value) {
		$current_period_end = $value['current_period_end'];
		$date = new DateTime($current_period_end);
		$now = new DateTime();
		if($date < $now) {
		   
		    //extend their trial 1 time, for an additional week
		    $extended_trial = $value['extended_trial'];
		    $accountid = $value['accountid'];
		    $email = $value['email'];
		    $billing_customer_id = $value['billing_customer_id'];
		    if($extended_trial == 0 && strlen($billing_customer_id) == 0){

		    	$sql = "UPDATE `account` SET extended_trial = '1' WHERE accountid = ?";
				$result1 = $conn->prepare($sql); 
				$result1->execute(array($accountid)); 

				$current_period_end = new DateTime;  
				$current_period_end->modify( '+8 day' );
				$current_period_end = $current_period_end->format('Y-m-d H:i:s'); 

		    	$sql = "UPDATE `account` SET current_period_end = ? WHERE accountid = ?";
				$result1 = $conn->prepare($sql); 
				$result1->execute(array($current_period_end, $accountid)); 
				 
				$SendEmailService = new SendEmailService();
				
				$subject = "SplitWit trial extended!";

				$body = "Your SplitWit trial was supposed to expire today. As a courtesy, we're extending it another 7 days!<br><br>";
				
				$altBody = "Your SplitWit trial was supposed to expire today. We're extending it another 7 days!";

				$SendEmailService -> sendEmail($subject, $body, $altBody, $email);


		    }else{
				
				$sql = "UPDATE `account` SET past_due = '1' WHERE accountid = ?";
				$result1 = $conn->prepare($sql); 
				$result1->execute(array($accountid)); 
				
				//turn off all experiments
				$status = "Not running";
				$sql = "UPDATE `experiment` set status = ? where accountid = ?";
				$result2 = $conn->prepare($sql); 
				$result2->execute(array($status, $accountid));


				//update all snippets for this account (1 snippet per project)
				$sql = "SELECT * FROM `project` WHERE accountid = ?";
				$result3 = $conn->prepare($sql); 
				$result3->execute(array($accountid));
				$rows3 = $result3->fetchAll(PDO::FETCH_ASSOC);
				foreach ($rows3 as $key3 => $value3) {
					$projectid = $value3['projectid'];
			    	$write_snippet_service = new ProjectService();
					$write_snippet_service -> writeSnippetFile(false, false, $projectid);
				}
				
				$SendEmailService = new SendEmailService();
				$subject = "SplitWit account past due";

				$body = "Your SplitWit account is past due. Please login to your account and update your payment information to continue running A/B experiments.<br><br>";
				
				$body .= "A/B testing helps you increase conversion rates and avoid unnecessary risk. <a href='https://www.splitwit.com/blog/'>Check out the SplitWit blog for experiment ideas</a>. Remember, everything is testable!";
				 
				$body .= "<br><br><a href='https://www.splitwit.com/'><img src='https://www.splitwit.com/img/splitwit-logo.png'></a>";

				$altBody = "Your SplitWit account is past due. Please login to your account and update your payment information to continue running A/B experiments. A/B testing helps you increase conversion rates and avoid unnecessary risk. Check out the SplitWit blog for experiment ideas: https://www.splitwit.com/blog/ ";

				$SendEmailService -> sendEmail($subject, $body, $altBody, $email);

		    }
			
		}
	}

}

The “current period end” date is updated each month after the customer is invoiced.

webhook payment success

When the Stripe “payment succeeded” event happens, a webhook triggers our custom end-point code.

function webhookPaymentSuccess(){
	$payload = @file_get_contents("php://input"); 
	$endpoint_secret = "whsec_XXXX";

	$sig_header = $_SERVER["HTTP_STRIPE_SIGNATURE"];
	$event = null;

	try {
	  $event = \Stripe\Webhook::constructEvent(
	    $payload, $sig_header, $endpoint_secret
	  );
	} catch(\UnexpectedValueException $e) {
	  // Invalid payload
	  http_response_code(400); // PHP 5.4 or greater
	  exit();
	} catch(\Stripe\Error\SignatureVerification $e) {
	  // Invalid signature
	  http_response_code(400); // PHP 5.4 or greater
	  exit();
	}
	
	if($event->type == 'invoice.payment_succeeded'){

		$invoice = $event->data->object;
		$customer_id = $invoice['customer'];
		//update their accocunt current_period_end
		$conn = $this->connection;
		$sql = "UPDATE `account` SET  current_period_end = ?, past_due = 0 WHERE billing_customer_id = ?"; 
		$result = $conn->prepare($sql);
		$past_due = false;
		$current_period_end = new DateTime;  
		$current_period_end->modify( '+32 day' );
		$current_period_end = $current_period_end->format('Y-m-d H:i:s'); 
		$result->execute(array($current_period_end, $customer_id));
	}else{
		http_response_code(400);
	    exit();
	}
	
	http_response_code(200);
	// var_dump($payload);
}

Although there is a webhook available for payment failure, the scheduled cron job handles that scenario.

If a user decides to cancel their subscription, we use their Stripe subscription ID and update their account records.

function cancelSubscription(){
	include '/var/www/html/service-layer/project-service.php';
	$conn = $this->connection;
	if(isset($_SESSION['userid'])){
		$accountid = $_SESSION['userid'];
	}else{
		die("No userid found.");
	}
	
	if(strlen($accountid)>0){
		
		$sql = "SELECT * FROM `account` WHERE accountid = ?"; 
		$result = $conn->prepare($sql); 
		$result->execute(array($accountid));
		$row = $result->fetch(PDO::FETCH_ASSOC);
	}
	$stripe_subscription_id = $row['stripe_subscription_id'];
	$subscription = \Stripe\Subscription::retrieve($stripe_subscription_id);
	$subscription->cancel();
	
	//#TODO: We should let the cron job handle this, so the user gets the rest of their month's service.
	//turn off experiments and update snippets. clear stripe IDs. set current_period_end to yesterday. set past_due = 1
	$current_period_end   = new DateTime;  
	$current_period_end->modify( '-1 day' );
	$current_period_end = $current_period_end->format('Y-m-d H:i:s'); 
	$sql = "UPDATE `account` SET billing_customer_id = '', stripe_subscription_id = '', past_due = 1, current_period_end = ? WHERE accountid = ?"; 
	$result = $conn->prepare($sql); 
	$result->execute(array($current_period_end, $accountid));

	//turn off all experiments
	$status = "Not running";
	$sql = "UPDATE `experiment` set status = ? where accountid = ?";
	$result2 = $conn->prepare($sql); 
	$result2->execute(array($status, $accountid));

	//update all snippets for this account (1 snippet per project)
	$sql = "SELECT * FROM `project` WHERE accountid = ?";
	$result3 = $conn->prepare($sql); 
	$result3->execute(array($accountid));
	$rows3 = $result3->fetchAll(PDO::FETCH_ASSOC);
	foreach ($rows3 as $key3 => $value3) {
		$projectid = $value3['projectid'];
    	$write_snippet_service = new ProjectService();
		$write_snippet_service -> writeSnippetFile(false, false, $projectid);
	}

	$this->status = "complete";
}

Being able to charge money for your web based software is an important step in building a SAAS business. Using a Stripe as your payment infrastructure makes it easy. Build stuff that people love and you can get paid to do it!

Update

I recently integrated Stripe payments for one of my apps, BJJ Tracker. I used version 13.0.0 of Stripe’s PHP library, which requires a slightly different code syntax. For this use-case I only needed to create a one-time payment instead of a subscription. I was able to create a charge on the fly, and did not need to create a “product” in the Stripe dashboard:

$stripe = new \Stripe\StripeClient('sk_test_XXX');
$customer = $stripe->customers->create([
	'email' => $_SESSION['email'],
	'source' => $stripe_token
]);
$charge = $stripe->charges->create([
	'amount' => 1000,
	'currency' => 'usd',
	'description' => 'BJJ Tracker',
	'customer' => $customer->id,
]);

$sql = "UPDATE `users` SET paid = ?, customer_id = ? WHERE ID = ?"; 
$result = $conn->prepare($sql);
 
$result->execute(array($charge->id, $customer->id, $_SESSION['userid']));


Visual Website Editor in PHP

visual editor in php

Tools for non-programmers to manage websites are growing in demand. No-code solutions increase bandwidth. Many SaaS products promise marketers and project managers a way to get things done without a developer. A visual website editor baked into an app is an important technology for digital product builders. The ability for a software service to interact with a client’s website can be a critical selling point.

SplitWit A/B Testing is an example of a web app that had that requirement. It lets user specify an existing website and displays it in an editor window. The user can then click on elements, make changes, and add new content. Those changes are actually applied to the live website by a JavaScript snippet. This post explains how it was built using PHP and jQuery.

Showing the website via iFrame

Displaying an already existing website on your app is easy with an iFrame. But, since users should be able to view and edit any page they choose, challenges arise. If a non-SSL URL is used (http:// instead of https://), the editor app will throw a “mixed-content warning”. If the page has X-FRAME-OPTIONS set to DENY, then the request will fail. To get around these issues I load an internal page into the iFrame that contains all of the DOM code from the one specified.

var pageIframe = $('<iframe id="page-iframe" style="" src="/page-to-edit.php?baseUrl='+baseUrl+'&url=<?php echo $url; ?>"></iframe>').appendTo(".page-iframe-wrapper");

The page to be edited is entered into an input field.  That 3rd party webpage’s URL is passed along to my internal “page-to-edit.php” as a query parameter. From there, I get its full code using PHP Simple HTML DOM Parser. You’ll notice that I also pass along a “base url” – which is the root domain of the page. I’m able to grab it using JavaScript.

<?php
$url = "";
if(isset($_GET['url']) && strlen($_GET['url']) > 0){
  $url = $_GET['url'];
}
?>
function removeSubdirectoryFromUrlString(url, ssl){
  
  var ssl = ssl || false;
  if(url.indexOf("https://")){
    ssl = true;
  }

  url = url.replace("http://", "");
  url = url.replace("https://", "");
  var pathArray = url.split("/")
  url = pathArray[0];
  if(ssl){
    url = "https://" + url;
  }else{
    url = "http://" + url;
  }

  return url;
}

var url = "<?php echo $url; ?>";
var ssl = false;
var pageIframe;
 
if(url.length > 0){

  if(url.indexOf("https:") !== -1){
    ssl = true
  }
   
  var baseUrl = removeSubdirectoryFromUrlString(url, ssl);
  if(baseUrl.slice(-1) !== "/"){
    baseUrl = baseUrl + "/";
  }
}

I need to append that to any assets (images, scripts, etc.) that use relative references – or else they won’t load.

<?php 
// Report all errors
error_reporting(E_ALL);
ini_set("display_errors", 1);
require 'simple_html_dom.php';


class HtmlDomParser {
	
	/**
	 * @return \simplehtmldom_1_5\simple_html_dom
	 */
	static public function file_get_html() {
		return call_user_func_array ( '\simplehtmldom_1_5\file_get_html' , func_get_args() );
	}

	/**
	 * get html dom from string
	 * @return \simplehtmldom_1_5\simple_html_dom
	 */
	static public function str_get_html() {
		return call_user_func_array ( '\simplehtmldom_1_5\str_get_html' , func_get_args() );
	}
}

$base_url = $_GET['baseUrl'];
$url = $_GET['url'];
$ch = curl_init();
curl_setopt($ch, CURLOPT_URL, $url);
curl_setopt($ch, CURLOPT_RETURNTRANSFER, TRUE);
curl_setopt($ch, CURLOPT_FOLLOWLOCATION, TRUE);
$html = curl_exec($ch);
$redirectedUrl = curl_getinfo($ch, CURLINFO_EFFECTIVE_URL);
$url = $redirectedUrl;

$parse = parse_url($url);

$base_url = $parse["scheme"] . "://" . $parse["host"];

$html = @HtmlDomParser::file_get_html($url);

if(substr($base_url, 0, 1) == "/"){
    $base_url = substr_replace($base_url ,"",-1);
}

if($html === FALSE) { 
    echo "Sorry, we do not have permission to analyze that website. ";
    return;
}
foreach($html->find('script') as $element){
    $src = $element->src;
    // echo "<script>console.log('starting src: ".$src."')</script>";
    
    if (strlen($src) > 0 && strpos($src, '//') === false){
        if(substr($src, 0, 1) !== "/"){
            $src = "/" . $src;
        }
        $element->src = $base_url . $src;
    }
    if(strlen($element->integrity) > 0){
        $element->integrity = "";
    }
    // echo "<script>console.log('final src: ".$base_url . $src."')</script>";

    // echo $element->src . "\n";
} 
foreach($html->find('link') as $element){
    $src = $element->href;
    
    if (strlen($src) > 0 && strpos($src, '//') === false){
        if(substr($src, 0, 1) !== "/"){
            $src = "/" . $src;
        }
        $element->href = $base_url . $src;
    }
    if(strlen($element->integrity) > 0){
        $element->integrity = "";
    }
   
}
foreach($html->find('a') as $element){
    $src = $element->href;
    
    if (strlen($src) > 0 && strpos($src, '//') === false){
        if(substr($src, 0, 1) !== "/"){
            $src = "/" . $src;
        }
        $element->href = $base_url . $src;
    } 
  
}
foreach($html->find('img') as $element){
    $src = $element->src;
    if (strlen($src) > 0 && strpos($src, '//') === false){
        if(substr($src, 0, 1) !== "/"){
            $src = "/" . $src;
        }

        $element->src = $base_url . $src;
    } 
   
}
foreach($html->find('source') as $element){
    $src = $element->srcset;
    $sources = explode(",",$src);
    $src = trim($sources[0]);

    if (strlen($src) > 0 && strpos($src, '//') === false){
        if(substr($src, 0, 1) !== "/"){
            $src = "/" . $src;
        }

        $element->srcset = $base_url . $src;
    } 
}

echo $html;

?>

I check against five different element types for assets that could need to be updated: <script>, <link>, <a>, <img>, and <source>. In version 1.0, I had missed the <link> and <source> elements.

Now that I was able to load any website into my editor UI, I had to think about layout. I split the screen in half, having the right side display the website, and the left side showing editor options.
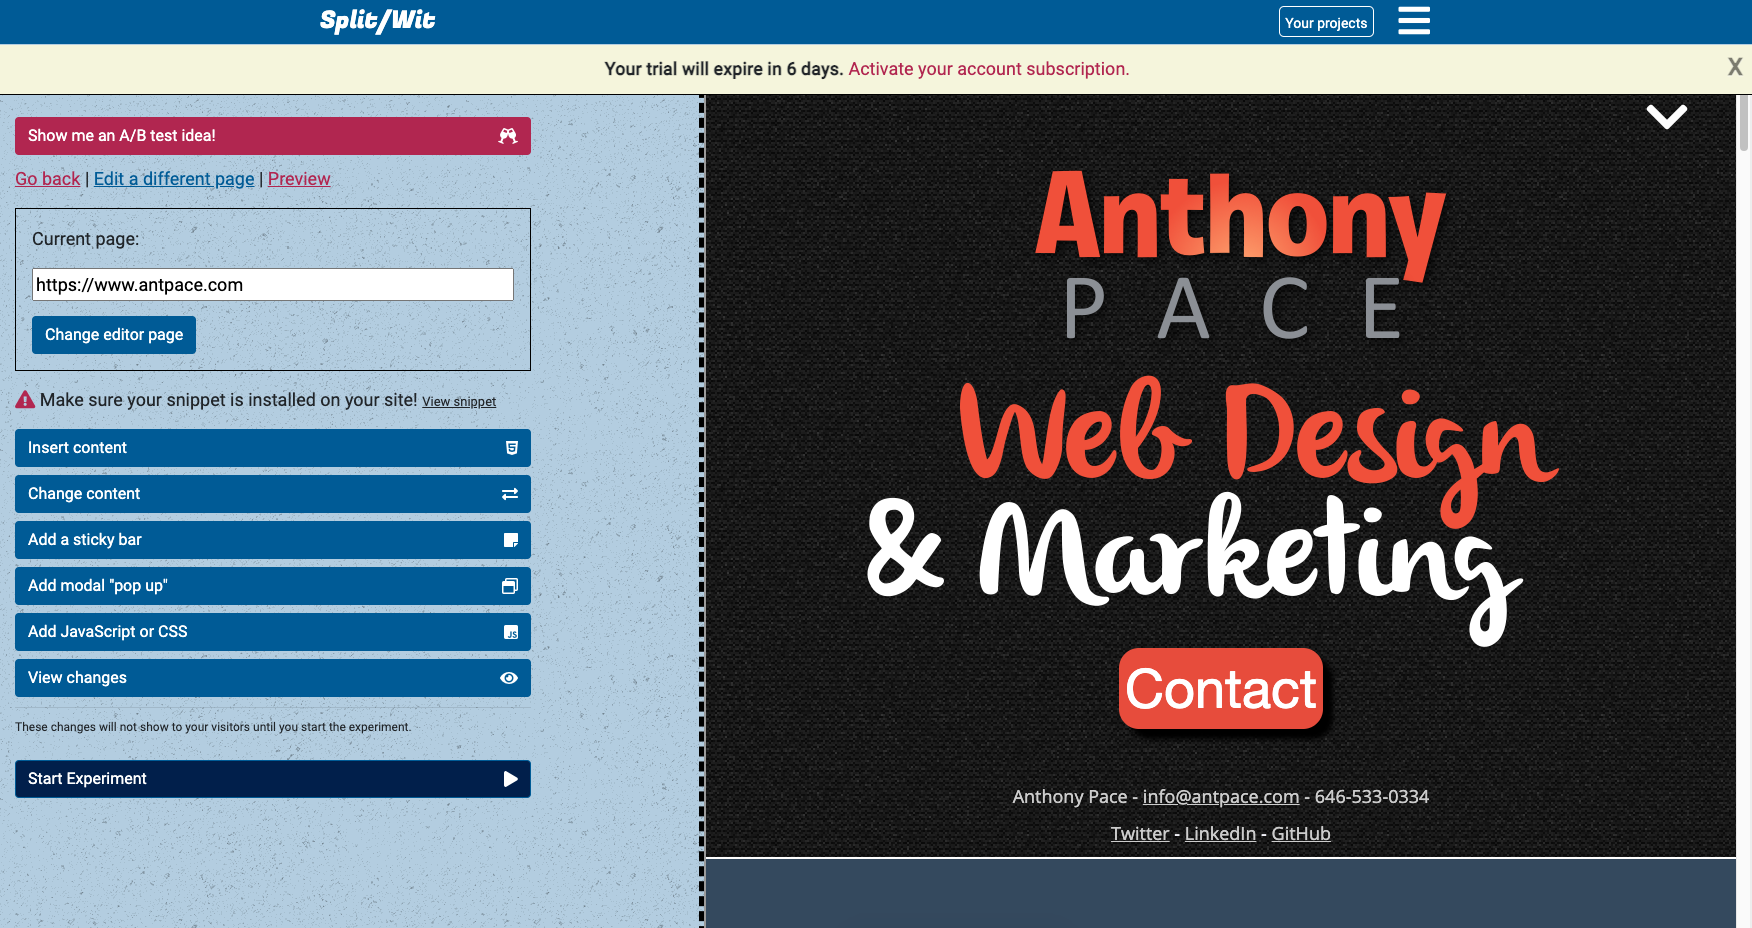
visual website editor

Update: Eventually, I noticed that some pages were not loading properly. I found it to be two issues: a security error & a permission-denied response. The security error was a PHP problem. The permission-denied (401) response was due to server settings. Some sites don’t want to be accessed by bots and try to ensure that an actual user is making the request. I was able to fix it by passing context settings to the ‘file_get_html’ method.

$arrContextOptions=array(
    "ssl"=>array(
        "verify_peer"=>false,
        "verify_peer_name"=>false,
    ),
    "http" => array(
        "header" => "User-Agent: Mozilla/5.0 (Windows NT 10.0; WOW64) AppleWebKit/537.36 (KHTML, like Gecko) Chrome/50.0.2661.102 Safari/537.36"
    )
); 
$html = file_get_html($url, false, stream_context_create($arrContextOptions));

Element selection

Page-clicks in the editor window need to be intercepted to stop links from being followed and any other actions from happening. Instead, any thing clicked is selected by the editor and its details shown in the options panel.
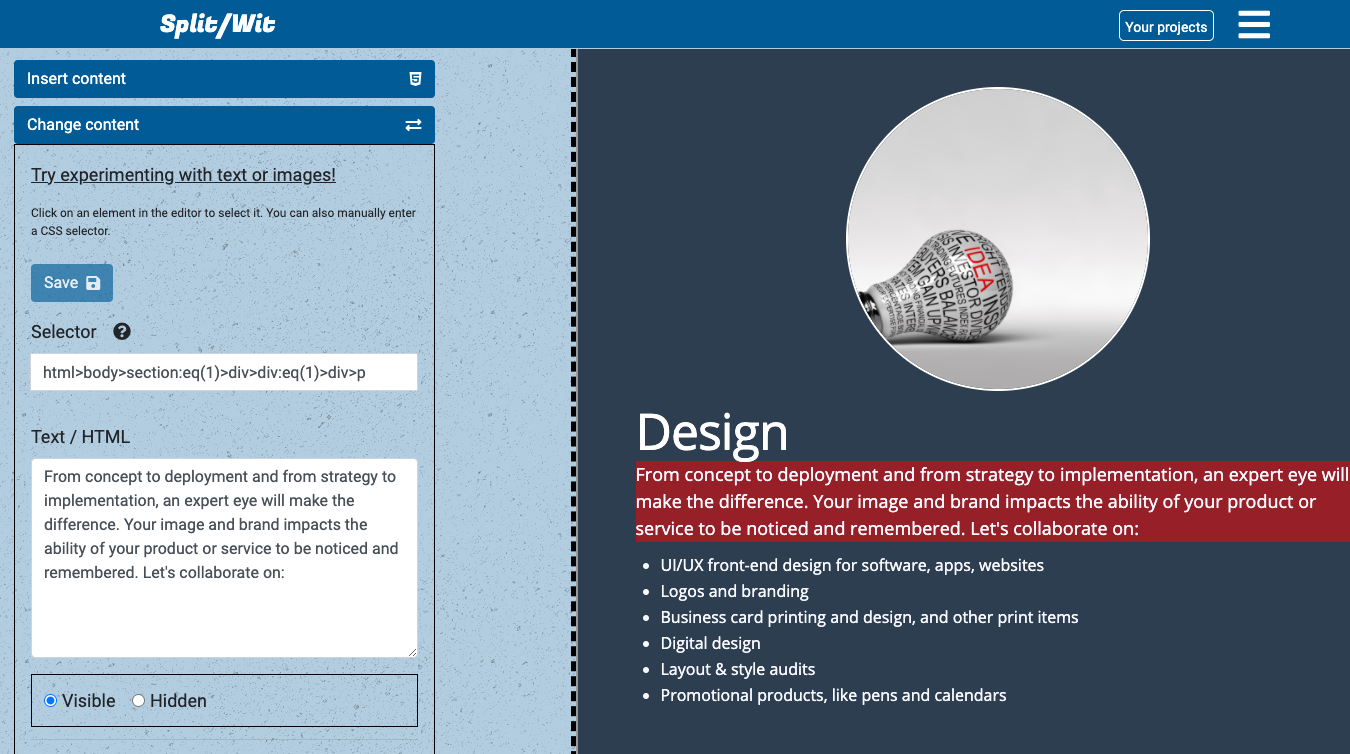
highlight element selected

As elements are moused over, a semi-transparent red highlight is applied as a visual cue. It is achieved by injecting CSS into the iFrame and adding mouseenter and mouseout event listeners.

pageIframe.on('load', function(){
    var style = "<style>.highlighted{background-color:rgba(255, 0, 0, 0.5);} </style>";         
    pageIframe.contents().find("body").prepend(style);
     
    pageIframe.contents().find("body *").mouseenter(function(){
	$(this).addClass('highlighted'); 
    }).mouseout(function(){
	$(this).removeClass('highlighted');   
    });

});

When something is clicked, normal functionality is stopped by using the web browser’s preventDefault() method. Once the element is grabbed (using the this keyword), we want to be sure that we’re as deep into the DOM tree as possible. That way, our “Text / HTML” content won’t contain unnecessary code tags.

To do so, we use a while loop to iterate an arbitrary number of times. Eight iterations seems to be the number that gets us to the heart of any selected content, without taking too much time.

First, we check if the element has any child nodes – if it does, we grab the first one. If that node happens to be a <style> or <script> tag, we move onto the second instead. As long as that new node is not a formatting element (<strong>, <em>, etc.), we set it as the new element before continuing our loop.

testSelectorEl = $(this);
var i = 8;
while(i > 0){
	if ( $(testSelectorEl).children().length > 0 ) {
	  nextEl = $(testSelectorEl).find(">:first-child");
	  if(nextEl.is( "style" ) || nextEl.is( "script" ) || nextEl.is( "noscript" )){
	     nextEl = $(testSelectorEl).find(">:nth-child(2)");
	  }
	  if ( !nextEl.is( "u" ) && !nextEl.is( "i" ) && !nextEl.is( "strong" ) && !nextEl.is( "em" )) {
	    testSelectorEl = nextEl;
	  }
	}
	i--;
}

The above code is added to the click event listener on all elements within the iFrame. Next, below that code, we determine a unique CSS selector by which we can later reference the element. This is important for writing any changes to the JavaScript snippet to effect changes on the 3rd-party website.

var node = testSelectorEl;
var path = "";
while (node.length) {
  var realNode = node[0], name = realNode.localName;
  if (!name) break;
  name = name.toLowerCase();

  var parent = node.parent();

  var siblings = parent.children(name);
  if (siblings.length > 1) { 
      name += ':eq(' + siblings.index(realNode) + ')';
  }

  path = name + (path ? '>' + path : '');
  node = parent;
}
var value = path;
$(".selector-input").val(value);

The final iFrame on-load function looks like this:

var url = "<?php echo $url; ?>";
var ssl = false;
var pageIframe;
 
if(url.length > 0){

  if(url.indexOf("https:") !== -1){
    ssl = true
  }
   
  var baseUrl = removeSubdirectoryFromUrlString(url, ssl);
  if(baseUrl.slice(-1) !== "/"){
    baseUrl = baseUrl + "/";
  }

  var style = "<style>.highlighted{background-color:rgba(255, 0, 0, 0.5);} </style>";


  var pageIframe = $('<iframe id="page-iframe" style="" src="/new-page-to-edit.php?baseUrl='+baseUrl+'&url=<?php echo $url; ?>"></iframe>').appendTo(".page-iframe-wrapper");
     
  pageIframe.on('load', function(){

    pageIframe.contents().find("body").prepend(style);
       
    pageIframe.contents().find("body *").mouseenter(function(){

      $(this).addClass('highlighted'); 

      testSelectorEl = $(this);
        
    }).mouseout(function(){

      $(this).removeClass('highlighted');   

    }).click(function(e){

      e.preventDefault();
      e.stopPropagation();
      
      //dig deeper down the dom
      var i = 8;
      while(i > 0){
        if ( $(testSelectorEl).children().length > 0 ) {
          nextEl = $(testSelectorEl).find(">:first-child");
          if(nextEl.is( "style" ) || nextEl.is( "script" ) || nextEl.is( "noscript" )){
             nextEl = $(testSelectorEl).find(">:nth-child(2)");
          }
          if ( !nextEl.is( "u" ) && !nextEl.is( "i" ) && !nextEl.is( "strong" ) && !nextEl.is( "em" )) {
            testSelectorEl = nextEl;
          }
        }
        i--;
      }
      
      var node = testSelectorEl;
      var path = "";
      while (node.length) {
          var realNode = node[0], name = realNode.localName;
          if (!name) break;
          name = name.toLowerCase();

          var parent = node.parent();

          var siblings = parent.children(name);
          if (siblings.length > 1) { 
              name += ':eq(' + siblings.index(realNode) + ')';
          }

          path = name + (path ? '>' + path : '');
          node = parent;
      }
      var value = path;
                
      $(".selector-input").val(value); //for html insert section (redundant for change element section)
      if(! $(".insert-html-wrap").is(':visible')){
        selectNewElement(value); // prepare editor options        
        $(".page-editor-info").offset().top; //scroll user to selector input
      }
      return false;
    });

   
   //make sure images load   
   pageIframe.contents().find("img").each(function(){
      var src = $(this).attr("src");
      if(src && src.length > 0 && src.indexOf("//") == -1){  //if not absolute reference
        if(src.charAt(0) !== "/"){
          src = "/" + src;
        }
        $(this).attr("src", baseUrl + src);
      }
   });
   
   //make sure links aren't followed  
   pageIframe.contents().find("a").each(function(){
      var href = $(this).attr("href");
      $(this).attr("href", "");
      $(this).attr("data-href", href);
   });

   pageIframe.contents().find("body").attr("style", "cursor: pointer !important");
    
   $(".loading-iframe").hide();

  }); //page-iframe load
   
}else{
  //no URL found
   $(".loading-iframe").hide();
}

Lastly, we prepare the editor options panel. This involves setting the original content for the selected element and removing any newly added features (modals, sticky-bars) that were not saved.

Editor Options

After an element is clicked its content and style properties are loaded into the editor panel. The original values are stored in memory. As users edit values a change indicator icon is revealed and the right-panel editor view is updated in real time.

var testSelectorEl;
var testSelectorElPath = "";
var testSelectorElHtml = "";
var testSelectorElImage = "";
var testSelectorElLink = "";
var originalVisibilityState = "";
var originalValues = [];
originalValues['height'] = "";
originalValues['width'] = "";
originalValues['margin'] = "";
originalValues['padding'] = "";
originalValues['border'] = "";
originalValues['font-family'] = "";
originalValues['font-weight'] = "";
originalValues['font-style']= "";
originalValues['text-decoration'] = "";
originalValues['background'] = "";
originalValues['css'] = "";
originalValues['classes'] = "";

$(".html-input").keyup(function(){
    var value = $(this).val();  
    if (value !== testSelectorElHtml){
      $(this).parent().find(".change-indicator").show();
    }else{
      $(this).parent().find(".change-indicator").hide();
    }

    if($(".change-indicator").is(":visible")){
      $(".element-change-save-btn").removeAttr("disabled");
    }else{
      $(".element-change-save-btn").attr("disabled", "disabled");
    }

    var selector = $(".selector-input").val();
    var iFrameDOM = $("iframe#page-iframe").contents()
    iFrameDOM.find(selector).html(value);
    
  });

Besides changing existing elements, new ones can also be added. The “insert content” section, also based on selecting an element, lets users add new text, html, or images before or after whatever has been clicked. In both sections, the CSS selector can also be manually typed (instead of clicking). Adding or editing images is handled by a custom built image upload gallery that leverages AWS S3 and PHP.
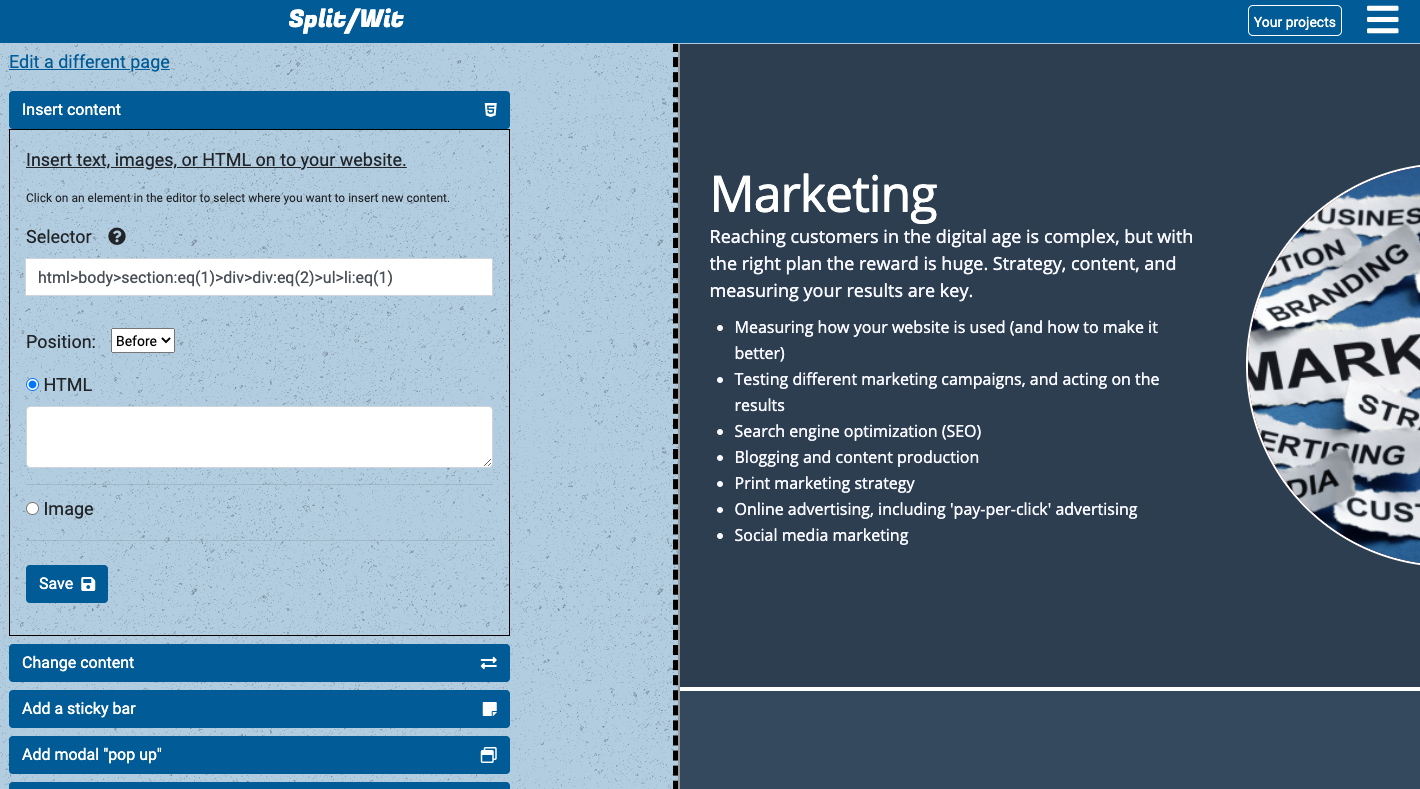
insert content

Out-of-the-box elements, such as sticky bars and modals, can also be added with a few clicks and configurations. The HTML and CSS for those are pre-built, with variables for any options that may be set. Any changes made are saved to the database in relation to the user account, project, experiment, and variation.

function addSticky(){
	$conn = $this->connection;
	$accountid = $this->accountid;
	$variationid = $_GET['variationid'];
	$experimentid = $_GET['experimentid'];
	$text = $_POST['text'];
	$color = $_POST['color'];
	$background = $_POST['background'];
	$position = $_POST['position'];
	$linkurl = $_POST['linkurl'];

	$insertStatement = "INSERT INTO `variationchange` (accountid, variationid, experimentid, selector, changetype, changecode, content) VALUES (:accountid, :variationid, :experimentid, :selector, :changetype, :changecode, :content)";
	$changetype = "stickybar";
	$selector = "body";

	$link_opening = "";
	$link_closing = "";

	if(strlen($linkurl) > 0){
		$link_opening = "<a style='color:".$color."' href='".$linkurl."'>";
		$link_closing = "</a>";
	}

	$sticky_html = "<div style='font-weight:bold;".$position.":0;position:fixed;z-index:100000;left:0px;text-align:center;padding:8px 20px;width:100%;background:".$background.";color:".$color."' id='splitwit-sticky'><p style='margin:0px'>".$link_opening.$text.$link_closing."</p></div>";

	$changecode = '$("body").append("'.$sticky_html.'")';

	$stmt = $conn->prepare($insertStatement);	
	$stmt->bindParam(':accountid', $accountid);
	$stmt->bindParam(':variationid', $variationid);
	$stmt->bindParam(':experimentid', $experimentid);
	$stmt->bindParam(':selector', $selector);
	$stmt->bindParam(':changetype', $changetype);
	$stmt->bindParam(':changecode', $changecode);
	$stmt->bindParam(':content', $text);
	$stmt->execute();	

	$this->writeSnippetFile($variationid);
}
		

Writing changes to the snippet

Every project has a unique JavaScript file that users must add to their webpage. The file is hosted by SplitWit, so website owners only need to copy/paste a snippet. The WordPress and Shopify plugins automatically add the snippet, making it even more friendly to non-developers.

Each project may contain multiple experiments with their own changes, metrics, variations, and conditions. After the data is produced by a SQL join statement, it is massaged into a nested object and parsed in JSON. That JavaScript output is concatenated to the necessary libraries and helper functions.

function writeSnippetFile($variationid=false, $experimentid=false, $projectid=false){
	
	$conn = $this->connection;
	$variationid = $variationid || false;
	$experimentid = $experimentid || false;
	
	if(isset($_GET['variationid'])){
		$variationid = $_GET['variationid'];
	}
	if(isset($_GET['experimentid'])){
		$experimentid = $_GET['experimentid'];
	}


	if($variationid){
		$variationid = $_GET['variationid'];
		$sql = "SELECT experiment.projectid FROM `variation` right join `experiment` on variation.experimentid = experiment.experimentid WHERE variationid = ?"; 
		$result = $conn->prepare($sql); 
		$result->execute(array($variationid));
		$experiment_row = $result->fetch(PDO::FETCH_ASSOC);
	}elseif($experimentid){
		$experimentid = $_GET['experimentid'];
		$sql = "SELECT projectid FROM `experiment` WHERE experimentid = ?"; 
		$result = $conn->prepare($sql); 
		$result->execute(array($experimentid));
		$experiment_row = $result->fetch(PDO::FETCH_ASSOC);
	}
	
	if(!$projectid){
		$projectid = $experiment_row['projectid'];
	}

	$sql = "SELECT experiment.experimentid, experiment.status, experimentcondition.experimentconditionid, variation.variationid, variationchange.variationchangeid, variationchange.changecode, variation.css, variation.javascript, experimentcondition.url, experimentcondition.matchtype, experimentcondition.conditiontype, metric.metricid, metric.type, metric.input, metric.urlmatch FROM `experiment` left join `metric` on metric.experimentid = experiment.experimentid join `experimentcondition` on experimentcondition.experimentid = experiment.experimentid join `variation` on variation.experimentid = experiment.experimentid left join `variationchange` on variationchange.variationid = variation.variationid WHERE experiment.projectid = ?"; 
	
	// echo "<br />"."variationid: ".$variationid . "<br />";
	// echo "<br />"."experimentid: ".$experimentid . "<br />";
	// echo "<br />"."projectid: ".$projectid . "<br />";

	// $this->status = "SQL: " . $sql;
	$result = $conn->prepare($sql); 
	$result->execute(array($projectid));
	 
	$experiment_row = $result->fetchAll(PDO::FETCH_ASSOC);
	 
	//turn flat array, into a nested one
	$endResult = array();
	foreach($experiment_row as $row){
	    if (!isset($endResult[$row['experimentid']])){
	        $endResult[$row['experimentid']] = array(
	            'experimentid' => $row['experimentid'],
	            'status' => $row['status'],
	            'conditions' => array(),
	            'variations' => array(),
	            'metrics' => array()
	        );
	    }

	    if (!isset($endResult[$row['experimentid']]['conditions'][$row['experimentconditionid']])){
		    $endResult[$row['experimentid']]['conditions'][$row['experimentconditionid']] = array(
		        'experimentconditionid' => $row['experimentconditionid'],
		        'url' => $row['url'],
		        'matchtype' => $row['matchtype'],
		        'conditiontype' => $row['conditiontype']
		    );
		}

	    if (!isset($endResult[$row['experimentid']]['variations'][$row['variationid']])){
		    $endResult[$row['experimentid']]['variations'][$row['variationid']] = array(
		        'variationid' => $row['variationid'],
		        'javascript' => $row['javascript'],
		        'css' => $row['css'],
		        'changes' => array()
		    );
		}

	    if (!isset($endResult[$row['experimentid']]['variations'][$row['variationid']]['changes'][$row['variationchangeid']])){
		   	$endResult[$row['experimentid']]['variations'][$row['variationid']]['changes'][$row['variationchangeid']] = array(
		        'variationchangeid' => $row['variationchangeid'],
		        'changecode' => $row['changecode']
		    );
		}

	    if (!isset($endResult[$row['experimentid']]['metrics'][$row['metricid']])){
		    $endResult[$row['experimentid']]['metrics'][$row['metricid']] = array(
		        'metricid' => $row['metricid'],
		        'type' => $row['type'],
		        'input' => $row['input'],
		        'urlmatch' => $row['urlmatch']
		    );
		}
		
	}

	$json_output = json_encode($endResult);
	// echo $json_output;
	// get snippet file name.
	$sql = "SELECT snippet from `project` where projectid=?";
	$result = $conn->prepare($sql); 
	$result->execute(array($projectid));
	$projectrow = $result->fetch(PDO::FETCH_ASSOC);
	$filename = $projectrow['snippet'];
	// echo $filename;
	$snippet_template = file_get_contents("/var/www/html/snippet/snippet-template.min.js");
	// concat json to snippet template. write file			
	$myfile = fopen("/var/www/html/snippet/".$filename, "w") or die("Unable to open file!");
	//if there are any animation changes, include the necessary library.
	$txt = "";
	if(strpos($json_output, "addClass('animated") !== false){
		$txt .= 'var head=document.getElementsByTagName("head")[0],link=document.createElement("link");link.rel="stylesheet";link.type="text/css";link.href="https://www.splitwit.com/css/animate.min.css";link.media="all";head.appendChild(link); ';
	}
	$txt .= "window.splitWitExperiments = ".$json_output . "\n" . $snippet_template;
	
	fwrite($myfile, $txt) or die("Unable to save file!");

	fclose($myfile);

	//if this project is for a shopify app, we need to update the snippet cache
	$update_snippet_url = "https://www.splitwit.com/service-layer/shopify-app-service.php?method=updateSnippetScriptTag&projectid=".$projectid;
	$params = [];
	$curl_update_snippet = $this->curlApiUrl($update_snippet_url, $params);

}

One of the helper functions is a method that checks if the current URL matches the experiment’s conditions to run on:

function testUrl(testurl, conditions){
	
	if(testurl.search(/(?:[a-z0-9](?:[a-z0-9-]{0,61}[a-z0-9])?\.)+[a-z0-9][a-z0-9-]{0,61}[a-z0-9]/) < 0){
		console.log("no domain")
		return window.inputError($(".test-url-input"), "Please test a valid URL.");
	}
	var valid = false;

	for (i = 0; i < conditions.length; i++) { 
		 var url = conditions[i].url;
		 var matchtype = conditions[i].matchtype;
		 var conditiontype = conditions[i].conditiontype;

		 //exact match
		 if(matchtype == "exact" && conditiontype == "target" && url == testurl){
		 	valid = true;
		 }
		 if(matchtype == "exact" && conditiontype == "exclude" && url == testurl){
		 	valid = false;
		 }

		 //basic match
		 if(matchtype == "basic"){
		 	//strip off querystring, hashtags, protocols, and www from url and testurl - then compare
		 	var cleanTestUrl = testurl.toLowerCase();
		 	var cleanUrl = url.toLowerCase();

		 	if (cleanTestUrl.indexOf("?") > 0) {
					cleanTestUrl = cleanTestUrl.substring(0, cleanTestUrl.indexOf("?"));
				}
		 	if (cleanUrl.indexOf("?") > 0) {
					cleanUrl = cleanUrl.substring(0, cleanUrl.indexOf("?"));
				}
		 	if (cleanTestUrl.indexOf("&") > 0) {
					cleanTestUrl = cleanTestUrl.substring(0, cleanTestUrl.indexOf("&"));
				}
		 	if (cleanUrl.indexOf("&") > 0) {
					cleanUrl = cleanUrl.substring(0, cleanUrl.indexOf("&"));
				}
		 	if (cleanTestUrl.indexOf("#") > 0) {
					cleanTestUrl = cleanTestUrl.substring(0, cleanTestUrl.indexOf("#"));
				}
		 	if (cleanUrl.indexOf("#") > 0) {
					cleanUrl = cleanUrl.substring(0, cleanUrl.indexOf("#"));
				}
				cleanTestUrl = cleanTestUrl.replace(/^(?:https?:\/\/)?(?:www\.)?/i, "");
				cleanUrl = cleanUrl.replace(/^(?:https?:\/\/)?(?:www\.)?/i, "");
				cleanTestUrl = cleanTestUrl.replace(/\/$/, "");
				cleanUrl = cleanUrl.replace(/\/$/, ""); //remove trailing slash

				// console.log(cleanTestUrl);
				// console.log(cleanUrl);
				if(conditiontype == "target" && cleanUrl == cleanTestUrl){
					valid = true;
				}
				if(conditiontype == "exclude" && cleanUrl == cleanTestUrl){
					valid = false;
				}

		 }
		 
		 //substring match
		 if(matchtype == "substring"){
		 	if(testurl.includes(url) && conditiontype == "target"){
					valid = true;
		 	}
		 	if(testurl.includes(url) && conditiontype == "exclude"){
					valid = false;
		 	}
		 }
		 
	} //end conditions loop
	
	$(".test-url-msg").hide();		
	if(valid){
		$(".valid-msg").fadeIn();
	}else{
		$(".invalid-msg").fadeIn();
	}

}

While the snippet code is specific to this use-case (experimental A/B UI changes), the visual editor can be used in a variety of other contexts. You can look through more of the code I used in this GitHub repository I created.
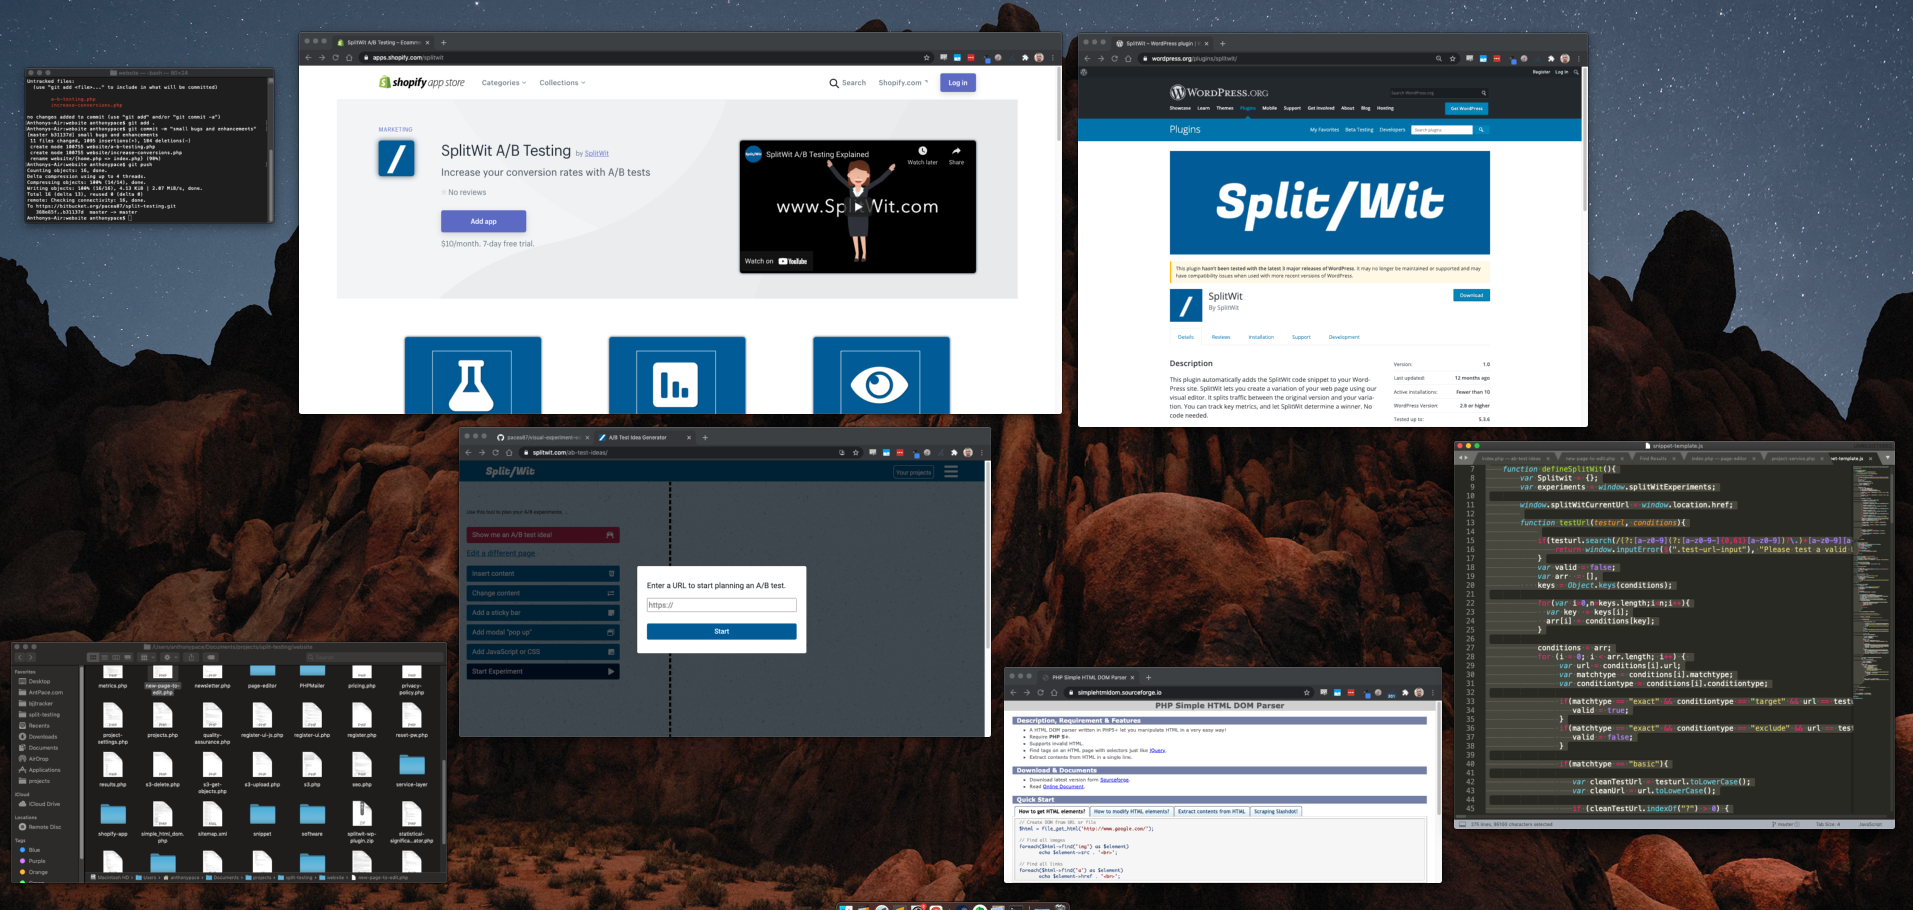
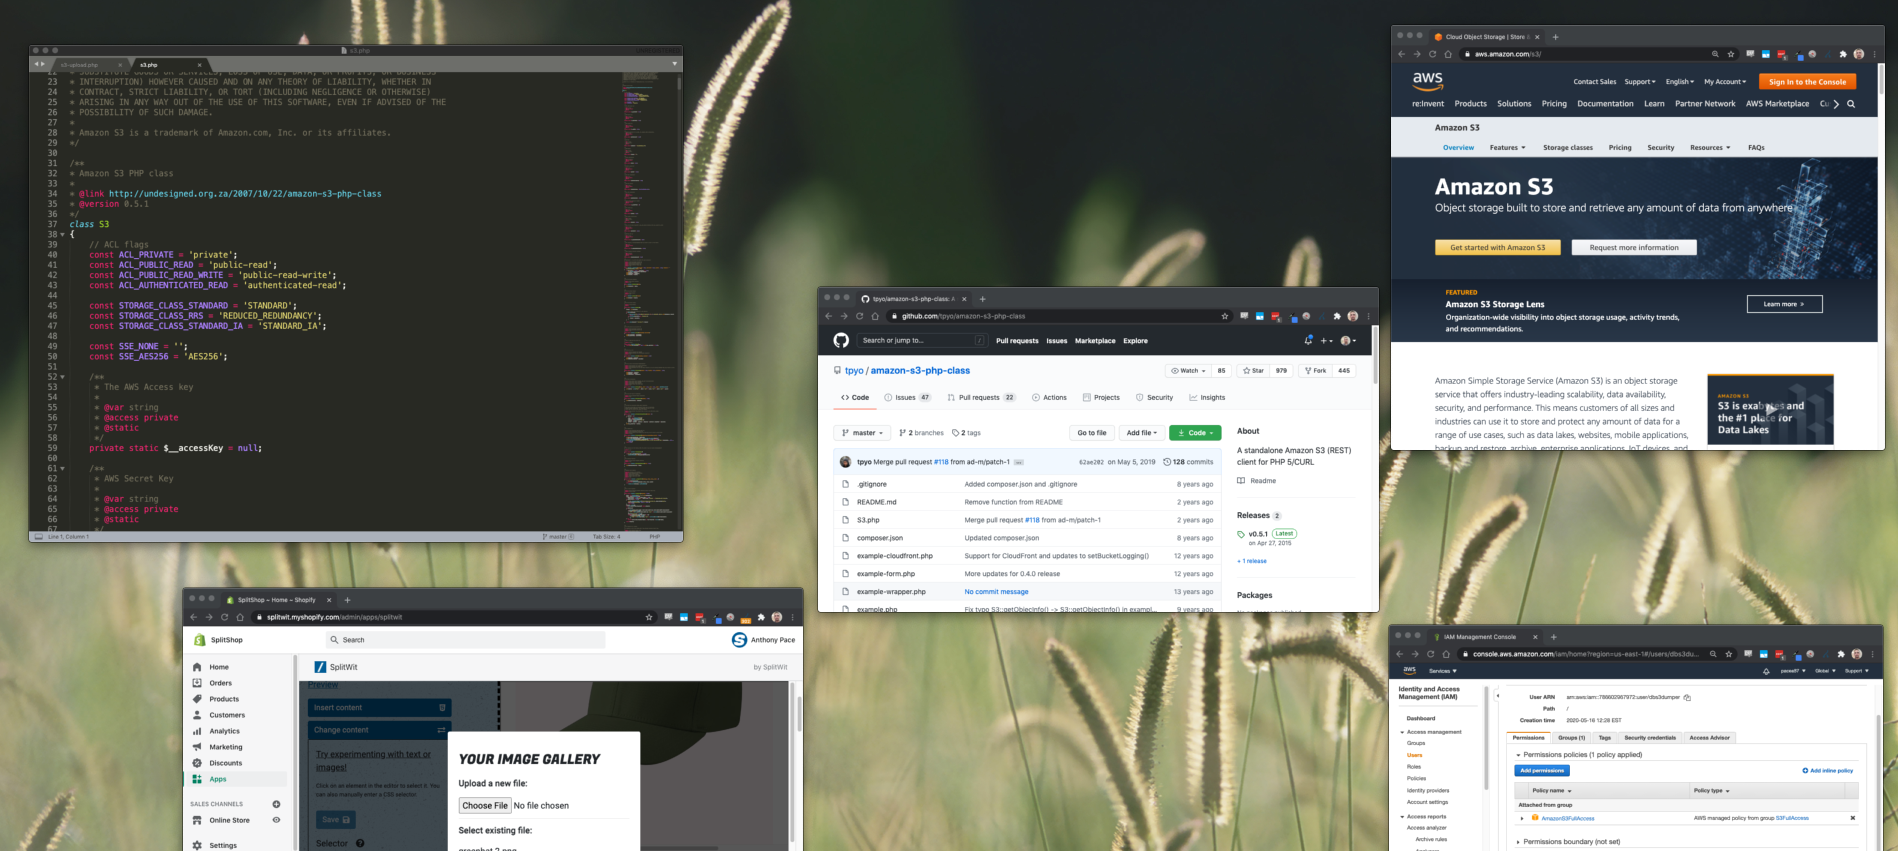
Build an image upload gallery

media gallery upload with s3

Allowing users to upload images to your app can be a pivotal feature. Many digital products rely on it. This post will show you how to do it using PHP and AWS S3.

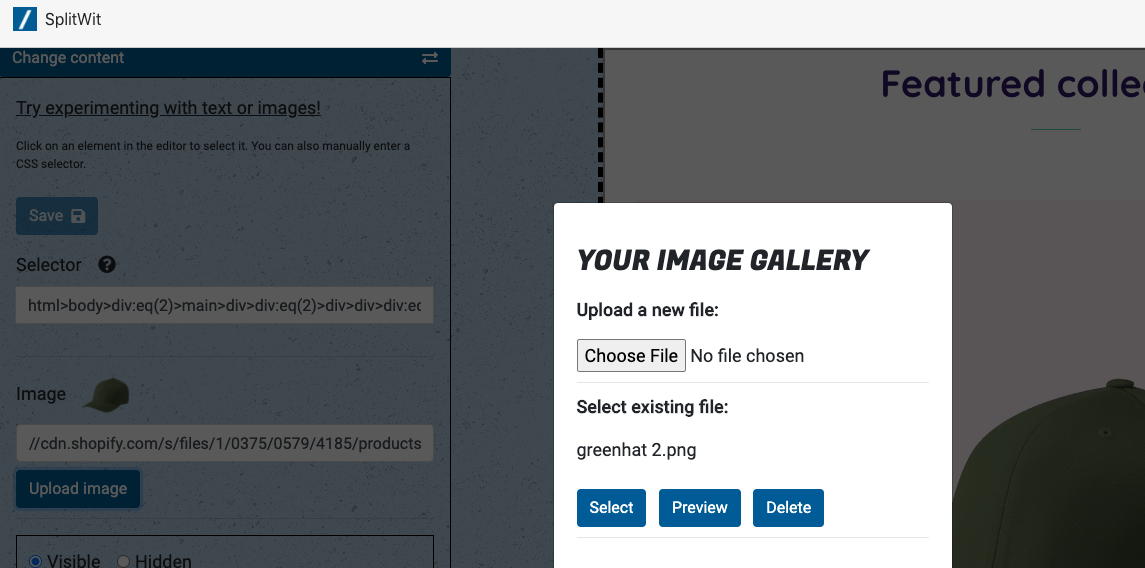
image upload gallery

After launching version 1.0 of SplitWit, I decided to enhance the platform by adding features. An important A/B experiment involves swapping images. This is particularly useful on ecommerce stores that sell physical products.

Originally, users could only swap images by entering a URL. To the average website owner, this would seem lame. For SplitWit to be legit, adding images on the fly had to be a feature.

I wrote three scripts – one to upload files, one to fetch them, and one to delete them. Each leverages a standalone PHP class written by Donovan Schönknecht, making it easy to interact with AWS S3. All you’ll need is your S3 bucket name and IAM user credentials. The library provides methods to do everything you need.

AWS S3

Amazon S3 stands for “simple storage service”. It provides data storage that is scalable, secure, highly available, and performant.

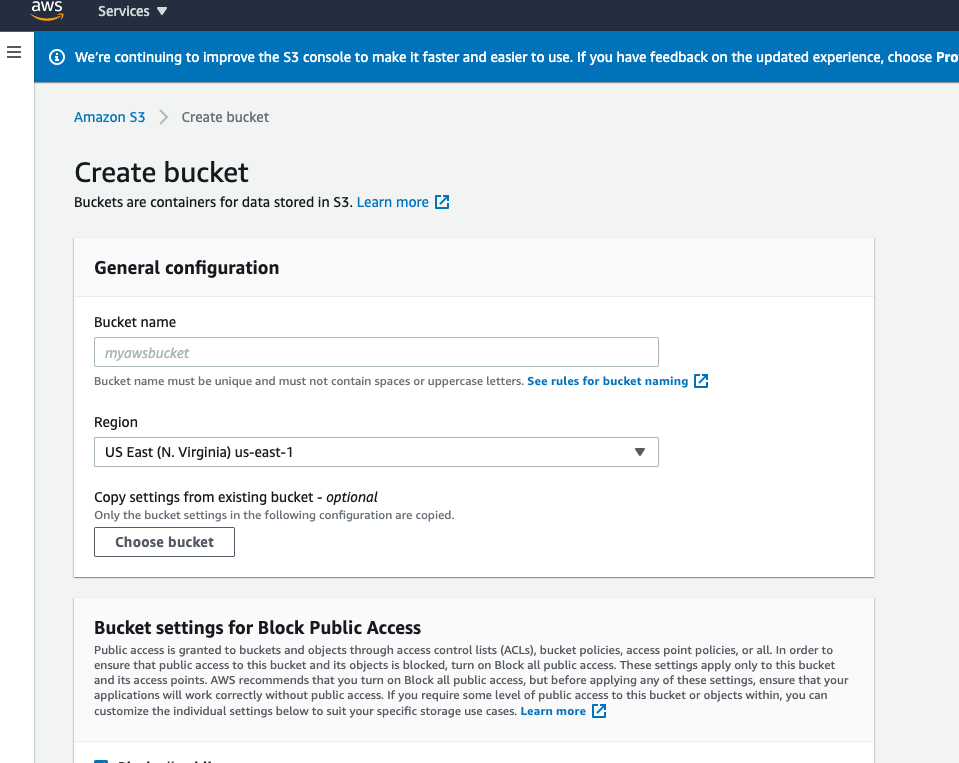
A new bucket can be created directly from the management console.

create new s3 bucket

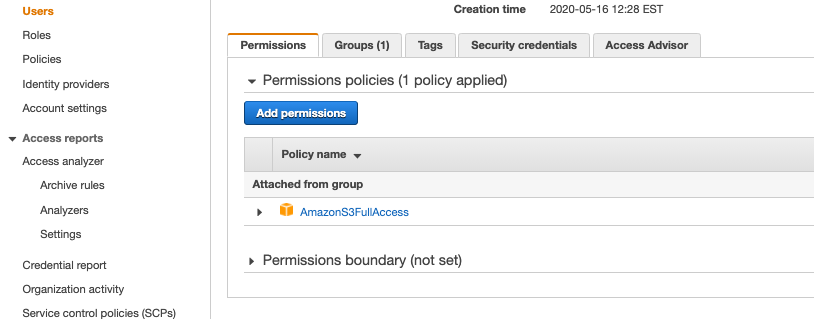
You’ll want to create a new IAM user to programmatically interact with this bucket. Make sure that new user is added to a group that includes the permission policy “AmazonS3FullAccess”. You can find the access key ID and secret in the “Security credentials” tab.

IAM user in AWS with permissions for S3

Uploading image files

When users select an image in the visual editor, they are shown a button to upload a new file. Clicking on it opens the gallery modal.

<div id="image-gallery-modal" class="modal image-gallery-modal" style="display: none;">
  <div class="modal-content">
    <h3>Your image gallery</h3>
    <p><strong>Upload a new file:</strong></p>
    <input class="uploadimage" id="uploadimage" type="file" name="uploadimage" />
    <p class="display-none file-error"></p>
    <div><hr /></div>
    <div class="image-gallery-content"></div>
    <p class="loading-images"><i class="fas fa-spinner fa-spin"></i> Loading images...</p>
  </div>
</div>

The HTML file-type input element presents a browser dialog to select a file. Once selected, the image data is posted to the S3 upload script. The newly uploaded image then replaces the existing image in the visual editor. 

$(".uploadimage").change(function(){
    
    var file = $(this)[0].files[0];   
    var formData = new FormData();
    formData.append("file", file, file.name);
    formData.append("upload_file", true);         

    $.ajax({
      type: "POST",
      url: "/s3-upload.php",
      xhr: function () {
        var myXhr = $.ajaxSettings.xhr();
        if (myXhr.upload) {
            // myXhr.upload.addEventListener('progress', that.progressHandling, false);
        }
        return myXhr;
      },
      success: function (response) {
        console.log(response);
        
        document.getElementById("uploadimage").value = "";

        if(response !== "success"){
          $(".file-error").text(response).show();
          setTimeout(function(){ $(".file-error").fadeOut();}, 3000)
          return;
        }
        
        $("#image-gallery-modal").hide();
        loadS3images();
        var newImageUrl = "https://splitwit-image-upload.s3.amazonaws.com/<?php echo $_SESSION['userid'];?>/" + file.name;
        $("input.img-url").val(newImageUrl);
        $(".image-preview").attr("src", newImageUrl).show();
        $(".image-label .change-indicator").show();

        //update editor (right side)
        var selector = $(".selector-input").val();
        var iFrameDOM = $("iframe#page-iframe").contents()
        if($(".element-change-wrap").is(":visible")){
          iFrameDOM.find(selector).attr("src", newImageUrl).attr("srcset", "");
          $(".element-change-save-btn").removeAttr("disabled");
        }
        if($(".insert-html-wrap").is(":visible")){
          var position = $(".position-select").val();
          var htmlInsertText = "<img style='display: block; margin: 10px auto;' class='htmlInsertText' src='"+newImageUrl+"'>";
          iFrameDOM.find(".htmlInsertText").remove();
          if(position == "before"){
            iFrameDOM.find(selector).before(htmlInsertText);
          }
          if(position == "after"){
            iFrameDOM.find(selector).after(htmlInsertText);
          }
        }
      },
      error: function (error) {
        console.log("error: ");
        console.log(error);
      },
      async: true,
      data: formData,
      cache: false,
      contentType: false,
      processData: false,
      timeout: 60000
  });

});

The upload script puts files in the same S3 bucket, under a separate sub-directory for each user account ID. It checks the MIME type on the file to make sure an image is being uploaded.

<?php
require 's3.php';
 
$s3 = new S3("XXXX", "XXXX"); //access key ID and secret

// echo "S3::listBuckets(): ".print_r($s3->listBuckets(), 1)."\n";

$bucketName = 'image-upload';

if(isset($_FILES['file'])){
	$file_name = $_FILES['file']['name'];   
	$uploadFile = $_FILES['file']['tmp_name']; 

	if ($_FILES['file']['size'] > 5000000) { //5 megabyte
     	   echo 'Exceeded filesize limit.';
     	   die();
    	}
    	$finfo = new finfo(FILEINFO_MIME_TYPE);
	if (false === $ext = array_search(
	        $finfo->file($uploadFile),
	        array(
	            'jpg' => 'image/jpeg',
	            'png' => 'image/png',
	            'gif' => 'image/gif',
	        ),
	        true
	    )) {
	    	if($_FILES['file']['type'] == ""){
	    		echo 'File format not found. Please re-save the file.';
	    	}else{
		    	echo 'Invalid file format.';
		    }
     	    die();
	 }

	//create new directory with account ID, if it doesn't already exist
	session_start();
	$account_id = $_SESSION['userid'];

	if ($s3->putObjectFile($uploadFile, $bucketName, $account_id."/".$file_name, S3::ACL_PUBLIC_READ)) {
		echo "success";
	}

}
?>

After upload, the gallery list is reloaded by the loadS3images() function.

Fetching image files from S3

When the image gallery modal first shows, that same loadS3images() runs to populate any images that have been previously uploaded.

function loadS3images(){

  $.ajax({
      url:"/s3-get-objects.php",
      complete: function(response){
        gotImages = true;
        $(".loading-images").hide();
        var data = JSON.parse(response.responseText);
        var x;
        var html = "<p><strong>Select existing file:</strong></p>";
        var l = 0;
        for (x in data) {
          l++;
          var name = data[x]["name"];
          nameArr = name.split("/");
          name = nameArr[1];
          var imgUrl = "https://splitwit-image-upload.s3.amazonaws.com/<?php echo $_SESSION['userid'];?>/" + name;
          html += "<div class='image-data-wrap'><p class='filename'>"+name+"</p><img style='width:50px;display:block;margin:10px;' src='' class='display-none'><button type='button' class='btn select-image'>Select</button> <button type='button' class='btn preview-image'>Preview</button> <button type='button' class='btn delete-image'>Delete</button><hr /></div>"
        }
        if(l){
          $(".image-gallery-content").html(html);
        }

      }
    });
}

It hits the “get objects” PHP script to pull the files in the account’s directory.

<?php
require 's3.php';
 
$s3 = new S3("XXX", "XXX"); //access key ID and secret

$bucketName = 'image-upload';
session_start();
$account_id = $_SESSION['userid'];
$info = $s3->getBucket($bucketName, $account_id);
echo json_encode($info);

?>

Existing images can be chosen to replace the one currently selected in the editor. There are also options to preview and delete.

Delete an S3 object

When the delete button is pressed for a file in the image gallery, all we need to do is pass the filename along. If the image is currently being used, we also remove it from the editor.

$(".image-gallery-content").on("click", ".delete-image", function() {
    var parent = $(this).parent();
    var filename = parent.find(".filename").text();
    var currentImageUrl = $(".img-url").val();
    if(currentImageUrl =="https://splitwit-image-upload.s3.amazonaws.com/<?php echo $_SESSION['userid'];?>/" + filename){
      $(".img-url").val(testSelectorElImage);
      $(".image-preview").attr("src", testSelectorElImage);
      var selector = $(".selector-input").val();
      var iFrameDOM = $("iframe#page-iframe").contents()
      iFrameDOM.find(selector).attr("src", testSelectorElImage);
    }
    $.ajax({
      method:"POST",
      data: { 
        'filename': filename, 
      },
      url: "/s3-delete.php?filename="+filename,
      complete: function(response){
        parent.remove();
        if(!$(".image-data-wrap").length){
          $(".image-gallery-content").html("");
        }
      }
    })

}); 


<?php
require 's3.php';
 
$s3 = new S3("XXX", "XXX"); //access key ID and secret

$bucketName = 'image-upload';
session_start();
$account_id = $_SESSION['userid'];
$filename = $_POST['filename'];
if ($s3->deleteObject($bucketName, $account_id."/".$filename) ){
	echo "S3::deleteObject(): Deleted file\n";
}

?>


Reset password flow in PHP

reset password


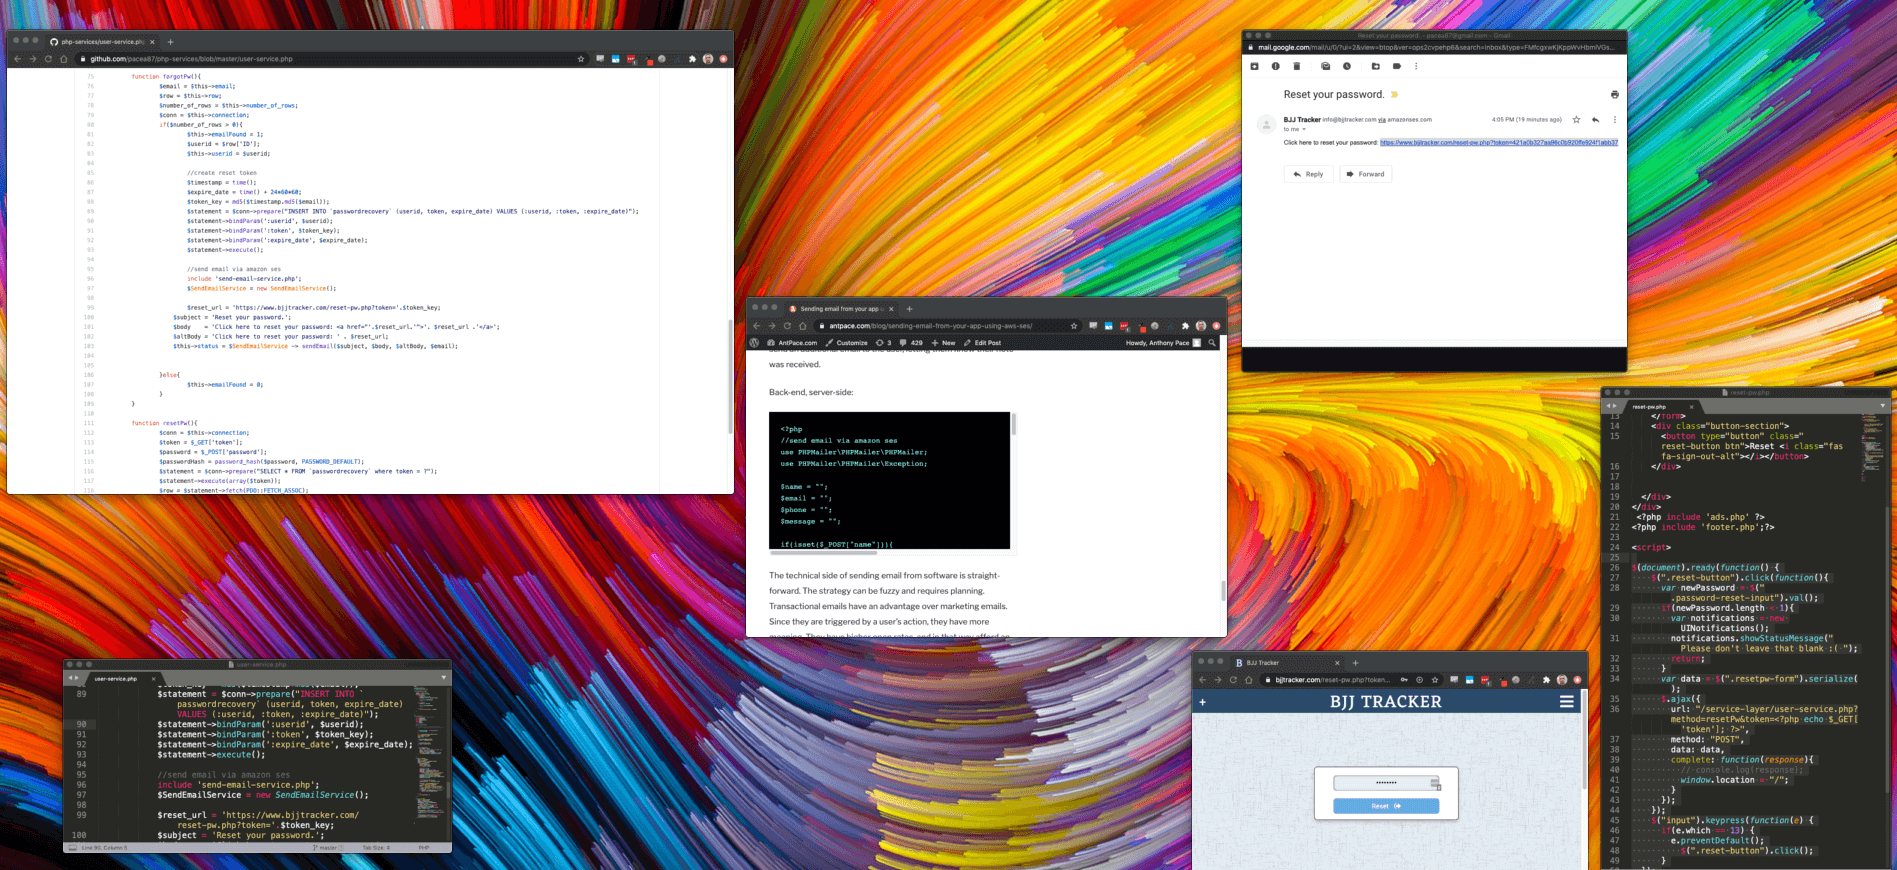
My email account is a skeleton key to anything online I’ve signed up for. If I forget a password, I can reset it. Implementing this feature for a web app takes just a few steps.

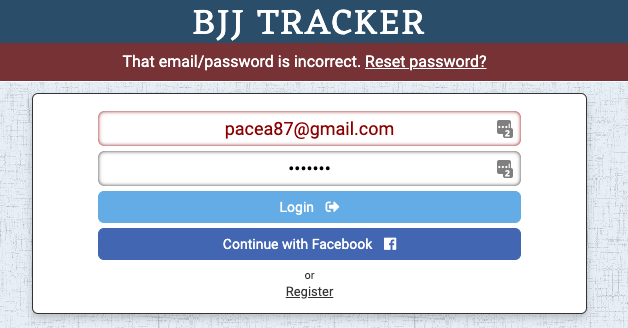
When users enter an incorrect password, I prompt them to reset it.

incorrect password warning

Clicking the reset link calls a “forgot password” back-end service.

$(document).on("click",".reset-pw-cta", function(){
	var email = $(this).attr("data");
	$.ajax({
		url:"/service-layer/user-service.php?method=forgotPw&email="+email,
		complete:function(response){
			console.log(response.responseText)
			window.showStatusMessage("A password reset email as been sent to " + email);
		}
	})
});

A token is created in our ‘password recovery’ database table. That token is related back to an account record.

password recovery database table

As a security practice, recovery tokens are deleted nightly by a cron job.

An email is then sent containing a “reset password” link embedded with the token. AWS SES and PHPMailer is used to send that message.

function forgotPw(){
	$email = $this->email;
	$row = $this->row;
	$number_of_rows = $this->number_of_rows;
	$conn = $this->connection;
	if($number_of_rows > 0){
		$this->emailFound = 1;
		$userid = $row['ID'];
		$this->userid = $userid;

		//create reset token
		$timestamp = time();
		$expire_date = time() + 24*60*60;
		$token_key = md5($timestamp.md5($email));
		$statement = $conn->prepare("INSERT INTO `passwordrecovery` (userid, token, expire_date) VALUES (:userid, :token, :expire_date)");
		$statement->bindParam(':userid', $userid);
		$statement->bindParam(':token', $token_key);
		$statement->bindParam(':expire_date', $expire_date);
		$statement->execute();

		//send email via amazon ses
		include 'send-email-service.php';	
		$SendEmailService = new SendEmailService();

		$reset_url = 'https://www.bjjtracker.com/reset-pw.php?token='.$token_key;
	        $subject = 'Reset your password.';
	        $body    = 'Click here to reset your password: <a href="'.$reset_url.'">'. $reset_url .'</a>';
	        $altBody = 'Click here to reset your password: ' . $reset_url;
	        $this->status = $SendEmailService -> sendEmail($subject, $body, $altBody, $email);


	}else{
		$this->emailFound = 0;
	}
}

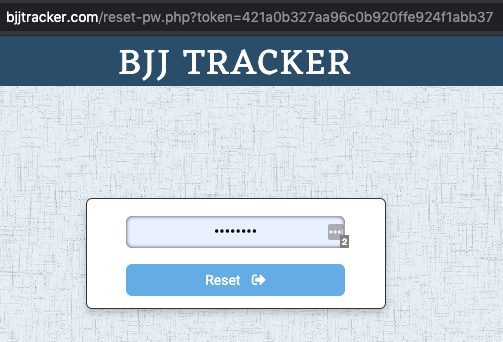
That link navigates to a page with a “reset password” form.

reset password form

Upon submission the new password and embedded token are passed along to the server.

$(document).ready(function() {
    $(".reset-button").click(function(){
      var newPassword = $(".password-reset-input").val();
      if(newPassword.length < 1){
        var notifications = new UINotifications();
        notifications.showStatusMessage("Please don't leave that blank :( ");
        return;
      }
      var data = $(".resetpw-form").serialize();
      $.ajax({
        url: "/service-layer/user-service.php?method=resetPw&token=<?php echo $_GET['token']; ?>",
        method: "POST",
        data: data,
        complete: function(response){
          // console.log(response);
          window.location = "/";
        }
      });
    });
    $("input").keypress(function(e) {
      if(e.which == 13) {
        e.preventDefault();
          $(".reset-button").click();
      }
  });
  

});

The correct recovery record is selected by using the token value. That provides the user ID of the account that we want to update. The token should be deleted once the database is updated.

function resetPw(){
	$conn = $this->connection;
	$token = $_GET['token'];
	$password = $_POST['password'];
	$passwordHash = password_hash($password, PASSWORD_DEFAULT);
	$statement = $conn->prepare("SELECT * FROM `passwordrecovery` where token = ?");
	$statement->execute(array($token));
	$row = $statement->fetch(PDO::FETCH_ASSOC);
	$userid = $row['userid'];

	$update_statement = $conn->prepare("UPDATE `users` SET password = ? where ID = ?");
	$update_statement->execute(array($passwordHash, $userid));

	$delete_statement = $conn->prepare("DELETE FROM `passwordrecovery` where token = ?");
	$delete_statement->execute(array($token));
}

This is a secure and user-friendly workflow to allow users to reset their passwords.

Custom UI notifications

UI feedback alerts

Showing brief notifications to website visitors is an important UI/UX component. They’re useful for providing feedback. They can communicate success, failure, or warnings.

Don Norman (The Design of Everyday Things) mentions that “Feedback is essential, but not when it gets in the way of other things, including a calm and relaxing environment” and goes on to say “Feedback is essential, but it has to be done correctly”.

A common use-case is data validation. Specifically, when logging in or signing up. If the user enters an invalid email address, or wrong login credentials, we need to let them know. The built in browser alert() is clunky and unsophisticated. Plugins are bloated and over-engineered. I wrote some basic HTML, CSS, and JavaScript that gets the job done and looks great.

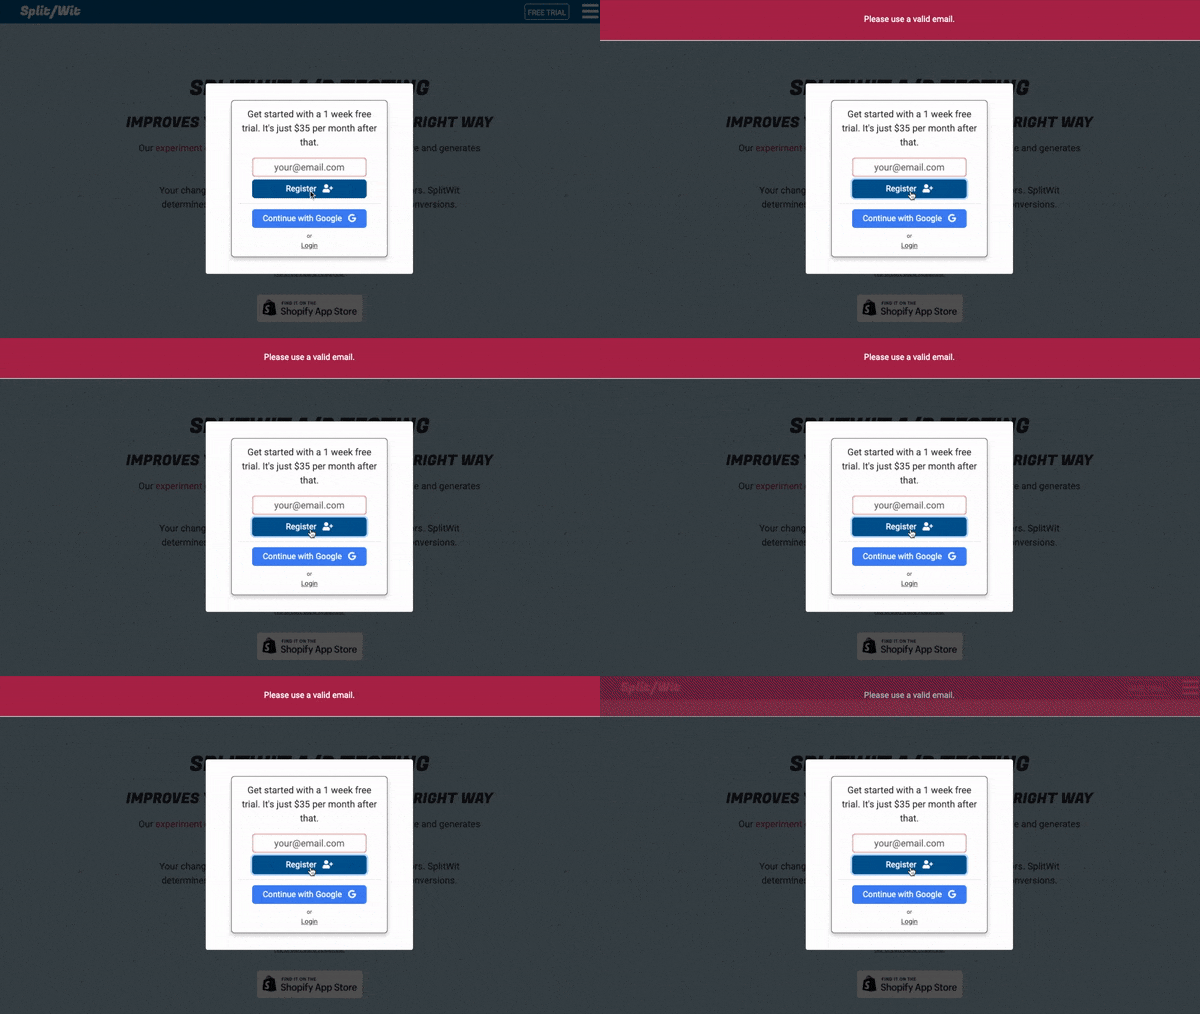
My code provides two versions of the alert. The first is a basic sticky bar that fades in and out at the top of the page.

example of alert message for an invalid email address

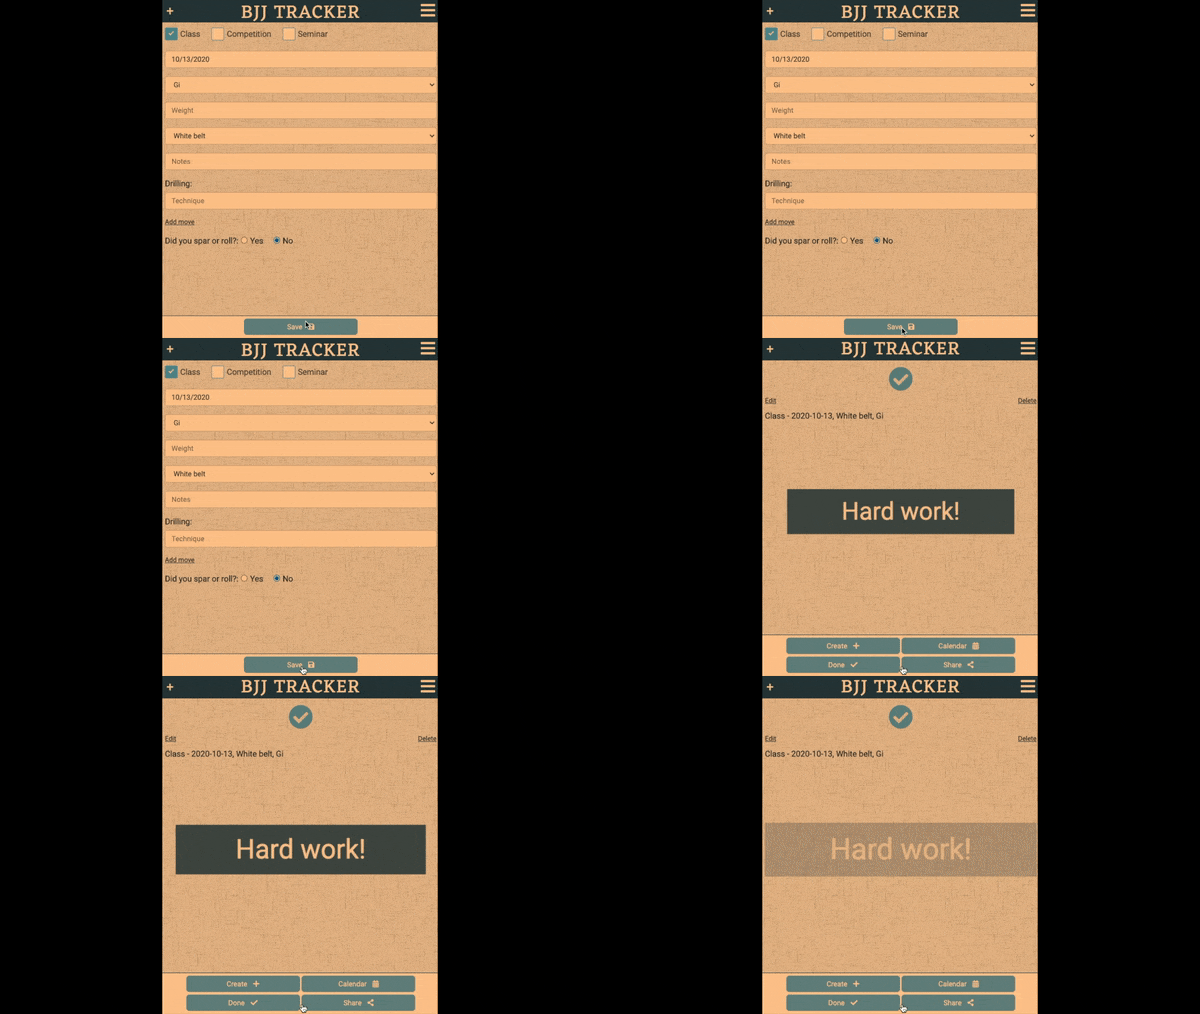
The other flashes in the middle of the screen. I call it “in-your-face” alerts and reserve them for positive success messages.

example of a flashing UI alert to provide positive feedback to users

The CSS adds styles for both versions. Both utilize ‘position: fixed’ to stay in a set location on the page. The “in-your-face” example uses a pulse animation to achieve its effect.

<!-- UI-notifications.css -->
<style>
body{
  margin: 0px;
}
.status-message{
  display: none;
  color: white;
  text-align: center;
  font-size: 16px;
  padding: 8px;
  border-top: 1px solid white;
  border-bottom: 1px solid white;
  position: fixed;
  width: 100%;
  top: 0px;
  padding: 28px 8px;
  background-color: #b12650;
  z-index: 1000;
}
.status-message-inner{
  margin: 0px;
}

.status-message-close{
  cursor: pointer;
  position: fixed;
  right: 10px;
}
.in-your-face{
  display: none;
  position: fixed;
  top: 45%;
  width: 100%;
  text-align: center;
  font-size: 48px;
  color: white;
  z-index: 2;
}
.in-your-face-inner{
    background: #005b96;
    width: 80%;
    margin: 0 auto;
    opacity: .85;
    padding: 10px;
}
@keyframes pulse{
  50%  {transform: scale(1.2);}

}
.pulse{
  animation: pulse 0.5s ease-in infinite;
}
</style>
<!-- end UI-notifications.css -->

The javascript relies on jQuery as a dependency. It is written as a class, with a constructor and two methods. Each method takes message text as a parameter.

class UINotifications {
	constructor() {
		window.jQuery || document.write('<script src="js/vendor/jquery-1.11.2.min.js"><\/script>');
		var statusMessageHtml = '<div class="status-message"><p class="status-message-inner"><span class="status-message-text">Welcome to My App</span><span class="status-message-close">X</span></p></div>';
		var inYourFaceHtml = '<div class="in-your-face pulse"><p class="in-your-face-inner"><span class="in-your-face-text">Great Job!</span></p></div>';

		$(document).on("click", ".status-message-close", function(){
			$(".status-message").fadeOut();
		});

		this.statusMessage = $("<div/>").html(statusMessageHtml);
		this.inYourFace = $("<div/>").html(inYourFaceHtml);
		
		$('body').prepend(this.inYourFace);
		$('body').prepend(this.statusMessage);

	}

 	showStatusMessage(message){
 		var notifications = this;
	  	var message = message || "Default Message"
	  	var statusMessageTimeout;
	  	
		if(notifications.statusMessage.find(".status-message").is(':visible')){
	     clearTimeout(statusMessageTimeout);
	    }

		notifications.statusMessage.find(".status-message .status-message-text").html(message);
		notifications.statusMessage.find(".status-message").fadeIn();
		
	    statusMessageTimeout = setTimeout(function(){
	       notifications.statusMessage.find(".status-message").fadeOut(); 
	    }, 5000)
		
	}
	showInYourFace(message, callback){
		var notifications = this;
		var inYourFaceTimeout;
		var inYourFaceRandoms = ["Good work!", "Hard work!", "Nice job!", "Hustle!"]

		var message = message || inYourFaceRandoms[Math.floor(Math.random()*inYourFaceRandoms.length)];;
		var callback = callback || function(){};

		if(notifications.inYourFace.find(".in-your-face").is(':visible')){
	     clearTimeout(inYourFaceTimeout);
	    }

		notifications.inYourFace.find(".in-your-face .in-your-face-text").html(message);
		notifications.inYourFace.find(".in-your-face").show();
		
	    inYourFaceTimeout = setTimeout(function(){
	       notifications.inYourFace.find(".in-your-face").fadeOut(function(){
	       	callback();
	       }); 

	    }, 1000)
	}
}

This is a simple and lightweight solution to showing web app visitors informative alerts without using a plugin. Please, checkout the code and use it in your next project.

You can find the code on GitHub.

Error establishing connection to database – WordPress solution

solutions for wordpress database errors

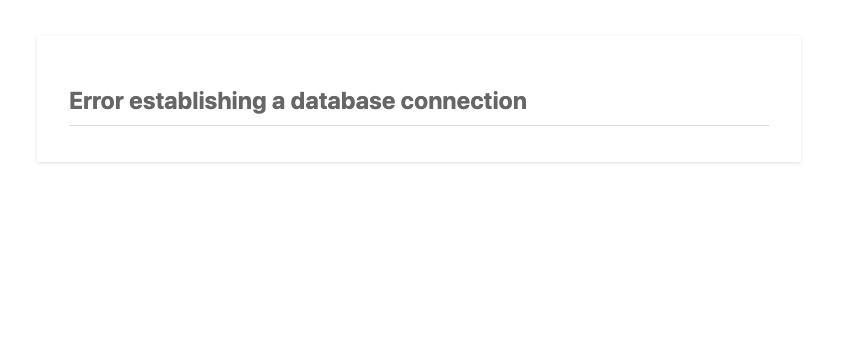
A crashed database is a problem I’ve encountered across multiple WordPress websites. When trying to load the site you’re faced with a dreaded “Error establishing a database connection” message. Restarting the DB service usually clears things up. But, sometimes it won’t restart at all – which is why I started automating nightly data dumps to an S3 bucket.

Recently, one particular site kept going down unusually often. I assumed it was happening due to low computing resources on the EC2 t3.micro instance. I decide to spin up a a new box with more RAM (t3.small) and migrate the entire WordPress setup.

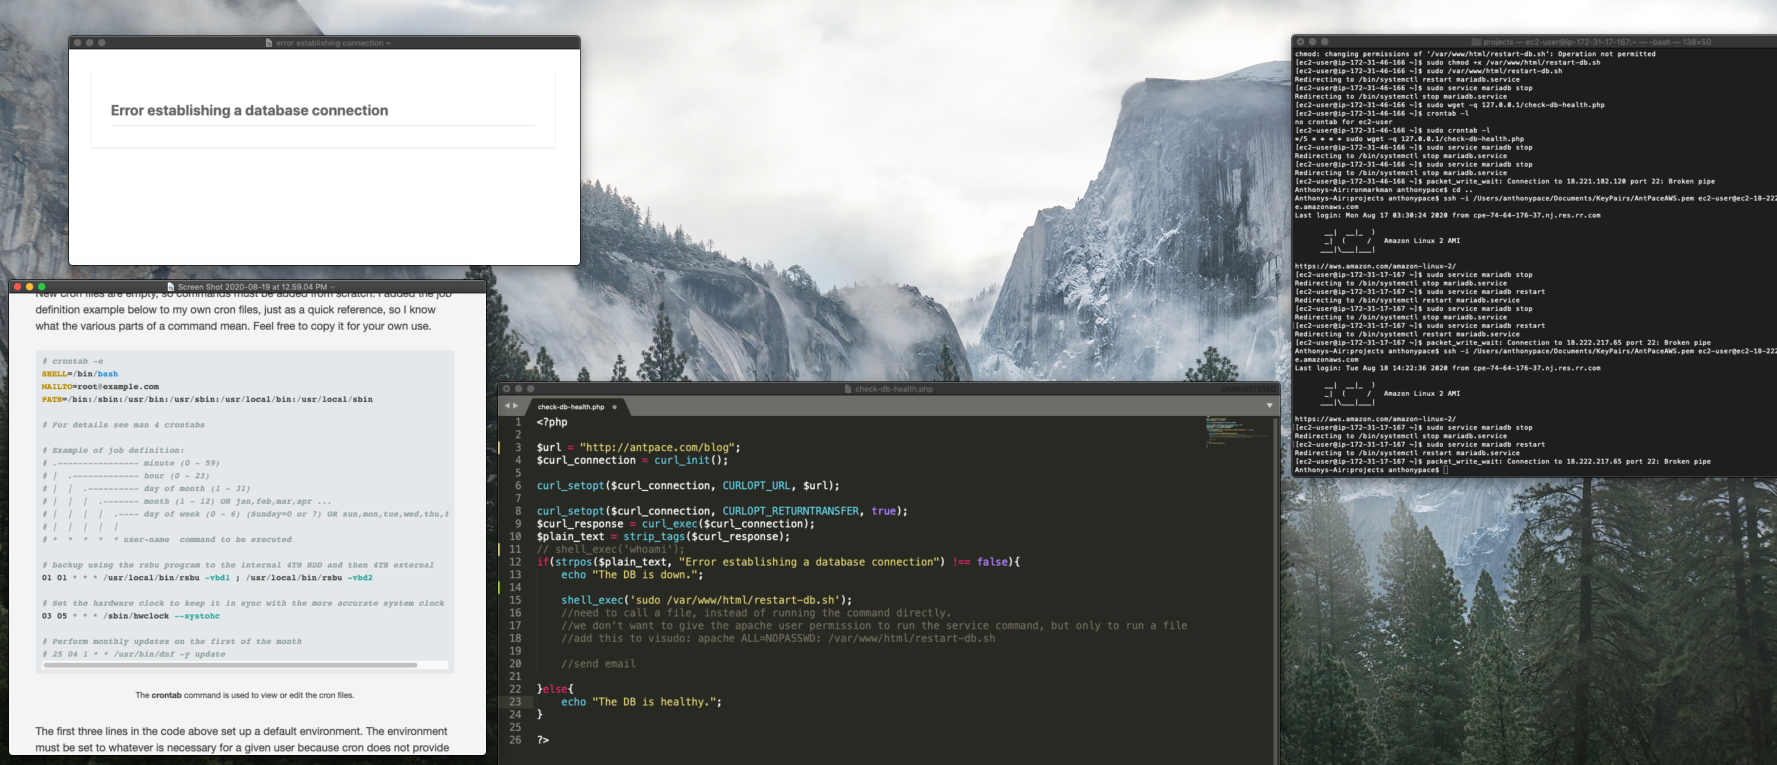
Since I couldn’t be sure of what was causing the issue, I needed a way to monitor the health of my WordPress websites. I decided to write code that would periodically ping the site, and if it is down send an email alert and attempt to restart the database.

warning message when a website can't connect to the database

The first challenge was determining the status of the database. Even if it crashed, my site would still return a 200 OK response. I figured I could use cURL to get the homepage content, and then strip out any HTML tags to check the text output. If the text did match the error message, I could take further action.

Next, I needed to programmatically restart MySql. This is the command I run to do it manually: sudo service mariadb restart 

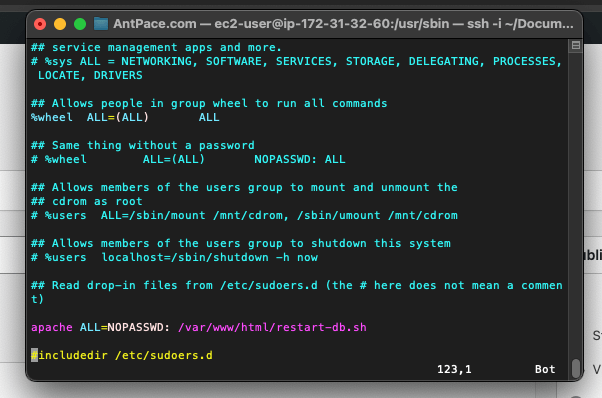
After doing some research, I found that I could use shell_exec() to run it from my PHP code. Unfortunately, Apache wouldn’t let the (non-password using) web server user execute that without special authorization. I moved that command to its own restart-db.sh file, and allowed my code to run it by adding this to the visudo file: apache ALL=NOPASSWD: /var/www/html/restart-db.sh

My visudo file was located at /usr/sbin/visudo. It is a tool found on most Linux systems to safely update the /etc/sudoers file, which is the configuration file for the sudo command. To edit this file, I don’t open it in vim like I would with other editable files. Instead, I run the file as its own command: sudo visudo. Once it is open, you can press the i key to enter “insert” mode. It is considered “safe” because it edits the sudoers file following a strict procedure.

edit the visduo file

I also needed to make the file executable by adjusting permissions: sudo chmod +x /var/www/html/restart-db.sh

Once those pieces were configured, my code would work:

<?php

$url = "https://www.antpace.com/blog/";
$curl_connection = curl_init();

curl_setopt($curl_connection, CURLOPT_URL, $url);

curl_setopt($curl_connection, CURLOPT_RETURNTRANSFER, true);
$curl_response = curl_exec($curl_connection);
$plain_text = strip_tags($curl_response);

if(strpos($plain_text, "Error establishing a database connection") !== false){
	echo "The DB is down.";
        
        //restart the database
        shell_exec('sudo /var/www/html/restart-db.sh');
        
        //send notification email
        include 'send-email.php';
        send_email();
}else{
	echo "The DB is healthy.";
}

?>

You can read more about how to send a notification email in another post that I wrote on this blog.

The contents of restart-db.sh looks like this:

#!/bin/bash

sudo service mariadb restart

Create the cron job

A cron job is a scheduled task in Linux that runs at set times. For my PHP code to effectively monitor the health of the database, it needs to run often. I decided to execute it every five minutes. Below are three shell commands to create a cron job.

The first creates the cron file for the root user:

sudo touch /var/spool/cron/root

The next appends my cron command to that file:

echo "*/5 * * * * sudo wget -q https://www.antpace.com/check-db-health.php" | sudo tee -a /var/spool/cron/root

And, the last sets the cron software to listen for that file:

sudo crontab /var/spool/cron/root

Alternatively, you can create, edit, and set the cron file directly by running sudo crontab -e . The contents of the cron file can be confirmed by running sudo crontab -l .

Pro-tip: If your WordPress site does continually crash, you probably do need to upgrade to an instance with more RAM. Also, consider using RDS for the database.

Update

I previously used the localhost loop back address in my cron file: */5 * * * * sudo wget -q 127.0.0.1/check-db-health.php. After setting up 301 redirects to prevent traffic from hitting my public DNS, that stopped working. It is more reliable to use an explicit domain name URL: */5 * * * * sudo wget -q https://www.antpace.com/check-db-health.php

Migrate a WordPress Site to AWS

Migrate a WordPress site to AWS

In a previous article I discussed launching a website on AWS. The project was framed as transferring a static site from another hosting provider. This post will extend that to migrating a dynamic WordPress site with existing content.

Install WordPress

After following the steps to launch your website to a new AWS EC2 instance, you’ll be able to connect via sFTP. I use FileZilla as my client. You’ll need the hostname (public DNS), username (ec2-user in this example), and key file for access. The latest version of WordPress can be downloaded from wordpress.org. Once connected to the server, I copy those files to the root web directory for my setup: /var/www/html

Make sure the wp-config.php file has the correct details (username, password) for your database. You should use the same database name from the previous hosting environment.

Data backup and import

It is crucial to be sure we don’t lose any data. I make a MySql dump of the current database and copy the entire wp-content folder to my local machine. I’m careful to not delete or cancel the old server until I am sure the new one is working identically.

Install phpMyAdmin

After configuring my EC2 instance, I install phpMyAdmin so that I can easily import the sql file.

sudo yum install php-mbstring -y
sudo systemctl restart httpd
sudo systemctl restart php-fpm
cd /var/www/html
wget https://www.phpmyadmin.net/downloads/phpMyAdmin-latest-all-languages.tar.gz
mkdir phpMyAdmin && tar -xvzf phpMyAdmin-latest-all-languages.tar.gz -C phpMyAdmin --strip-components 1
rm phpMyAdmin-latest-all-languages.tar.gz
sudo systemctl start mariadb

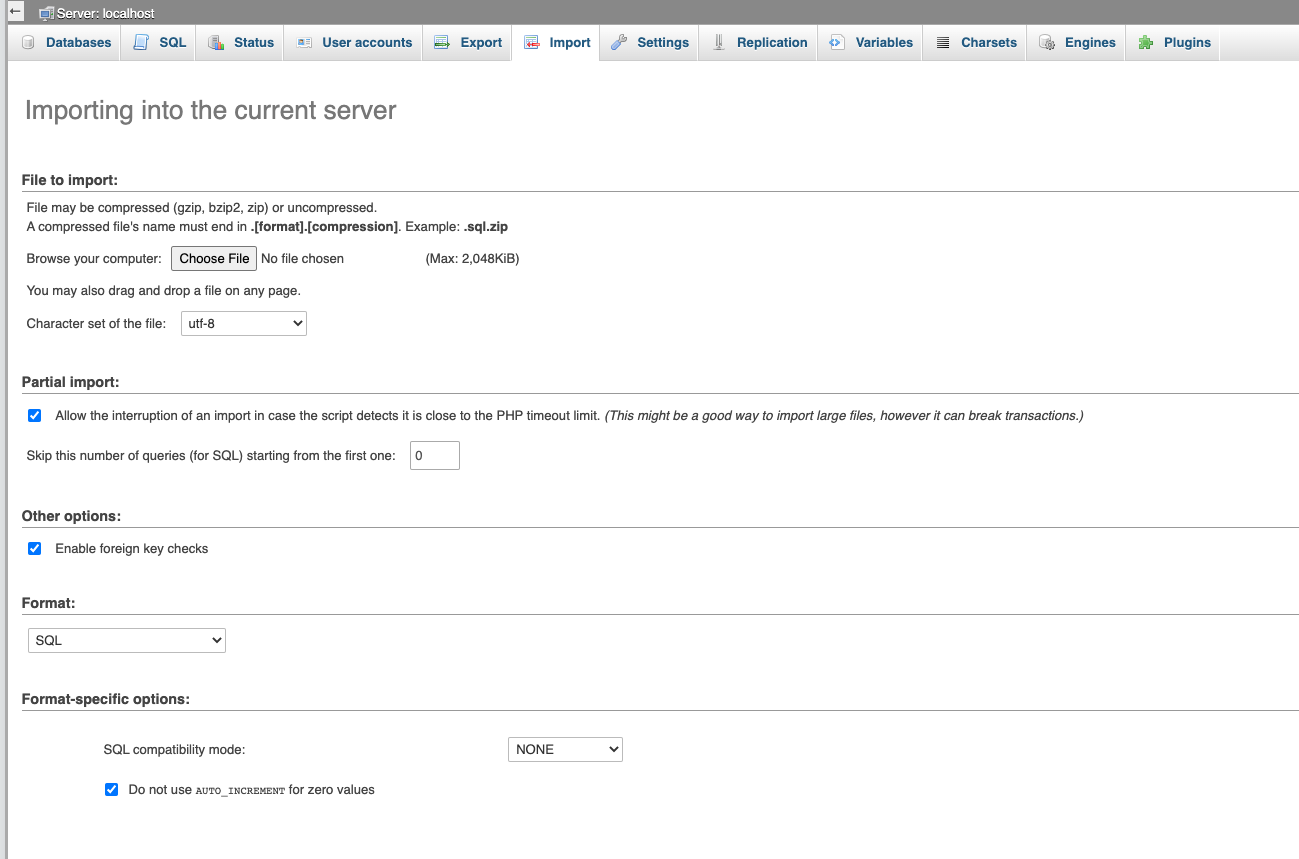
The above Linux commands installs the database management software on the root directory of the new web server. It is accessible from a browser via yourdomainname.com/phpMyAdmin. This tool is used to upload the data to the new environment.

phpMyAdmin import screen

Create the database and make sure the name matches what’s in wp-config.php from the last step. Now you’ll be able to upload your .sql file.

Next, I take the wp-content folder that I stored on my computer, and copy it over to the new remote. At this point, the site homepage will load correctly. You might notice other pages won’t resolve, and will produce a 404 “not found” response. That error has to do with certain Apache settings, and can be fixed by tweaking some options.

Server settings

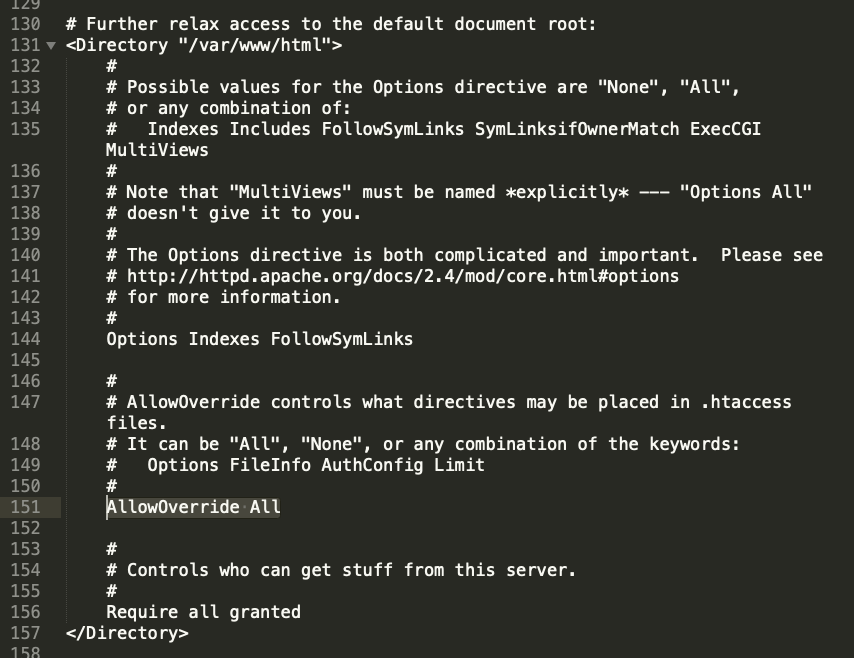
With my setup, I encountered the above issue with page permalinks . WordPress relies on the .htaccess file to route pages/posts with their correct URL slugs. By default, this Apache setup does not allow its settings to be overridden by .htaccess directives. To fix this issue, the httpd.conf file needs to be edited. Mine was located in this directory: /etc/httpd/conf

You’ll need to find (or create) a section that corresponds to the default document root: <Directory “/var/www/html”></Directory>. In that block, they’ll be a AllowOverride command that is set to “None”. That needs to be changed to “All” for our configuration file to work.

apache config settings found in the HTTPD conf file

Final steps

After all the data and content has been transferred, do some smoke-testing. Try out as many pages and features as you can to make sure the new site is working as it should. Make sure you keep a back-up of everything some place secure (I use an S3 bucket). Once satisfied, you can switch your domain’s A records to point at the new box. Since the old and new servers will appear identical, I add a console.log(“new server”) to the header file. That allows me tell when the DNS update has finally resolved. Afterwards, I can safely cancel/decommission the old web hosting package.

Don’t forget to make sure SSL is setup!

Updates

AWS offers an entire suite of services to help businesses migrate. AWS Application Migration Service is a great choice to “simplify and expedite your migration while reducing costs”.

Upgrade PHP

In 2023, I used this blog post to stand-up a WordPress website. I was using a theme called Balasana. When I would try to set “Site Icon” (favicon) from the “customize” UI I would receive a message stating that “there has been an error cropping your image“. After a few Google searches, and also asking ChatGPT, the answer seemed to be that GD (a graphics library) was either not installed or not working properly. I played with that for almost an hour, but with no success. GD was installed, and so was ImageMagick (a back-up graphics library that WordPress falls back on).

The correct answer was that I needed to upgrade PHP. The AWS Linux 2 image comes with PHP 7.2. Upgrading to version 7.4 did the trick. I was able to make that happen, very painlessly, by following a blog post from Gregg Borodaty . The title of his post is “Amazon Linux 2: Upgrading from PHP 7.2 to PHP 7.4” (thanks Gregg).

Update

My recommendation, as of 2024, is to use a managed WordPress service. I wrote a post about using AWS Lightsail for that purpose: Website Redesign with WordPress Gutenberg via AWS Lightsail


Lazy Load Images and Assets on WordPress with IntersectionObserver

wordpress homepage design

I write online a lot. Adding articles to this blog serves to build a catalog of technical solutions for future reference. Updating the homepage has improved user experience and SEO. The new design displays the most recent articles as clickable cards, rather than listing the entire text of each one. The changes for this were added to index.php file, in the child-theme folder. The theme’s original code already used a While() loop to iterate through the post records. My modification removed the article content, and only kept the title and image:

<div class="doc-item-wrap">
	<?php
	while ( have_posts() ) {
		the_post();
		echo "<div class='doc-item'><a href='". get_the_permalink() ."'><img class='lazy' data-src='".get_the_post_thumbnail_url()."'><h2>" . get_the_title() . "</h2></a></div>";
	} ?>
</div> <!-- doc-item-wrap -->

I used custom CSS, leveraging Flexbox, to style and position the cards:

.doc-item-wrap{
    display: flex;
    flex-wrap: wrap;
    justify-content: center;
}
.doc-item{
    width: 30%;
    padding: 20px;
    border: 3px solid #f0503a;
    margin: 15px;
    background: black;
    flex-grow: 1;
    text-align: center;
}
.doc-item:hover{
    background-color: #34495e;
}
.doc-item p{
    margin: 0px;
    line-height: 40px;
    color: white;
}
.doc-item img{
    display: block;
    margin: 0 auto;
}
.doc-item h2{
    font-size: 22px;
    color: white;

}
@media(max-width: 1000px){
	.doc-item{
		width: 45%
	}
}
@media(max-width: 700px){
	.doc-item{
		width: 100%
	}
}

The media queries adjust the size of the cards (and how many are in a row), based on screen size.

Look and feel of the design

Card layout design is a common way to arrange blog content. It gives visitors a visual overview of what’s available. It also stops the homepage from duplicating content that’s already available on the individual post pages.

You can see this pattern throughout the digital world. Card layout translates well across screen sizes and devices. Since I put much effort into writing, making it organized was a priority. This implementation can be extended to add additional content (such as date, description, etc.) and features (share links, animations, expandability). And, it fits nicely with what WordPress already provides.

Lazy loaded images

Image content can often be the biggest drag to site speed. Lazy loading media defers rendering until it is needed. Since this blog’s homepage has an image for each post, this was essential.

While iterating through post records the image URL is assigned to a custom data-src attribute on the image tag, leaving the normal src blank. This assures the image is not immediately retrieved nor loaded. I wrote a JavaScript function to lazy load the images, relying on the IntersectionObserver API. The card’s image does not load until a user scrolls it into view. This improves the speed of the page, which has a positive effect on SEO and UX.

The code creates a IntersectionObserver object.  It observes each of the image elements, checking to see if they are within the browser viewport. Once the image elements come into view, it takes the image URL from the data-src attribute, and assigns it to the tag’s src – causing the image to load.

document.addEventListener("DOMContentLoaded", function() {
  var lazyImages = [].slice.call(document.querySelectorAll("img.lazy"));
  if ("IntersectionObserver" in window) {
    let lazyImageObserver = new IntersectionObserver(function(entries, observer) {
      entries.forEach(function(entry) {
        if (entry.isIntersecting) {
          let lazyImage = entry.target;
          lazyImage.src = lazyImage.dataset.src;
          // lazyImage.srcset = lazyImage.dataset.srcset;
          lazyImage.classList.remove("lazy");
          lazyImageObserver.unobserve(lazyImage);
        }
      });
    });

    lazyImages.forEach(function(lazyImage) {
      lazyImageObserver.observe(lazyImage);
    });
  } 
});

The original JS code was referenced from a web.dev article. Web.dev is a resource created by Google that provides guidance, best practices, and tools to help web developers build better web experiences.

You can also use this same method for lazy loading videos, backgrounds, and other assets.

IntersectionObserver to lazily load JavaScript assets

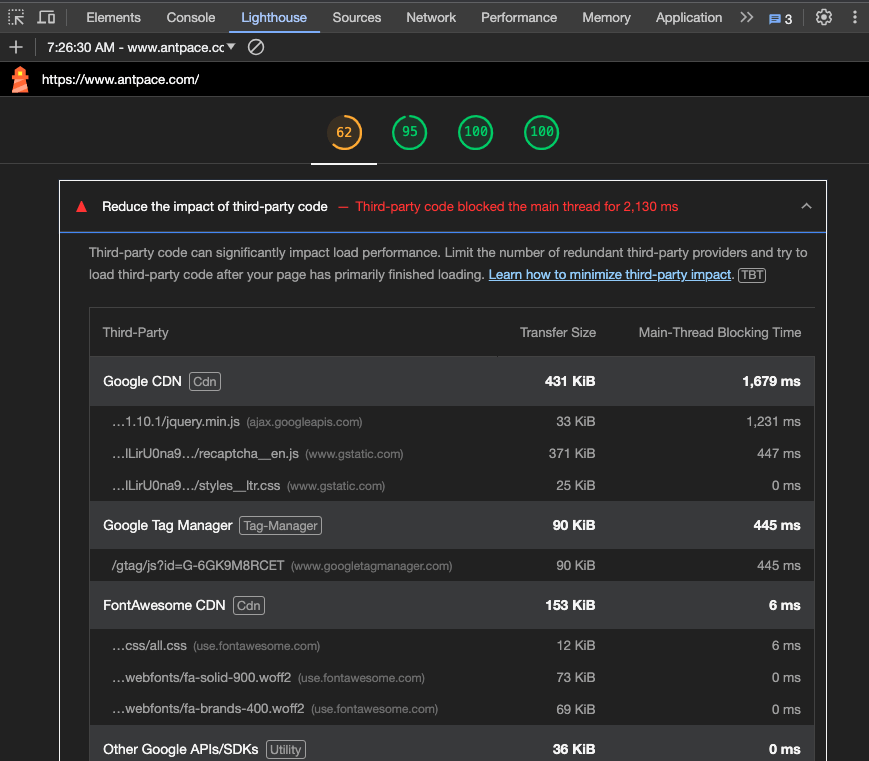
I discovered another application for the IntersectionObserver implementation that I used above to load lazy load images. The Google Lighthouse performance score on my homepage was being dinged due to the “impact of third-party code”.

impact of 3rd party js on performance scores

The largest third-party resource was is used for the reCaptcha on a contact form at the bottom of my homepage. It makes sense to not load it until the user scrolls down to that section – especially because the UX expects them to take time to fill out the form before hitting “submit” anyway.

Using the same pattern as above, I created a new `IntersectionObserver` and passed the contact form section as the target:

function captchaLazyLoad(){
	contactCaptchaTarget = document.getElementById('contactSection')
	if (!contactCaptchaTarget) {
        return;
    }
	let contactCaptchaObserver = new IntersectionObserver(function(entries, observer) {
		if (entries[0].isIntersecting) {
            var script = document.createElement('script');
		    script.src = "https://www.google.com/recaptcha/api.js";
		    document.body.appendChild(script);
            contactCaptchaObserver.unobserve(contactCaptchaTarget);
        }
	})
	contactCaptchaObserver.observe(contactCaptchaTarget);
}

I included this function to the already existing `DOMContentLoaded`  event listener just below the loop to observe lazy image elements:

<script>
function captchaLazyLoad(){
	contactCaptchaTarget = document.getElementById('contactSection')
	if (!contactCaptchaTarget) {
        return;
    }
	let contactCaptchaObserver = new IntersectionObserver(function(entries, observer) {
		if (entries[0].isIntersecting) {
            var script = document.createElement('script');
		    script.src = "https://www.google.com/recaptcha/api.js";
		    document.body.appendChild(script);
            contactCaptchaObserver.unobserve(contactCaptchaTarget);
        }
	})
	contactCaptchaObserver.observe(contactCaptchaTarget);
}

document.addEventListener("DOMContentLoaded", function() {
  var lazyImages = [].slice.call(document.querySelectorAll("img.lazy"));
  if ("IntersectionObserver" in window) {
    let lazyImageObserver = new IntersectionObserver(function(entries, observer) {
      entries.forEach(function(entry) {
        if (entry.isIntersecting) {
          let lazyImage = entry.target;
          lazyImage.src = lazyImage.dataset.src;
          // lazyImage.srcset = lazyImage.dataset.srcset;
          lazyImage.classList.remove("lazy");
          lazyImageObserver.unobserve(lazyImage);
        }
      });
    });

    lazyImages.forEach(function(lazyImage) {
      lazyImageObserver.observe(lazyImage);
    });

    //
    captchaLazyLoad()

  } else {
    // Possibly fall back to a more compatible method here if IntersectionObserver does not exist on the browser
  }

});

</script>

This update raised my Lighthouse performance score by fifteen points!