Redirecting Traffic from EC2 Public DNS to a Domain Name

301 redirect from hostname

I searched Google for my own website, and noticed that some results were returning with my EC2 instance’s public hostname: http://ec2-18-191-145-67.us-east-2.compute.amazonaws.com/ – That’s a bad look for branding, and I figured it couldn’t be good for SEO. I fixed it by adding a new rewrite condition to my apache server’s httpd.conf file. The server runs on a Linux 2 image, and I found that file in this directory: /etc/httpd/conf/.

Initial Configuration

I already had a Virtual Host block that listens on port 80, responsible for making sure all traffic going through my domain name goes to the https://www.antpace.com. I just had to add the public DNS to the ServerAlias statement and add an additional RewriteCond statement:

    
<VirtualHost *:80>
    DocumentRoot "/var/www/html"
    ServerName "antpace.com"
    ServerAlias "www.antpace.com" "ec2-18-191-145-67.us-east-2.compute.amazonaws.com"
    RewriteEngine on
    RewriteCond %{HTTP_HOST} ^ec2-18-191-145-67.us-east-2.compute.amazonaws.com$ [OR]
    RewriteCond %{SERVER_NAME} =antpace.com [OR]
    RewriteCond %{SERVER_NAME} =www.antpace.com
    RewriteRule ^ https://www.antpace.com%{REQUEST_URI} [END,NE,R=permanent]
</VirtualHost>

Handling SSL Traffic

After restarting the server, I did another search, and saw some pages still returning with the SSL encrypted address https://ec2-18-191-145-67.us-east-2.compute.amazonaws.com/.

SERP

To handle traffic going there, I needed to add another Virtual Host block that would listen on port 443. You’ll notice that I had to reference my SSL certificates that were installed via Let’s Encrypt.

<VirtualHost *:443>
    DocumentRoot "/var/www/html"
    ServerName "antpace.com"
    ServerAlias "www.antpace.com" "ec2-18-191-145-67.us-east-2.compute.amazonaws.com"
    
    SSLEngine on
    SSLCertificateFile /etc/letsencrypt/live/antpace.com/fullchain.pem
    SSLCertificateKeyFile /etc/letsencrypt/live/antpace.com/privkey.pem
    SSLCertificateChainFile /etc/letsencrypt/live/antpace.com/chain.pem
    
    RewriteEngine on
    RewriteCond %{HTTP_HOST} ^ec2-18-191-145-67.us-east-2.compute.amazonaws.com$ [OR]
    RewriteCond %{HTTP_HOST} ^antpace.com$ [OR]
    RewriteCond %{HTTP_HOST} ^www.antpace.com$
    RewriteRule ^ https://www.antpace.com%{REQUEST_URI} [END,NE,R=permanent]
</VirtualHost>

Unfortunately, adding this block broke the site temporarily. It resulted in a redirect loop, in tandem with the previous block. I tried to adjust them both, resulting in the following:

<VirtualHost *:80>
    DocumentRoot "/var/www/html"
    ServerName "antpace.com"
    ServerAlias "www.antpace.com" "ec2-18-191-145-67.us-east-2.compute.amazonaws.com"

    RewriteEngine on
    # Redirect all HTTP traffic to HTTPS
    RewriteCond %{HTTPS} off
    RewriteRule ^ https://%{HTTP_HOST}%{REQUEST_URI} [L,R=301]
</VirtualHost>

<VirtualHost *:443>
    DocumentRoot "/var/www/html"
    ServerName "antpace.com"
    ServerAlias "www.antpace.com" "ec2-18-191-145-67.us-east-2.compute.amazonaws.com"

    SSLEngine on
    SSLCertificateFile /etc/letsencrypt/live/antpace.com/fullchain.pem
    SSLCertificateKeyFile /etc/letsencrypt/live/antpace.com/privkey.pem
    SSLCertificateChainFile /etc/letsencrypt/live/antpace.com/chain.pem

    RewriteEngine on
    # Redirect all non-preferred hostnames to the preferred hostname
    RewriteCond %{HTTP_HOST} ^ec2-18-191-145-67.us-east-2.compute.amazonaws.com [NC,OR]
    RewriteCond %{HTTP_HOST} ^antpace.com [NC]
    RewriteRule ^ https://www.antpace.com%{REQUEST_URI} [L,R=301]
</VirtualHost>

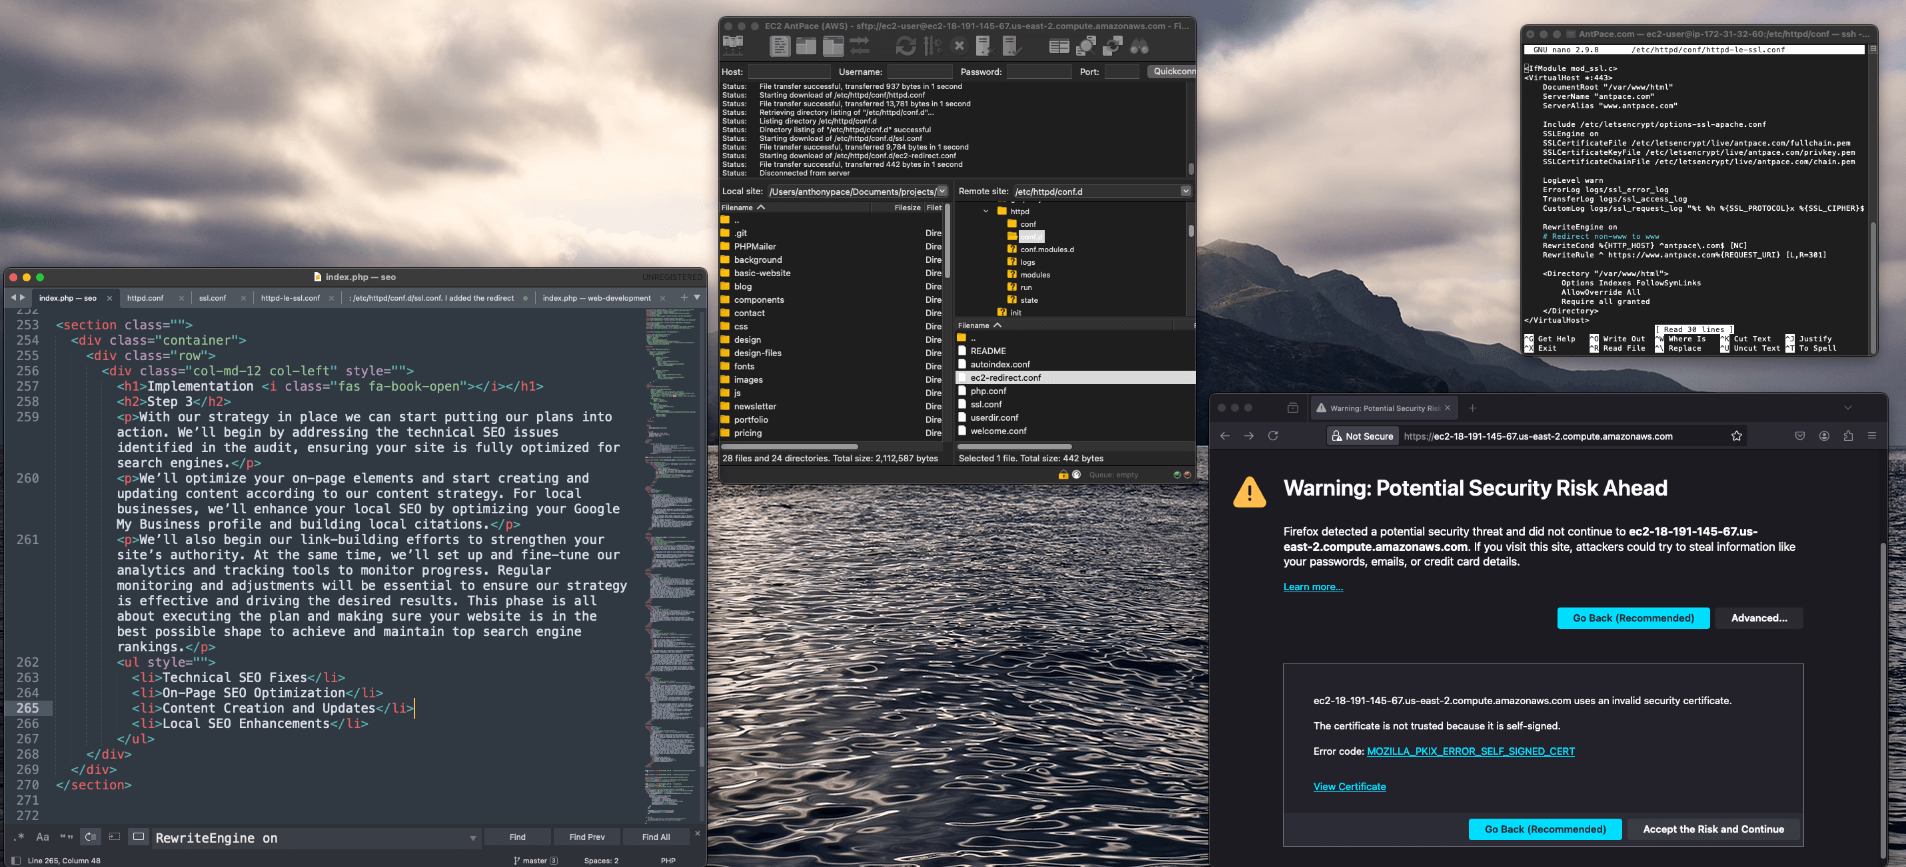
Although this configuration resolved the redirect loop, it failed to address the original issue. I discovered that my system had a separate configuration file for SSL traffic: /etc/httpd/conf.d/ssl.conf. I added the redirect rule and certificate references to the 443 Virtual Host block within this file, but the redirect issue persisted.

Diagnosing the Issue

Executing sudo apachectl -S revealed a conflicting Virtual Host on port 443 in httpd-le-ssl.conf. I moved the rewrite rules to this file, yet the redirect remained elusive. Suspecting a browser cache issue, I verified the redirect using curl:

301 redirect via CLI CURL

The 301 Moved Permanently response confirmed the redirect to https://www.antpace.com. Since the redirection works when tested with curl -k but not in a browser, the issue likely stems from the browser not accepting the SSL certificate due to the mismatch. Browsers are more strict with SSL certificate validation than curl -k.

I attempted to add the public host name as a subject alternative name (SAN) in my existing SSL certificate, but Let’s Encrypt refuses to issue certificates for EC2 hostnames. This restriction is due to Let’s Encrypt’s policy to prevent abuse. To circumvent this, I generated a self-signed certificate:

sudo mkdir -p /etc/ssl/private 
sudo mkdir -p /etc/ssl/certs
sudo chmod 700 /etc/ssl/private
sudo openssl req -x509 -nodes -days 365 -newkey rsa:2048 -keyout /etc/ssl/private/ec2-selfsigned.key -out /etc/ssl/certs/ec2-selfsigned.crt

Final Configuration

I created a new Apache configuration file for the EC2 redirection and ensured no conflicts with existing configurations:

sudo nano /etc/httpd/conf.d/ec2-redirect.conf

Here’s the contents:

<IfModule mod_ssl.c>
<VirtualHost *:443>
    DocumentRoot "/var/www/html"
    ServerName "ec2-18-191-145-67.us-east-2.compute.amazonaws.com"

    SSLEngine on
    SSLCertificateFile /etc/ssl/certs/ec2-selfsigned.crt
    SSLCertificateKeyFile /etc/ssl/private/ec2-selfsigned.key

    RewriteEngine on
    # Redirect EC2 URL to the preferred domain
    RewriteRule ^ https://www.antpace.com%{REQUEST_URI} [L,R=301]
</VirtualHost>
</IfModule>

Upon restarting Apache, the 301 redirect functioned correctly in the browser, albeit with an initial security warning due to the self-signed certificate. Accepting the certificate led me to the desired URL. This project underscored the importance of meticulous configuration and validation in managing web traffic and ensuring optimal SEO performance.

Pro-tip: Each time I had to edit any of these sever configuration files, I did so from the command line using the Nano text editor. I learned along the way that I could select multiple lines of text by pressing “Ctrl + Shift + 6”, pressing the arrows to expand the selection, and then “Ctrl + K” to remove content.

Alternative Approaches

To stop this problem from arising, even to begin with, we can take an alternative approach. It is possible, when creating a new EC2 instance, to disable the auto-assign public IP address in the network settings. This will launch the instance without a public IP address.
Error establishing connection to database – WordPress solution

solutions for wordpress database errors

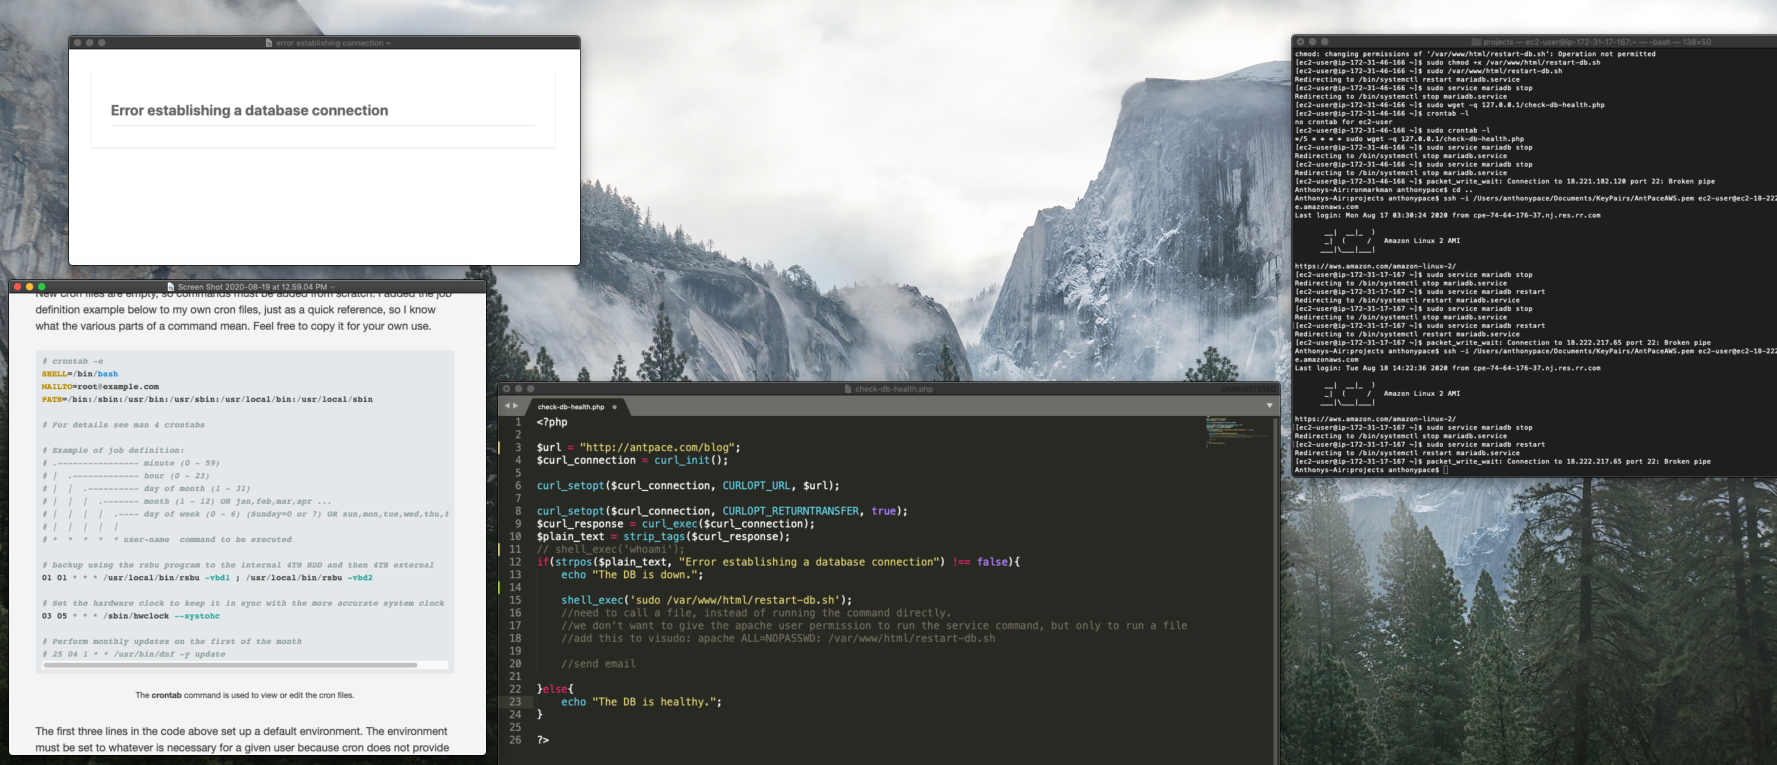
A crashed database is a problem I’ve encountered across multiple WordPress websites. When trying to load the site you’re faced with a dreaded “Error establishing a database connection” message. Restarting the DB service usually clears things up. But, sometimes it won’t restart at all – which is why I started automating nightly data dumps to an S3 bucket.

Recently, one particular site kept going down unusually often. I assumed it was happening due to low computing resources on the EC2 t3.micro instance. I decide to spin up a a new box with more RAM (t3.small) and migrate the entire WordPress setup.

Since I couldn’t be sure of what was causing the issue, I needed a way to monitor the health of my WordPress websites. I decided to write code that would periodically ping the site, and if it is down send an email alert and attempt to restart the database.

warning message when a website can't connect to the database

The first challenge was determining the status of the database. Even if it crashed, my site would still return a 200 OK response. I figured I could use cURL to get the homepage content, and then strip out any HTML tags to check the text output. If the text did match the error message, I could take further action.

Next, I needed to programmatically restart MySql. This is the command I run to do it manually: sudo service mariadb restart 

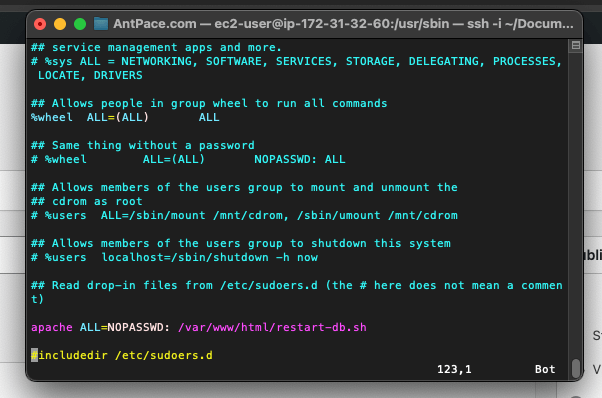
After doing some research, I found that I could use shell_exec() to run it from my PHP code. Unfortunately, Apache wouldn’t let the (non-password using) web server user execute that without special authorization. I moved that command to its own restart-db.sh file, and allowed my code to run it by adding this to the visudo file: apache ALL=NOPASSWD: /var/www/html/restart-db.sh

My visudo file was located at /usr/sbin/visudo. It is a tool found on most Linux systems to safely update the /etc/sudoers file, which is the configuration file for the sudo command. To edit this file, I don’t open it in vim like I would with other editable files. Instead, I run the file as its own command: sudo visudo. Once it is open, you can press the i key to enter “insert” mode. It is considered “safe” because it edits the sudoers file following a strict procedure.

edit the visduo file

I also needed to make the file executable by adjusting permissions: sudo chmod +x /var/www/html/restart-db.sh

Once those pieces were configured, my code would work:

<?php

$url = "https://www.antpace.com/blog/";
$curl_connection = curl_init();

curl_setopt($curl_connection, CURLOPT_URL, $url);

curl_setopt($curl_connection, CURLOPT_RETURNTRANSFER, true);
$curl_response = curl_exec($curl_connection);
$plain_text = strip_tags($curl_response);

if(strpos($plain_text, "Error establishing a database connection") !== false){
	echo "The DB is down.";
        
        //restart the database
        shell_exec('sudo /var/www/html/restart-db.sh');
        
        //send notification email
        include 'send-email.php';
        send_email();
}else{
	echo "The DB is healthy.";
}

?>

You can read more about how to send a notification email in another post that I wrote on this blog.

The contents of restart-db.sh looks like this:

#!/bin/bash

sudo service mariadb restart

Create the cron job

A cron job is a scheduled task in Linux that runs at set times. For my PHP code to effectively monitor the health of the database, it needs to run often. I decided to execute it every five minutes. Below are three shell commands to create a cron job.

The first creates the cron file for the root user:

sudo touch /var/spool/cron/root

The next appends my cron command to that file:

echo "*/5 * * * * sudo wget -q https://www.antpace.com/check-db-health.php" | sudo tee -a /var/spool/cron/root

And, the last sets the cron software to listen for that file:

sudo crontab /var/spool/cron/root

Alternatively, you can create, edit, and set the cron file directly by running sudo crontab -e . The contents of the cron file can be confirmed by running sudo crontab -l .

Pro-tip: If your WordPress site does continually crash, you probably do need to upgrade to an instance with more RAM. Also, consider using RDS for the database.

Update

I previously used the localhost loop back address in my cron file: */5 * * * * sudo wget -q 127.0.0.1/check-db-health.php. After setting up 301 redirects to prevent traffic from hitting my public DNS, that stopped working. It is more reliable to use an explicit domain name URL: */5 * * * * sudo wget -q https://www.antpace.com/check-db-health.php

Migrate a WordPress Site to AWS

Migrate a WordPress site to AWS

In a previous article I discussed launching a website on AWS. The project was framed as transferring a static site from another hosting provider. This post will extend that to migrating a dynamic WordPress site with existing content.

Install WordPress

After following the steps to launch your website to a new AWS EC2 instance, you’ll be able to connect via sFTP. I use FileZilla as my client. You’ll need the hostname (public DNS), username (ec2-user in this example), and key file for access. The latest version of WordPress can be downloaded from wordpress.org. Once connected to the server, I copy those files to the root web directory for my setup: /var/www/html

Make sure the wp-config.php file has the correct details (username, password) for your database. You should use the same database name from the previous hosting environment.

Data backup and import

It is crucial to be sure we don’t lose any data. I make a MySql dump of the current database and copy the entire wp-content folder to my local machine. I’m careful to not delete or cancel the old server until I am sure the new one is working identically.

Install phpMyAdmin

After configuring my EC2 instance, I install phpMyAdmin so that I can easily import the sql file.

sudo yum install php-mbstring -y
sudo systemctl restart httpd
sudo systemctl restart php-fpm
cd /var/www/html
wget https://www.phpmyadmin.net/downloads/phpMyAdmin-latest-all-languages.tar.gz
mkdir phpMyAdmin && tar -xvzf phpMyAdmin-latest-all-languages.tar.gz -C phpMyAdmin --strip-components 1
rm phpMyAdmin-latest-all-languages.tar.gz
sudo systemctl start mariadb

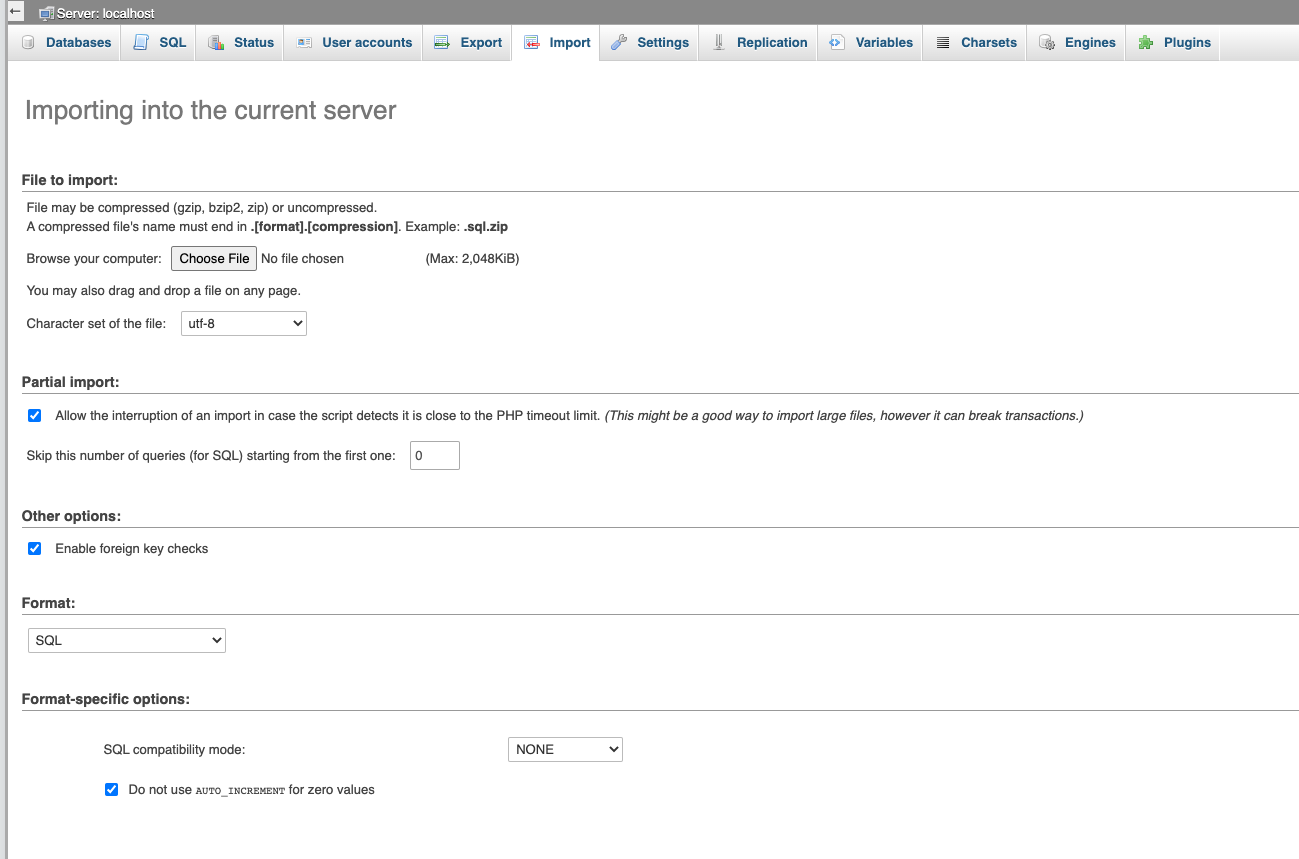
The above Linux commands installs the database management software on the root directory of the new web server. It is accessible from a browser via yourdomainname.com/phpMyAdmin. This tool is used to upload the data to the new environment.

phpMyAdmin import screen

Create the database and make sure the name matches what’s in wp-config.php from the last step. Now you’ll be able to upload your .sql file.

Next, I take the wp-content folder that I stored on my computer, and copy it over to the new remote. At this point, the site homepage will load correctly. You might notice other pages won’t resolve, and will produce a 404 “not found” response. That error has to do with certain Apache settings, and can be fixed by tweaking some options.

Server settings

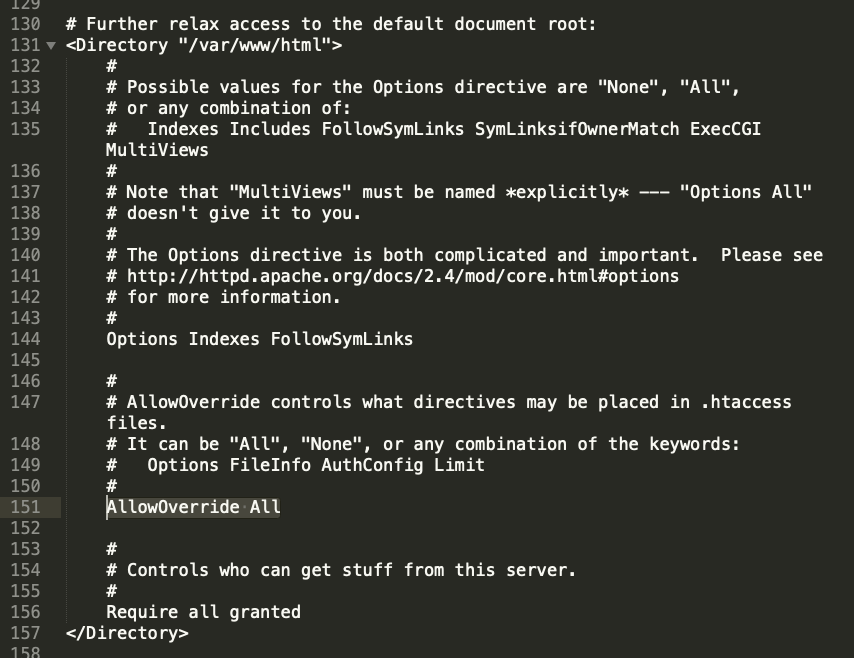
With my setup, I encountered the above issue with page permalinks . WordPress relies on the .htaccess file to route pages/posts with their correct URL slugs. By default, this Apache setup does not allow its settings to be overridden by .htaccess directives. To fix this issue, the httpd.conf file needs to be edited. Mine was located in this directory: /etc/httpd/conf

You’ll need to find (or create) a section that corresponds to the default document root: <Directory “/var/www/html”></Directory>. In that block, they’ll be a AllowOverride command that is set to “None”. That needs to be changed to “All” for our configuration file to work.

apache config settings found in the HTTPD conf file

Final steps

After all the data and content has been transferred, do some smoke-testing. Try out as many pages and features as you can to make sure the new site is working as it should. Make sure you keep a back-up of everything some place secure (I use an S3 bucket). Once satisfied, you can switch your domain’s A records to point at the new box. Since the old and new servers will appear identical, I add a console.log(“new server”) to the header file. That allows me tell when the DNS update has finally resolved. Afterwards, I can safely cancel/decommission the old web hosting package.

Don’t forget to make sure SSL is setup!

Updates

AWS offers an entire suite of services to help businesses migrate. AWS Application Migration Service is a great choice to “simplify and expedite your migration while reducing costs”.

Upgrade PHP

In 2023, I used this blog post to stand-up a WordPress website. I was using a theme called Balasana. When I would try to set “Site Icon” (favicon) from the “customize” UI I would receive a message stating that “there has been an error cropping your image“. After a few Google searches, and also asking ChatGPT, the answer seemed to be that GD (a graphics library) was either not installed or not working properly. I played with that for almost an hour, but with no success. GD was installed, and so was ImageMagick (a back-up graphics library that WordPress falls back on).

The correct answer was that I needed to upgrade PHP. The AWS Linux 2 image comes with PHP 7.2. Upgrading to version 7.4 did the trick. I was able to make that happen, very painlessly, by following a blog post from Gregg Borodaty . The title of his post is “Amazon Linux 2: Upgrading from PHP 7.2 to PHP 7.4” (thanks Gregg).

Update

My recommendation, as of 2024, is to use a managed WordPress service. I wrote a post about using AWS Lightsail for that purpose: Website Redesign with WordPress Gutenberg via AWS Lightsail


Secure a Website with SSL and HTTPS on AWS

Secure a website with SSL and HTTPS on AWS

My last post was about launching a website onto AWS. This covered launching a new EC2 instance, configuring a security group, installing LAMP software, and pointing a domain at the new instance. The only thing missing was to configure SSL and HTTPS.

Secure Sockets Layer (SSL) encrypts traffic between a website and its server. HTTPS is the protocol to deliver secured data via SSL to end-users.

In my last post, I already allowed all traffic through port 443 (the port that HTTPS uses) in the security group for my EC2 instance. Now I’ll install software to provision SSL certificates for the server.

Certbot

Certbot is free software that will communicate with Let’s Encrypt, an SSL certificate authority, to automate the management of encryption certificates.

Before downloading and installing Certbot, we’ll need to install some dependencies (Extra Packages for Enterprise Linux). SSH into the EC2 instance that you want to secure, and run this command in your home directory (/home/ec2-user):

sudo wget -r --no-parent -A 'epel-release-*.rpm' http://dl.fedoraproject.org/pub/epel/7/x86_64/Packages/e/

Then install it:

sudo rpm -Uvh dl.fedoraproject.org/pub/epel/7/x86_64/Packages/e/epel-release-*.rpm

And enable it:

sudo yum-config-manager --enable epel*

Now, we’ll need to edit the Apache (our web hosting software) configuration file. Mine is located here: /etc/httpd/conf/httpd.conf

You can use the Nano CLI text editor to make changes to this file by running:

sudo nano /etc/httpd/conf/httpd.conf

Scroll down a bit, and you’ll find a line that says “Listen 80”. Paste these lines below (obviously, changing antpace.com to your own domain name)

<VirtualHost *:80>
    DocumentRoot "/var/www/html"
    ServerName "antpace.com"
    ServerAlias "www.antpace.com"
</VirtualHost>

Make sure you have an A record (via Route 53) for both yourwebsite.com AND www.yourwebsite.com with the value set as your EC2 public IP address.

After saving, you’ll need to restart the server software:

sudo systemctl restart httpd

Now we’re ready for Certbot. Install it:

sudo yum install -y certbot python2-certbot-apache

Run it:

sudo certbot

Follow the prompts as they appear.

Automatic renewal

Finally, schedule an automated task (a cron job) to renew the encryption certificate as needed. If you don’t do this part, HTTPS will fail for your website after a few months. Users will receive an ugly warning, telling them that your website is not secure. Don’t skip this part!

Run this command to open your cron file:

sudo nano /etc/crontab

Schedule Certbot to renew everyday, at 4:05 am:

05 4 * * * root certbot renew --no-self-upgrade

Make sure your cron daemon is running:

sudo systemctl restart crond

That’s it! Now your website, hosted on EC2 will support HTTPS. Next, we’ll force all traffic to use it.

* AWS Documentation Reference