Launching a website on AWS EC2

Using AWS for a website

In 2008 I deployed my first website to production. It used a simple LAMP stack , a GoDaddy domain name, and HostGator hosting.

Since 2016, I’ve used AWS as my primary cloud provider. And this year, I’m finally cancelling my HostGator package. Looking through that old server, I found artifacts of past projects – small businesses and start-ups that I helped develop and grow. A virtual memory lane.

Left on that old box was a site that I needed to move to a fresh EC2 instance. This is an opportunity to document how I launch a site to Amazon Web Services.

Amazon Elastic Compute Cloud

To start, I launch a new EC2 instance from the AWS console. Amazon’s Elastic Compute Cloud provides “secure and resizable compute capacity in the cloud.” When prompted to choose an Amazon Machine Image (AMI), I select “Amazon Linux 2 AMI”. I leave all other settings as default. When I finally click “Launch”, it’ll ask me to either generate a new key file, or use an existing one. I’ll need that file later to SSH or sFTP into this instance. A basic Linux server is spun up, with little else installed.

Linux AMI
Amazon Linux 2 AMI is free tier eligible.

Next, I make sure that instance’s Security Group allows inbound traffic on SSH, HTTP, and HTTPS. We allow all traffic via HTTP and HTTPS (IPv4 and IPv6, which is why there are 2 entries for each). That way end-users can reach the website from a browser. Inbound SSH access should not be left wide open. Only specific IP addresses should be allowed to command-line in to the server. AWS has an option labeled “My IP” that will populate it for your machine.

Inbound security rules
Don’t allow all IPs to access SSH in a live production environment.

Recent AWS UI updates let you set these common rules directly from the “Launch an instance” screen, under “Network settings”

AWS Network settings screen

Configure the server

Now that the hosting server is up-and-running, I can command-line in via SSH from my Mac’s terminal using the key file from before. This is what the command looks like:

 ssh -i /Users/apace/my-keys/keypair-secret.pem ec2-user@ec2-XXX-XXX-XX.us-east-2.compute.amazonaws.com

You might get a CLI error that says:

” It is required that your private key files are NOT accessible by others. This private key will be ignored. “

Bad permissions warning against a pem key file in the CLI

That just means you need to update the file permissions on the key file. You should do that from the command line, in the directory where the file resides:

chmod 400 KeyFileNameHere.pem

Make sure everything is up-to-date by running “sudo yum update“.  I begin installing the required software to host a website:

sudo amazon-linux-extras install -y lamp-mariadb10.2-php7.2 php7.2

Note: amazon-linux-extras doesn’t exist on the Amazon Linux 2023 image.

That command gives me Apache, PHP, and MariaDB – a basic LAMP stack. This next one installs the database server:

sudo yum install -y httpd mariadb-server

MariaDB is a fork of the typical MySQL, but with better performance.

By default, MariaDB will not have any password set. If you choose to install phpMyAdmin, it won’t let you login without a password (as per a default setting). You’ll have to set a password from the command line. While connected to your instance via SSH, dispatch this command:

mysql -u root -p

When it prompts you for a password, just hit enter.

login to mariadb for the first time

Once you’re logged in, you need to switch to the mysql database by running the following command:

use mysql;

Now you can set a password for the root user with the following command:

UPDATE user SET password = PASSWORD('new_password') WHERE user = 'root';

After setting the password, you need to flush the privileges to apply the changes:

FLUSH PRIVILEGES;

Start Apache: “sudo systemctl start httpd“. And, make sure it always starts when the server boots up “sudo systemctl enable httpd

The server setup is complete. I can access an Apache test page from a web browser by navigating to the EC2 instance’s public IP address.

Apache test page
A test page shows when no website files are present.

I’ll take my website files (that are stored on my local machine and synched to a Git repo) and copy them to the server via sFTP.

Copy website files to server
I use FileZilla to access my EC2 public directory

I need to make sure the Linux user I sFTP with owns the directory “/var/www/html”, or else I’ll get a permission denied error:

sudo chown -R ec2-user /var/www/html

Later, if I want to be able to upload media to the server from the WordPress CMS, I’ll need to be sure to change the owner of the blog’s directory to the apache user (which is the behind-the-scenes daemon user invoked for such things):

sudo chown -R apache /var/www/html/blog

* AWS Documentation Reference

Domain name and Route 53

Instead of having to use the EC2 server’s public address to see my website from a browser, I’ll point a domain name at it. AWS Route 53 helps with this. It’s a “DNS web service” that routes users to websites by mapping domain names to IP addresses.

In Route 53 I create a new “hosted zone”, and enter the domain name that I’ll be using for this site.  This will automatically generate two record sets: a Name Server (NS) record and a Start-of-Authority (SOA) record. I’ll create one more, an IPv4 address (A) record. The value of that record should be the public IP address that I want my domain to point at. You’ll probably also want to add another, identical to the last one, but specifying “www” in the record name.

setting a record in AWS

Finally, I’ll head over to my domain name registrar, and find my domain name’s settings. I update the nameserver values there to match those in my Route 53 NS record set. It’ll likely take some time for this change to be reflected in the domain’s settings. Once that is complete, the domain name will be pointing at my new EC2 instance.

And that’s it – I’ve deployed my website to AWS. The next step is to secure my site by configuring SSL and HTTPS.

If you’re migrating a dynamic WordPress site, you’ll require a some additional steps to complete the migration.

Sending email from your app using AWS SES

amazon ses

Simple Email Service (SES) from AWS

Email is the best way that we can communicate with our users; still better than SMS or app notifications. An effective messaging strategy can enhance the journey our products offer.

This post is about sending email from the website or app you’re developing. We will use SES to send transactional emails. AWS documentation describes Simple Email Service (SES) as “an email sending and receiving service that provides an easy, cost-effective way for you to send email.” It abstracts away managing a mail server.

Identity verification

When you first get set up, SES will be in sandbox mode. That means you can only send email to verified receivers. To get production access and start sending emails to the public, you will need to verify an email address and a sending domain.

Configuring your domain name

Sending email through SES requires us to verify the domain name that messages will be coming from. We can do this from the “Domains” dashboard.
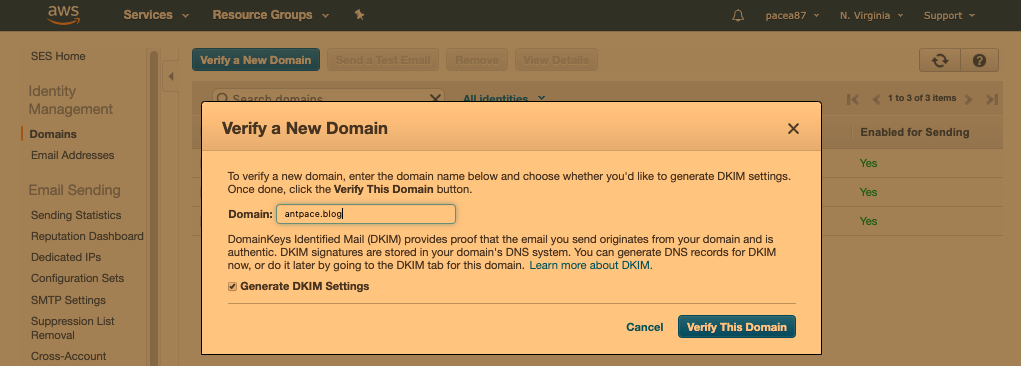
Verify a new domain name

This will generate a list of record sets that will need to be added to our domain as DNS records. I use Route 53, another Amazon service, to manage my domains – so that’s where I’ll need to enter this info. If this is a new domain that you are working with, you will need to create a “hosted zone”in AWS for it first.
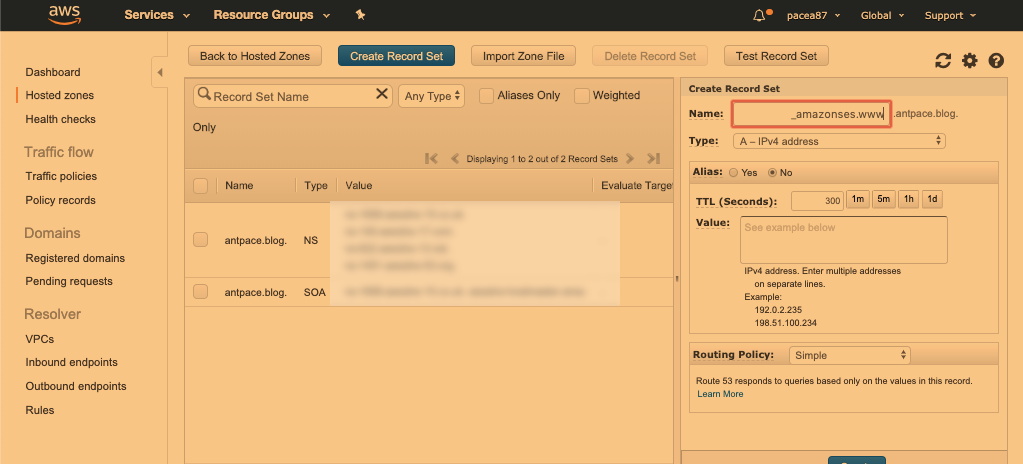
AWS Route 53

As of this update, Amazon recommends using CNAME DKIM (DomainKeys Identified Mail) records instead of TXT records to authenticate your domain. These signatures enhance the deliverability of your mail with DKIM-compliant email providers. If your domain name is in Route 53, SES will automatically import the CNAME records for you.

warning message about legacy TXT records

Understand deliverability

We want to be confident that intended recipients are actually getting the messages that are sent.  Email service providers, and ISPs, want to prevent being abused by spammers. Following best practices, and understanding deliverability, can ensure that emails won’t be blocked.

Verify any email addresses that you are sending messages from: “To maintain trust between email providers and Amazon SES, Amazon SES needs to ensure that its senders are who they say they are.”

You should use an email address that is at the domain you verified. To host business email, I suggest AWS WorkMail or Google Workspace

verify a new email in AWS

Make sure DKIM has been verified for your domain:  “DomainKeys Identified Mail (DKIM) provides proof that the email you send originates from your domain and is authentic”. If you’re already using Route 53 to manage your DNS records, SES will present an option to automatically create the necessary records.
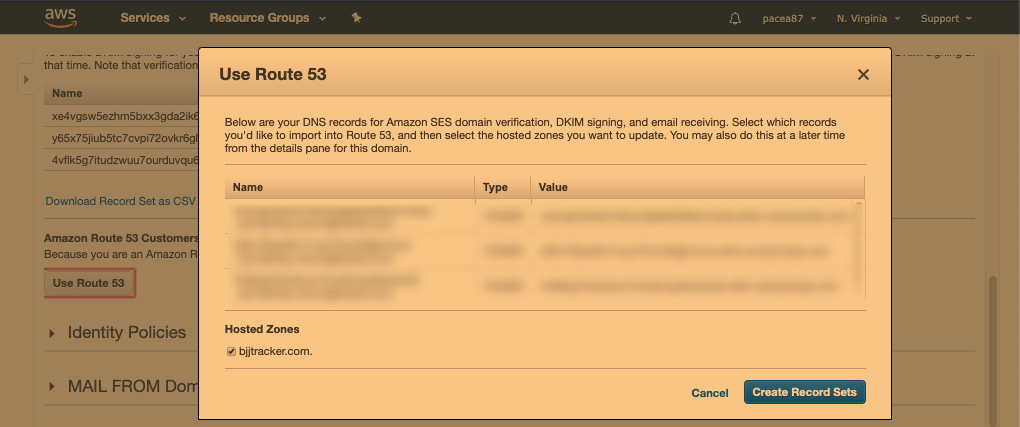
Route 53 DKIM records

Be reputable. Send high quality emails and make opt-out easy. You don’t want to be marked as spam. Respect sending quotas. If you’re plan on sending bulk email to a list-serve, I suggest using an Email Service Provider such as MailChimp (SES could be used for that too, but is outside the scope of this writing).

Sending email

SES can be used three ways: either by API, the SMTP interface, or the console. Each method lists different ways to authenticate. “To interact with [Amazon SES], you use security credentials to verify who you are and whether you have permission to interact with Amazon SES.” Next, we will use the API credentials – an access key ID and secret access key.

Create an access key pair

An access key can be created using Identity and Access Management (IAM). You use access keys to sign programmatic requests that you make to AWS.” This requires creating a user, and setting its permissions policies to include “AmazonSESSendingAccess”. We can create an access key in the “security credentials” for this user.
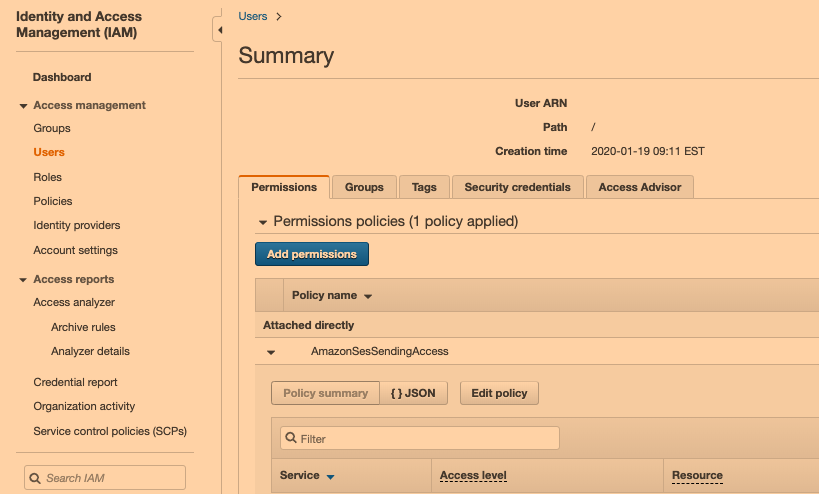
Permission policy for IAM user

Integrating with WordPress

Sending email from WordPress is made easy with plugins. They can be used to easily create forms. Those forms can be wired to use the outbound mail server of our choice using WP Mail SMTP Pro. All we’ll need to do is enter the access key details. If we try to send email without specifying a mail server, forms will default to sending messages directly from the LAMP box hosting the website. That would result in low-to-no deliverability.
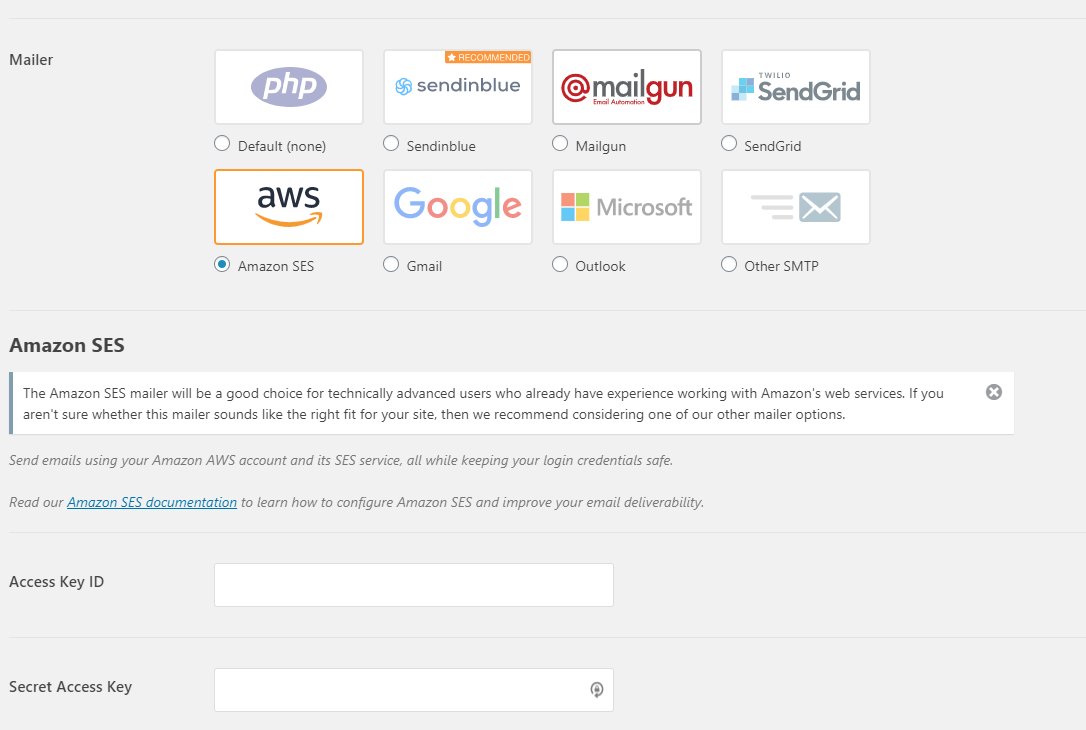
Screenshot of WP Mail SMTP Pro

As of this update, the above plugin now only provides the “Amazon SES” option with a premium (not free) monthly subscription. That’s OK, because we can still use Amazon SES through the “Other SMTP” option.

SMTP Username and Password

The “Other SMTP” option asks for a username and password. You can create those credentials from Amazon SES by going to “SMTP Settings”. When you click “Create SMTP credentials” you will be redirected to the IAM service to create a user with the details already filled
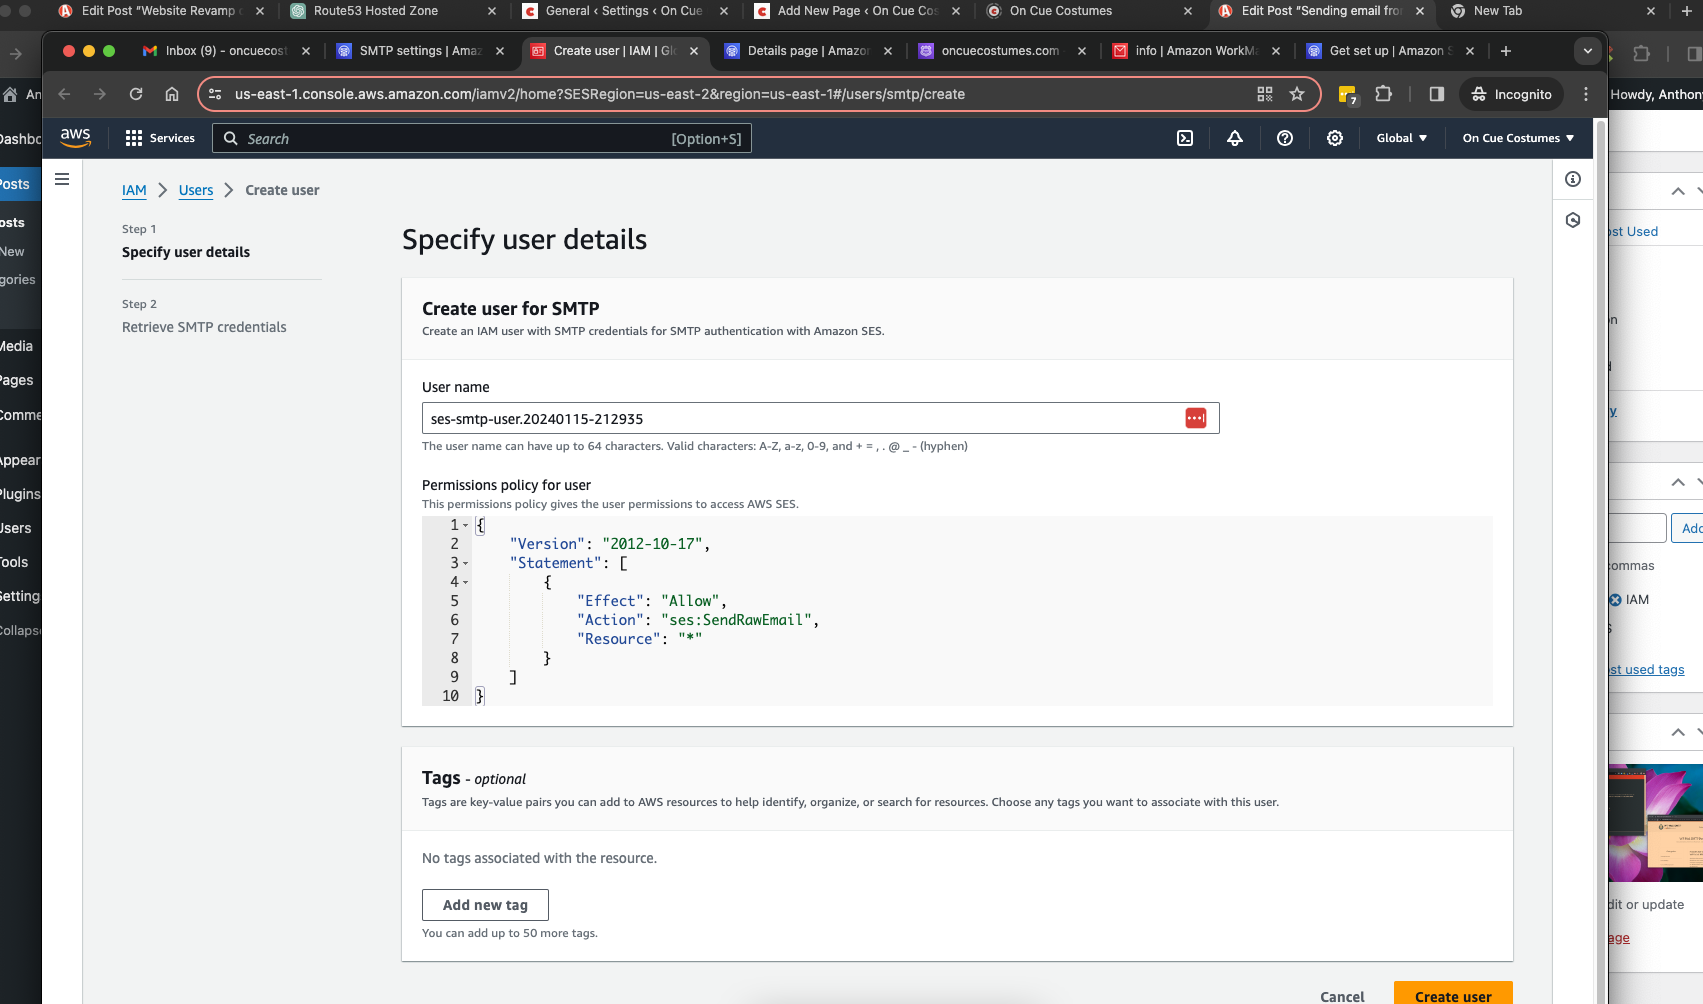
creating a new IAM user for SMTP

It will give you the SMTP user name (different than the IAM user name) and password on the following screen. After you add these details to the plugin, any emails sent from this WordPress instance will use SES as the mail server. As a use case, I create forms with another plugin called “Contact Form 7”. Any emails sent through these forms will use the above set up.

Integrating with custom code

Although the WordPress option is simple, the necessary plugin has an annual cost. Alternatively, SES can integrate with custom code we’ve written. We can use PHPMailer to abstract away the details of sending email programmatically. Just include the necessary files, configure some variables, and call a send() method.
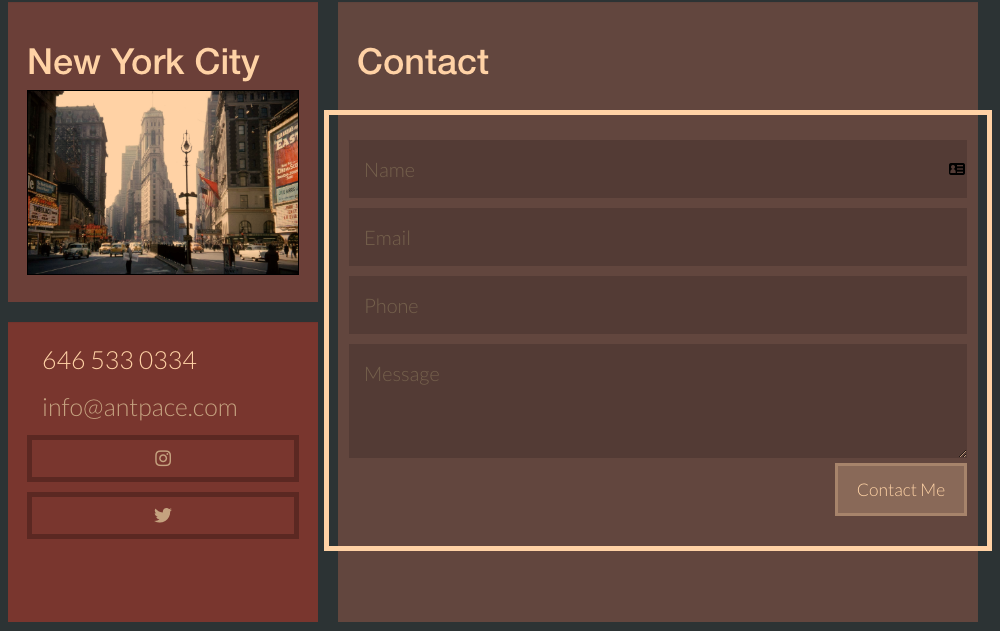
Contact form powered by SES

The contact forms on my résumé  and portfolio webpages use this technique. I submit the form data to a PHP file that uses PHPMailer to interact with SES. The front-end uses a UI notification widget to give the user alerts. It’s available on my GitHub, so check it out.

Front-end, client-side:

<form id="contactForm">
    <div class="outer-box">
      
        <input type="text" placeholder="Name" name="name" value="" class="input-block-level bordered-input">
        <input type="email" placeholder="Email" value="" name="email" class="input-block-level bordered-input">
        <input type="text" placeholder="Phone" value="" name="phone" class="input-block-level bordered-input">
       
        <textarea placeholder="Message" rows="3" name="message" id="contactMessage" class="input-block-level bordered-input"></textarea>
        <button type="button" id="contactSubmit" class="btn transparent btn-large pull-right">Contact Me</button>
    </div>
</form>
<link rel="stylesheet" type="text/css" href="/ui-messages/css/ui-notifications.css"> 
<script src="/ui-messages/js/ui-notifications.js"></script>
<script type="text/javascript">
$(function(){
	var notifications = new UINotifications();
	$("#contactSubmit").click(function(){
		var contactMessage = $("#contactMessage").val();
		if(contactMessage < 1){
			notifications.showStatusMessage("Don't leave the message area empty.");
			return;
		}
		var data = $("#contactForm").serialize();
		$.ajax({
			type:"POST",
			data:data,
			url:"assets/contact.php",
			success:function(response){
				console.log(response);
				notifications.showStatusMessage("Thanks for your message. I'll get back to you soon.");
				$("form input, form textarea").val("");					
			}
			
		});
	});
});
</script>

In the PHP file,  we set the username and password as the access key ID and access key secret. Make sure the region variable matches what you’re using in AWS. #TODO: It would be best practice to record the message to a database. (The WordPress plugin from earlier handles that out-of-the-box). We might also send an additional email to the user, letting them know their note was received.

Back-end, server-side:

<?php
//send email via amazon ses
use PHPMailer\PHPMailer\PHPMailer;
use PHPMailer\PHPMailer\Exception;

$name = "";
$email = "";
$phone = "";
$message = "";

if(isset($_POST["name"])){
	$name = $_POST["name"];
}
if(isset($_POST["email"])){
	$email = $_POST["email"];
}
if(isset($_POST["phone"])){
	$phone = $_POST["phone"];
}
if(isset($_POST["message"])){
	$message = $_POST["message"];
}

$region = "us-east-1"
$aws_key_id = "xxx"
$aws_key_secret = "xxx"

require '/var/www/html/PHPMailer/src/Exception.php';
require '/var/www/html/PHPMailer/src/PHPMailer.php';
require '/var/www/html/PHPMailer/src/SMTP.php';
// // Instantiation and passing `true` enables exceptions
$mail = new PHPMailer(true);
try {
	if(strlen($message) > 1){
    //Server settings
	    $mail->SMTPDebug = 2;                                       // Enable verbose debug output
	    $mail->isSMTP();                                            // Set mailer to use SMTP
	    $mail->Host       = 'email-smtp.' . $region . '.amazonaws.com';  // Specify main and backup SMTP servers
	    $mail->SMTPAuth   = true;                                   // Enable SMTP authentication
	    $mail->Username   = $aws_key_id;                     // access key ID
	    $mail->Password   = $aws_key_secret;                               // AWS Key Secret
	    $mail->SMTPSecure = 'tls';                                  // Enable TLS encryption, `ssl` also accepted
	    $mail->Port       = 587;                                    // TCP port to connect to

	    //Recipients
	    $mail->setFrom('XXX@antpace.com', 'Portfolio');
	    $mail->addAddress("XXX@antpace.com");     // Add a recipient
	    $mail->addReplyTo('XXX@antpace.com', 'Portfolio');

	    // Content
	    $mail->isHTML(true);                                  // Set email format to HTML
	  
	    $mail->Subject = 'New message from your portfolio page.';
	    $mail->Body    = "This message was sent from: $name - $email - $phone \n Message: $message";
	    $mail->AltBody = "This message was sent from: $name - $email - $phone \n Message: $message";
	    
	    $mail->send();
	    echo 'Message has been sent';
	}
    
} catch (Exception $e) {
    echo "Message could not be sent. Mailer Error: {$mail->ErrorInfo}";
}

?>

The technical side of sending email from software is straight-forward. The strategy can be fuzzy and requires planning. Transactional emails have an advantage over marketing emails. Since they are triggered by a user’s action, they have more meaning. They have higher open rates, and in that way afford an opportunity.

How can we optimize the usefulness of these emails? Be sure to create a recognizable voice in your communication that resonates your brand. Provide additional useful information, resources, or offers. These kind of emails are an essential part of the user experience and your product’s development.

You can find the code for sending emails this way on my GitHub.


Managing content for an art website

managing content as data

Content Management

Any product, experience, or artwork – anything you build – is made up of pieces. And content always sits at the center. Content is the fleshy part of media.

The other pieces include structure, style, and functionality.  These parts layout a skeleton, decorates the aesthetic, and adds usefulness. This  model translates well to modern web development. HTML defines the structure. CSS describes the style. JavaScript adds interactivity. But always, content is King.

That’s why a robust content management system (CMS) is critical. Most clients prefer to have one. It makes updates easy. WordPress is the modern choice. It’s what this blog is built on.

WordPress Website

A website I built featured the work of visual artist Ron Markman – paintings, etchings, photos. It had a lot of content. A lot of content that needed massaging. As you may have guessed, I chose WordPress to manage it. I choose the HTML5 Blank WordPress Theme as our starting point.

I was recommended to Ericka by a previous client. Her late relative left behind a corpus of work that needed a  new digital home. They already had a website, but needed it revamped and rebuilt from scratch.

ron markman old website

This was my proposal:

The look and feel will be modern, sleek, and adaptive. The homepage will feature a header section highlighting selected work. The website’s menu will link to the various category pages (as well as any ancillary pages). The menu, along with a footer, will persist throughout all pages to create a cohesive experience and brand identity. The website will be built responsively, adapting to all screen-sizes and devices. As discussed, select content will feature “zooming” functionality.”

art website

This was a situation where I had to be a project manager, and deliver results. Although the content itself was impressive, it was delivered as image files in various formats and different sizes. Filenames were not consistent. And the meta-data – descriptions, titles, notes – was listed is excel files that didn’t always match-up to the image’s filename. This required a lot of spot checking, and manual work. I did my best to automate as much as I could, and make things uniform.

Phases of Work

I broke the work out into four phases. This is how I described it to the client:

Layout and hierarchy

I will provide wire-frame layouts describing the essential structure, layout and hierarchy of the website overall.

Look and feel

I will finalize aesthetic details such as color palette, typography, user interface, and stylization.

Implementation

I will build and deploy the website with the content provided.

Content input

You’ll need to provide all copy, images, media, etc. before a first build of the website can be deployed. I’ll be implementing a standard content-management system that will allow you to add additional content, categories, pages, etc. Often times, content delivery can be a bottleneck for projects like this. After the finalized website is deployed live, with the initial content provided, you’ll be responsible for adding any more additionally.

Image Gallery

The UI to show each piece of art was powered by Galleria. It was out-of-the-box responsive. At first, each gallery page had so many large image files that things would crash or load very slowly. I was able to leverage the framework’s AJAX lazy loading to mitigate that issue.

Resizing Multiple Images

Resizing a batch of images can be done directly in Mac OS by selecting the files, and opening them in Preview. From the ‘Edit’ menu, I clicked ‘Select All’. Then, in the ‘Tool’ menu I found ‘Adjust Size’. Windows has a similar feature, as does other image manipulation apps.

Renaming Multiple Files

I had to make the filenames match what was listed in the meta-data spreadsheet. Here’s the command I used, in Mac OS, to truncate filenames to the first eight characters:

rename -n 's/(.{8}).*(\.jpg)$/$1$2/' *.jpg

Batch Uploading WordPress Posts

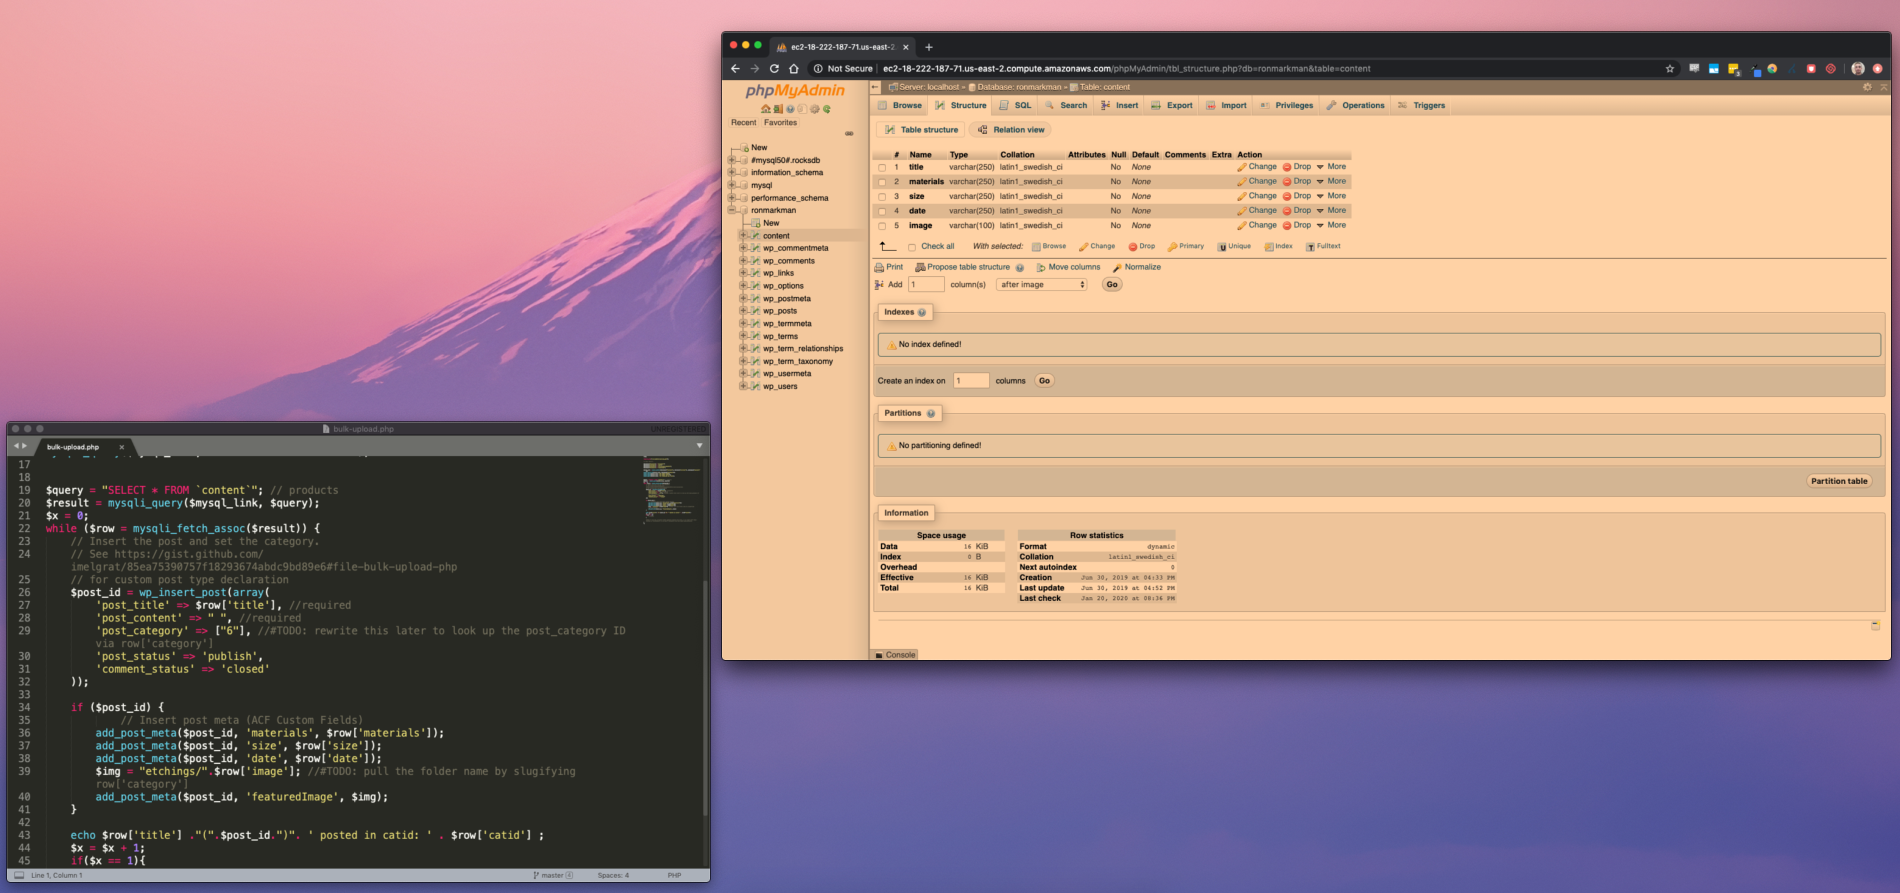
Each piece of art was a WordPress post, with a different title, meta-values, and image. Once all of the files were sized and named properly, I uploaded them to the server via sFTP. Each category of art (paintings, photos, etc.) was a folder. I created a temporary database table that matched the columns from the meta-data spreadsheet I was given.

CREATE TABLE `content` (
  `content_id` int,
  `title` varchar(250) NOT NULL,
  `medium` varchar(250) NOT NULL,
  `category_id` varchar(250) NOT NULL,
  `size` varchar(250) NOT NULL,
  `date` varchar(250) NOT NULL,
  `filename` varchar(100) NOT NULL,
  `processed` int
) ENGINE=InnoDB DEFAULT CHARSET=latin1;
COMMIT;

I wrote a PHP script that would loop through all records, and create a new post for each. I had to make sure to include core WordPress functionality,  so that I would be able to use the wp_insert_post() method.

require_once('/var/www/html/wp-load.php');

Once I connected to the database, I queried my temporary table, excluding any records that have been marked as already uploaded:

$query = "SELECT * FROM `content` where `processed` != 1"; 
$result = mysqli_query($mysql_link, $query);

While looping through each record, I would look up the WordPress category ID and slug based on the provided category name. This would allow my code to assign the post to the correct category, and to know which folder the image file was in. Once the post is inserted, I take that post ID and assign meta-values. At the end of the loop, I mark this record as processed.

while ($row = mysqli_fetch_assoc($result)) {

    $category = $row['category'];
    $content_id = $row['content_id'];
    $term_id = "";
    $slug = "";
    $category_query = $mysqli->prepare("SELECT * FROM `wp_terms` where name = :name");
    $category_query->bind_param(array(':name' => $category));
    $category_result = $category_query->execute();
    if (mysqli_num_rows($category_result) > 0) {
        while($cat_row = mysqli_fetch_assoc($category_result)) {
           $term_id = $cat_row['term_id'];
           $slug = $cat_row['slug'];
        }
    }
    $post_id = wp_insert_post(array(
        'post_status' => 'publish',
        'post_title' => $row['title'],
        'post_content' => " ",
        'post_category' => $term_id
        
    ));
    
    if ($post_id) { 
        //meta-values
        add_post_meta($post_id, 'medium', $row['medium']);
        add_post_meta($post_id, 'size', $row['size']);
        add_post_meta($post_id, 'date', $row['date']);
        $img = $slug . $row['image'];
        add_post_meta($post_id, 'image_file', $img);
    }

    $update = $mysqli->prepare("UPDATE `content` SET processed = 1 where content_id = :content_id");
    $update->bind_param(array(':content_id' => $content_id));
    $update = $category_query->execute(); 
}

Managing clients, and their content, can be the most challenging  part of web development. Using the right software for the job makes it easier. So does having a toolbox of techniques, and being clever.

Managing server operations

This website was hosted on AWS. It used EC2. At first, the instance size we selected was too small and led to repeated website crashes. That experience led me to coming up with a hacky work-around for restarting the server when it crashed – read about it here.